The common 3D format that nearly all VR Headsets can play is 3D SBS MP4. I have nerver heard that one 3D Glasses can play 3D Tivo. To play 3D Tivo on Oculus Rift CV1/DK2, you need to use a VR Video converter to convert 3D TiVo recordings to 3D MP4 files so you can watch them on Oculus Rift. The best 3D software that can help you convert 3D Tivo to 3D MP4 for Oculus Rift CV1/DK2 would be Pavtube Video Converter Ultimate.
Pavtube Video Converter Ultimate is a workflow for all VR Headsets and 3D TVs cause it can convert any 2D/3D video to 3D SBS/TB/Anaglyph video for various 3D devices. It also allows users to adjust 3D depth, 3D video resolution, 3D audio channel, Full SBS mode or HSBS mode. Now, let’s see what video it can convert to Oculus Rift CV1/DK2.
– Convert 3D Tivo recordings to 3D MP4/MKV for Oculus Rift CV1/DK2.
– Convert 3D YouTube FLV video to Oculus Rift CV1/DK2, Homido VR, etc.
– Rip 3D BD ISO, 3D Blu-ray to HTC Vive, Oculus Rift CV1/DK2, Gear VR, etc.
– Convert 3D MKV, 3D AVI to for Zeiss VR One, Oculus Rift CV1/DK2, PlayStation VR, etc.
– Convert all 2D video clips to 3D SBS video for all 3D devices including Oculus Rift CV1/DK2.
If you are using a Mac and want a video converter for macOS Sierra, El Capitan, etc, please use the equivalent Mac version – iMedia Converter for Mac.
Part 1: Transfer 3D Tivo recordings from TiVo to PC
First, you need to transfer the 3D TiVo recordings to PC. Make sure your TiVo and computer are in the same home network, and follow this guide to proceed TiVo file transfer:
1.On your PC, launch TiVo Desktop for PC (click to download), the freeware that transfers shows from your networked TiVo box to your computer.
2.Click “Pick Recordings to Transfer.” A window showing your TiVo box’s “Now Playing” or “My Shows” list appears.
![]()
3.Highlight any title in the list to see more information about the show. Check the box next to the title of the show (or shows) you want to transfer.
4.Click “Start Transfer.” Transfer times vary, but may take as long as the show’s duration to complete the transfer.
![]()
Part 2: Convert 3D TiVo recordings to 3D MP4 for Oculus Rift CV1/DK2
Step 1: Download and install 3D TiVo converter (Mac download).


Step 2: Launch 3D TiVo Converter, press “Option”icon first and enter TiVo Media Access Key to “Tivo” tab. Then hit the “Load file(s)”icon to import TiVo recorded 3D videos to this 3D TiVo converter. Since the app supports batch conversion so you can import more than one 3D TiVo recordings at a time.
Tip 1: How to find your Media Access Key on TiVo: Go to “TiVo Central” menu >> “Messages and Set Up” >> “Account and System Information”, and you will see your Media Access Key there.
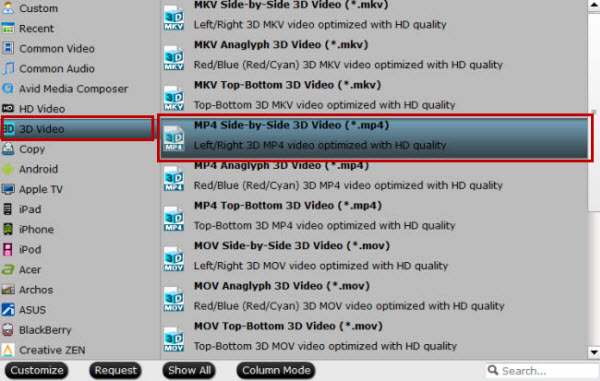
Step 3: From the “Format” drop-down list, you are suggested to follow the path “3D Video > MP4 Side-by-Side 3D Video(*.mp4)” for converting 3D Tivo to side-by-side 3D MP4 video for Oculus Rift CV1/DK2.

Step 4: Settings:
Adjust A/V parameters according to the specifications of Oculus Rift CV1/DK2. Take Oculus Rift CV1 as an instance below.
Oculus Rift CV1 claimed officially the specs of CV1 is 1200×1080 (per eye) but not by that much, at 1080×1200 per eye (to my best knowledge). With the DK2, the effective display resolution for watching movies on the biggest screen size that’s still comfortable is not quite 480p. So for high fidelity, you can downsize it to 960×1080 per eye or other lower resolution. You can adjust the size in “Settings” and different bitrate, size leads different 3D effect in different movies. You also can adjust 3D depth in “Settings”. Try different 3D depth, you can get different 3D effect on CV1.

Step 5: The last step is to press the big “Convert” button on the right to start converting 3D Tivo recordings to Oculus Rift CV1/DK2 on Windows. The conversion takes a few minutes, if you don’t have time to wait, you can choose “Shut down computer after conversion”. Then your computer will be turned off automatically after the conversion is finished.
Now, you have converted 3D Tivo recordings to Oculus Rift CV1/DK2 successfully and you can now view this 3D video on your Oculus Rift. Have Fun!
Related Articles:
]]>
Now, you are perhaps interested in PS VR and want to learn more about PS VR. I did a search about PSVR on Google and gatherd everything about PlayStation VR you want to know. Before you invest a PS VR, you maybe should read them.
Table of Contents
6 Things You Should Know About Playstation VR | pastemagazine.com
1. You’ll Need a Playstation 4, the PSVR Headset and the Playstation 4 Camera to Play
2. It’s Not as Powerful as the Oculus Rift or HTC Vive, but It is Cheaper and More Convenient
3. The Headset is Relatively Lightweight and Easy to Adjust, but isn’t Perfect
4. You’ll Need a DualShock 4 and Two Move Controllers for the Full Impact
5. Most Launch Titles Aren’t That Impressive, but There are Some Worth Playing
6. It Can Make You Sick, even if you don’t normally have to worry about motion sickness
PlayStation VR: The Ultimate FAQ | blog.us.playstation.com
Q: How much does PlayStation VR cost?
The core product includes the PS VR system which includes the PS VR headset, headphones and all cabling required with a suggested retail price of $399.99 USD / $549.99 CAD. The PlayStation VR Launch Bundle was available to customers that pre-ordered for a suggested retail price of $499.99 USD / $699.99 CAD. It includes the PS VR system, PlayStation Camera, two PlayStation Move Motion Controllers, and a copy of PlayStation VR Worlds.
Q: Will I be able to play non-VR games and watch video content on PS VR?
PS VR has a feature called Cinematic Mode, which lets users enjoy content in 2D, including PS4 games and movies, on a giant virtual screen while wearing the VR headset. The PS Camera is required for initial setup, but not when actually using Cinematic Mode.
Q: When I’m using PS VR, will other people in the room be able to experience what I’m seeing?
Yes, PlayStation VR displays what you’re seeing in VR or a completely different image as a 2D image on your TV screen via a feature we call “Social Screen.” This allows others to observe and, in some cases, play alongside you. For example, the free launch game The Playroom VR offers several experiences where players are working with, and against, one person wearing the PS VR headset.
Q: What are the specs on PS VR’s screen?
PS VR uses a single 5.7” 1920 x 1080 resolution full-color OLED RGB display, also known as “1920 x RGB x 1080.” Unlike other VR displays, the PS VR display uses full Red, Green and Blue sub-pixels to produce a full color pixel. There are 1920 Red, Green and Blue sub pixels for each of the 1080 lines of pixels, so this is referred to as 1920 x RGB x 1080. This enables PS VR to further immerse the player and deliver a strong sense of presence.
Q: Does the Processor Unit support 4K and HDR pass through?
The PS VR Processor Unit (PU) supports video pass through so that you can enjoy regular non-VR content on your TV when you have the PS4 connected to the TV via the PU and the PU is connected to power via the AC adapter and the PS VR headset is not in use. This pass through support works for regular 1080p signals and also supports 2160p (UHD or ‘4K’) content in YUV 420 color format at up to 60 Hz from a PlayStation Pro.
However, HDR signals are not supported for pass through by the PU. This applies to both 1080p and 2160p HDR. If you have a HDR capable TV and want to view PS4 content in HDR, it is necessary to cable the PS4 directly to the TV.
Q: What is the resolution of PS VR’s Cinematic mode?
PS VR presents images from a single 1920 x 1080 display split between both eyes, so the content can have a maximum resolution of 960×1080 in stereoscopic 3D. The actual resolution of the Cinematic Mode screen depends on the screen size and the resolution of the content being displayed.
Q: Will PS VR display 3D content in Cinematic Mode?
No. In Cinematic Mode, PS VR will display 3D games and films in 2D when playing on a 3D-compatible TV. When playing with non 3D-campatible TVs or without a TV, PS4 won’t play 3D games and films.
Q: Can I watch movies, YouTube videos and other media through the PS VR headset?
Yes, you can watch all your existing media in Cinematic Mode using PS VR. There will also be media applications designed to support PS VR.
Q: Can I play 360 video using my PlayStation VR?
A: An update is available for PS4’s Media Player that makes it possible to view videos / photos captured on a 360-degree omnidirectional camera (in equirectangular file format) on PS VR.
2 ways to use PS VR that have nothing to do with gaming | cnet.com
Cinematic mode
You’ll be able to watch regular movies, from a DVD or Blu-ray, with Playstation VR. It looks similar to watching a movie in a theater, with a widescreen 16:9 display. A simple black background surrounds the digital display, which adds to the movie theater effect.
It’s nice to have the option, but frankly I don’t know that I’d ever watch a movie through Playstation VR. It simultaneously looks like I’m at a movie theater and sitting a bit too close to the TV and it’s a bit disorientating. What’s more, I doubt I’d want to have a VR headset strapped to my head for two hours at a time since it’s just not that comfortable.
Watch your own 360 videos/photos
With the launch of Playstation VR, Sony will also update the Media Player app on the Playstation 4 so it can play 360 videos and show 360 photos. You’re probably not shooting in 360 degrees quite yet, but you might be soon. Cameras such as the LG 360 Cam and Ricoh Theta S make it easy — though not necessarily affordable — to shoot 360 content.
PlayStation VR Launch Titles | trustedreviews.com
Here’s a full list of PSVR launch titles:
- PlayStation VR Worlds
- Batman Arkham VR
- Rez Infinite
- RIGS: Mechanized Combat League
- Hustle Kings VR
- Battlezone
- Driveclub VR
- Thumper
- Kismet
- EVE Valkyrie
- EVE Gunjack
- Job Simulator
- Super Stardust Ultra VR
- The Assembly
- Tumble VR
- Until Dawn: Rush of Blood
- Harmonix Music VR
- Hatsune Miku: Project Diva X
- Here They Lie
- Keep Talking and Nobody Explodes
- Loading Human
- Sports Bar VR
- Superhypercube
- Wayward Sky
How to Use PlayStation VR with Wii U/Xbox One | ign.com
Surprisingly, you can use PlayStation VR as an monitor for your Xbox One or Wii U. All you need to do is plug in the HDMI cable from the Xbox One/Wii U into the processor box in the slot labeled “HDMI PS4.” This is the slot that passes through the PS4’s signal to the TV. By plugging in your Wii U and Xbox One’s HDMI cable, it passes the Wii U and Xbox One’s signal through the VR unit.

The virtual screen size depends on the setting you chose in the PS4 settings. If you want to adjust the size, you’ll need to plug the PS4 HDMI back in and power on the PS4. Hop into the settings and you can adjust the screen size. Simply plug the Wii U and Xbox One’s HDMI back into the processor unit to use the new screen size.
It is important to note that the edges of the virtual screen are not going to be as clear as the center of it. This is because of PSVR’s field of view and the fact that head tracking is not available since the PS Camera is not hooked up. 3D audio is also not available. The only way to get sound is through your TV.
Useful PlayStation VR Video Tools
– Rip all 3D Blu-ray to 3D MP4, 3D MKV for PS VR
– Convert all 3D Blu-ray to 2D MP4, 2D AVI, 2D MKV for PS VR
– Convert all 2D Blu-ray/DVD to 3D SBS video for PS VR
– Convert all 2D Blu-ray/DVD to 2D MKV, MP4, AVI for PS VR.
– Rip 4K Blu-ray to PS VR and shrink 4K Blu-ray to 1080p for PSVR.
ByteCopy Review | ByteCopy User Guide | ByteCopy Download | Mac version
Pavtube Video Converter Ultimate:
– Convert 3D MKV, 3D MTS, 3D ISO to 3D MP4/MKV for PS VR.
– Create 3D video out of 2D source for PS VR.
– Convert 3D video to 2D video for PS VR Cinematic Mode.
– Upscale video to 4K/1080P and compress 4K to 1080p video for PS VR.
– Rip Blu-ray and DVD to PS VR.
Ultimate Review | Ultimate User Guide | Ultimate Download | Mac version
PlayStation VR vs PC Oculus Rift vs Vive Comparison Chart | ign.com
This part compares Sony’s PlayStation VR headset, (formerly Project Morpheus) with Oculus VR’s Oculus Rift for PC and the HTC Vive.
| PlayStation VR | Oculus Rift | HTC Vive | |
| Current iteration | PlayStation VR | Rift | Vive VR |
| Cost (Excluding PC/console) | $399 (+$59.99 PlayStation Camera required, Move controllers not included) | $599 (Includes Xbox One controller) | $799 (Includes 2 controllers) |
| Display Resolution | 960 x 1080 per eye (single 1920×1080 screen) | 1080 x 1200 per eye (two screens, combined 2160 x 1200) |
1080 x 1200 per eye (two screens, combined 2160 x 1200) |
| Field of View | Approx 100 degree | Approx 100-110 degree | Approx 110 degree |
| Max Refresh | 90Hz, 120Hz | 90hz | 90hz |
| System Requirements | Sony PlayStation 4 | NVIDIA GTX 970/AMD 290 equiv or greater
Intel i5-4590 equiv or greater 8GB+ DDR3 RAM HDMI 1.3 video output 2 USB 3.0 ports |
NVIDIA GTX 970/ AMD R9 290 equiv or greater
Intel i5-4590/AMD FX 8350 equiv or greater 4GB+ RAM Video Output: HDMI 1.4 or DisplayPort 1.2 or newer 1x USB 2.0 or greater port |
| Audio | Built-in 3D Audio | Built-in 3D Audio | None |
| Connections | VR headset: HDMI, AUX, Stereo Headphone Jack / Processor unit: HDMI TV, HDMI PS4, USB, HDMI, AUX | HDMI, USB | 3-in-1 connector to interface box including HDMI/Display Port, USB, and power |
| Weight | 1.34 lbs. (610g, excluding cable) | 1.03 lbs. (470g) | 1.22 lbs (555g) |
| Sensors | Accelerometer
Gyroscope Magnetometer PS Eye Tracking |
Accelerometer
Gyroscope Magnetometer Tracking Sensor Array |
Accelerometer
Gyroscope Front-facing camera Laser sensor |
| Controllers | DualShock, PS Move (sold seperately) | Xbox One Controller, Remote (included), Oculus Touch, (TBD) | 2 Wireless Controllers (included) |
Related Articles:
]]>
First of all, you should know which phone is Daydream-ready. So far, only a few Daydream-ready phones have been announced but a few more recent devices will possibly be included to the list. But until the official hardware spec is published, we can’t say for sure. Here’s the confirmed list so far:
- Google Pixel XL
- Google Pixel
- ZTE Axon 7
- Asus Zenfone 3 Deluxe
- Huawei Mate 9 and Mate S2
- LG V20
Rumor says that Android phones with below Daydream-ready specs mostly can be used to play 3D video for Google Daydream VR.
1. The Snapdragon 820 is the minimum chipset required for the CPU and GPU performance expected by Google and 4 GB of RAM looks to be the minimum memory requirement.
2. On the display front, at least a Full HD OLED display with low persistence is also necessary.
3. As Qualcomm notes in its VR Software Development Kit notes for the Snapdragon 820, VR also requires “predictive head position processing” which the Qualcomm Hexagon DSP includes.
4. All devices will need to be running Android 7.0 Nougat to take advantage of its Sustained Performance Mode for VR, too.
These Daydream-ready phones determined what video files can be played on Google Daydream VR. Refering to the supported files of these Daydream-ready phones, MP4, WMV, FLV, 3GP formats will be fine for Google Daydream VR. Of course, for wide compatibility, 3D SBS MP4 in H.264 codec will be the best choice for Google Daydream VR. So, if you have some 3D MKV, 3D FLV, 3D BD ISO, 3D MTS, 3D Tivo, 3D AVCHD, 3D Blu-ray, how can you play these 3D video on Google Daydream VR? With a VR Video Converter, you can convert these 3D MKV/ISO/MTS, etc to 3D SBS MP4 for Google Daydream VR.
Best VR Video Converter for Google Daydream VR
Pavtube Video Converter Ultimate is absolutely the best VR Video Converter for Google Daydream VR on PC. It can handle nearly all video and export perfect 3D video for Google Daydream VR. This professional and powerful software performs the functions of 2D to 3D Converter, and 3D to 3D Converter.
– Switch 3D MKV, 3D BD ISO, 3D MTS to 3D MP4 for Google Daydream VR.
– Rip commercial 3D Blu-ray to 3D SBS MP4 for Google Daydream VR.
– Convert MKV/MOV/AVI/MP4/MTS, etc video in 2D to 3D for Google Daydream VR.
– Copy 2D Blu-ray and DVD to Google Daydream VR playable 3D video.
– Allow users to choose 1080*720, 1920*1080, 2160*1200 resolution in light of your Daydream-ready phones’ display specs.
If want to try Pavtube Video Converter Ultimate, just click here:
If you are a Mac user, please get a VR Video Converter for Mac.
Convert 3D MKV/FLV/MTS/ISO/Tivo to 3D MP4 for Google Daydream VR
Step 1: Import video.
Insert your 3D/2D Blu-ray/DVD movie to disc drive, and click “Load from disc” button to load Blu-ray or DVD from ROM. For video file, click the “Add video” button, browse to computer hard drive and import video into this app.
Step 2. Choose 3D format for Google Daydream VR
Click the “Format” bar and find “3D Video”, you will find several presets for MKV/MP4/MOV/AVI in Side-by-Side 3D, Top-Bottom 3D and Anaglyph 3D. Here MP4 Side-by-Side 3D Video(*.mp4) is most recommended formats for Google Daydream VR, but you still need to check your device specification to choose one accordingly.

Step 3. Adjust 3D effect.(Optional)
Click “Settings” to enter customize specs window; you can adjust resolution(size), bitrate, frame rate, 3D mode and depth here.
Step 3: Convert BD/DVD/Video to SBS 3D MP4 for Google Daydream VR
Click “Convert” button, video to SBS 3D MP4 conversion begins. When the process finishes, open the output folder to locate it.
Here you go. So easy to convert movies library to 3D movies for your Google Daydream VR. Now transfer your 3D MP4 movies to your Google Pixel XL, Google Pixel and other Daydream-ready Phones then slide your Daydream-ready phones to Google Daydream VR for enjoy your 3D home theater. Have Fun!
Note: This 3D MP4 videos can be also played in HTC Vive, Samsung Gear VR, PSVR, Oculus Rift CV1/DK2, View-Master VR and other VR Headsets.
Related Articles:
]]>
So how to rip 3D Blu-ray to HTC Vive playable 3D video? You need a 3D Software to help you extract 3D content from 3D Blu-ray for HTC Vive. Do a reseatch on the network to find the ripping software that is suitable for you.
Best 3D Blu-ray Ripper for HTC Vive Recommended
Pavtube Video Converter Ultimate is an all-in-one workflow for HTC Vive. With it, you never need to worry about the 3D content for HTC Vive playback. You can create 3D SBS video for HTC Vive out of various source and adjust A/V parameters to fit in your HTC Vive specification to get better 3D effect on the VR video player in HTC Vive. You even can trim video footage, crop video black area, add external subtitles to video, replace audio from video, etc. Now, let’s see the 3D functions that can be used for HTC Vive in detail
– Remove Blu-ray AACS, BD+ up to MKB v62 to convert 3D Blu-ray to 3D MKV/MP4 for HTC Vive.
– Rip 2D Blu-ray to 3D SBS MKV/MP4/MOV/AVI/WMV video for HTC Vive.
– Convert DVD to 3D SBS video for HTC Vive.
– Convert 2D/ 3D MKV to 3D MP4 for HTC Vive.
– Transcode FLV, WMV, AVI, TS, MTS, AVCHD, MXF, ISO to 3D SBS video for HTC Vive.
– Remux 3D video to HTC Vive only changing original 3D video’s audio codec.
– Make you adjust 3D depth and choose Full SBS or HSBS.
The 3D SBS videos from 3D Blu-ray also can be used on Oculus Rift CV1, Samsung Gear VR, PlayStation VR, Oculus Rift DK2, Homido VR and other VR Headsets and 3D TVs. If you are using a Mac, you can get mac version to convert 3D Blu-ray to HTC Vive.
Free download and install
How to Convert 3D Blu-ray to 3D SBS for HTC Vive?
Step 1. Load 3D Blu-ray files
Launch the 3D Blu-ray Ripper for HTC Vive. Click “Load from disc” button on the main interface to load your media files to the program. Blu-ray folder is also supported. All of your loved 2D/3D Blu-ray movies such as Avatar, The Walking Dead, The Martian, Spectre 007, etc can be loaded into the software to rip for your HTC Vive streaming.

Step 2. Select output 3D format
HTC Vive can accept 3D SBS MP4 so you can click “Format” bar on the interface then navigate to “3D Video” to choose “MP4 Side-by-Side 3D Video (*.mp4)”, “MP4 Anaglyph 3D Video (*.mp4)” or “MP4 Top bottom 3D Video (*.mp4)” as the output format.

Tip: Simply click Settings bar and you can tweak the settings to your satisfaction. With the right settings you can retain the quality of the original videos while also saving space.
Step 3. Start to convert 3D Blu-ray to SBS 3D MKV/MP4 for HTC Vive
Click “Convert” to accomplish the rest process of 3D Blu-ray to HTC Vive conversion automatically. Once the ripping ends, you can open the output folder to locate the 3D SBS video for HTC Vive. Then, you can set up your HTC Video to view your 3D movie on HTC Vive. For those who don’t know how to watch 3D videos on HTC Vive, I have searched a step-by-step guide for you on howtogeek.com and have extracted the important part for you at below.
How to Watch 3D Video on HTC Vive?
There are a few different apps for watching videos in HTC Vive, but after testing a few, we settled on Whirligig. You can download an old free version on their web site, or get the $4 version on Steam, which gets occasional updates, improvements, and new features. I definitely recommend buying the $4 version, but you can try out the free version to see if it’s your cup of tea first. (Note that the free version may stutter when playing large files.)
So, after buying Whirligig, open Steam, head to the Library tab, and click “Games” in the upper right-corner of the sidebar. Click “Software” to find Whirligig in your Library.
Then, right-click on Whirligig in Steam’s sidebar, and go to Properties. Click the “Betas” tab, and opt into the latest beta in the dropdown menu. Whirligig will update to the latest possible version.
Lastly, depending on the videos you plan to watch, you may need to download and install the K-Lite Codec Pack. I recommend installing the Basic version. Be sure to click the “Expert” radio button and pay close attention–K-Lite does come bundled with crapware, you just need to decline to install it during the wizard.
Once that’s done, launch Whirligig in your VR environment of choice, and you’ll be presented with Whirligig’s heads-up overlay. You can control Whirligig’s menus with the HTC Vive’s touchpad, an Xbox 360 or One controller, or a mouse and keyboard. I highly recommend using a mouse and keyboard, as it’s much easier than any of the gamepads.
To watch a video, click the Browse button in the top left-hand corner of the menu. You’ll be able to browse your hard drive to choose a video file. (Whirligig also claims to support YouTube links in its Settings, but I couldn’t get that to work at the time of this writing.)
As the video starts to play, you’ll probably want to adjust some settings using Whirligig’s heads-up controls. Here’s what we recommend for each type of video:
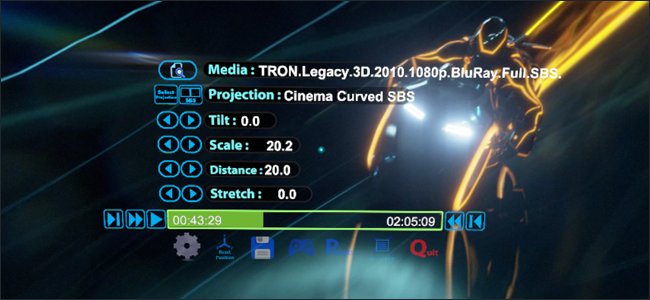
- Regular 2D video: Set Projector to Cinema or Cinema Curved.
- 3D video: 3D video comes in a few different forms, so check the video you downloaded–or the settings you used when you ripped it–to see whether it’s Half Side-By-Side, Full Side-By-Side, Half Over-Under, or Full Over-Under. Set the Projector to either Cinema or Cinema Curved, then select SBS or OU instead of Mono. If the video is Half SBS, set Stretch to “100” so it displays in the proper aspect ratio.
- 180 or 360 degree video: The video will usually tell you whether it’s 180 degrees or 360 degrees on the site you download it from. If it’s 180 degrees, set Projector to “Fisheye” and set FOV to 180. If it’s 360, set Projector to “Barrel” and FOV to 360. You may also have to tweak “Tilt” for 180 videos or “Rotation” for 360 videos so that the video is facing the right direction.
- Full VR video: Combine the correct settings from “3D video” and “180 or 360 degree video” sections of this list.
You can also adjust the Scale and Distance settings to fit your tastes, or click the Settings cog in the lower right-hand corner for even more options. Whirligig also has some other cool features like saving different presets, but these basics should get you up and running pretty quickly. For now, sit back and enjoy the movie! If you want to read the whole tutorial on How to Watch Any Video on HTC Vive, just click here.
Related Articles:
]]>
To create 3D sbs video out of 2D video, you need a 2D to 3D app which can turn 2D to 3D videos. Here, I stronly suggest you Pavtube 2D to 3D Converter – the best software to watch 3D movies app.
As a powerful 3D video converter, Pavtube 2D to 3D Converter works perfectly for all kinds of 2D to 3D Conversions. It can convert a normal 2D DVD/Blu-ray/video to fantastic 3D video available in a variety of formats like AVI, MP4, MKV, WMV, MOV.
The output 3D video can be side-by-side 3D, anaglyph 3D, and Top Bottom 3D effect. This 3D video can be played on computer, some 3D TV, glasses-free 3D smartphones, or other compatible 3D display device.
Pavtube 2D to 3D Converter Key Features
 |
|
 |
|
Supported Formats
| Input |
| 2D DVD/Blu-ray disc, 2D DVD/Blu-ray folder, 2D ISO image file, 2D/3D video |
| Output |
| 3D video: AVI, MP4, MKV, FLV, M2TS, TS |
Pavtube 2D to 3D Converter download link:
- 2D to 3D converter for Windows: http://www.multipelife.com/download/video-converter-ultimate/video_converter_ultimate_setup.exe
- 2D to 3D converter for Mac: http://www.multipelife.com/download/imedia-converter-mac/imedia_converter_setup.dmg
How to Convert 2D Movie Clips to 3D SBS MP4 with Pavtube 2D to 3D Converter?
Step 1: Import 2D video.
Insert your 3D/2D Blu-ray/DVD movie to disc drive, and click “Load from disc” button to load Blu-ray or DVD from ROM. For video file, click the “Add video” button, browse to computer hard drive and import video into this app.
This software also can directly convert 3D to 3D video such as converting 3D TB video to 3D SBS, 3D Anaglyph to 3D SBS, etc so you also can add 3D video into the program.
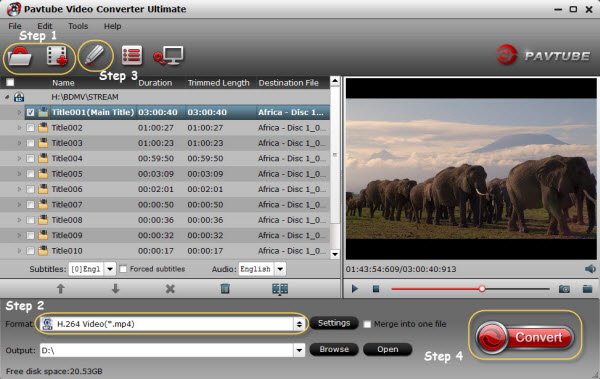
Step 2: Select format and set profile.
Tap on “Format” bar and find “3D Video”, there are a lot of format options for you. “MP4 Side-by-Side 3D Video (*.mp4)” is recommended for wide compatible with Oculus Rift DK2, Oculus Rift CV1, ANTVR Kit, Zeiss VR One, Google Cardboard, Freely VR, etc.
Learn >> VR Headset 3D Movie FAQs: Gear VR, Oculus Rift, HTC Vive, VR One …
Tip: If necessary, you are allowed to adjust video and audio presets in Settings. Parameters like video codec, video bitrate, video frame rate, audio sample rate, audio channel, and more can be adjusted to achieve a better video/audio playback on VR devices. 3D depth and video size, bitrate is very important for a 3D video effect. You HAVE TO check the user manual of your VR Headsets to learn the best compatible 3D video codec, frame rate, bitrate, audio codec, channel. AND, since the phone is the screen, you should make sure the 3D video is also supported by your iPhone 6S/6S Plus/6/6 Plus/5S/5, Samsung Galaxy S7/S7 Edge/S6/S6 Edge/Note 5/4, Blackberry, HUAWEI, LG, HTC, etc.
Step 3: Convert 2D Video to SBS 3D MP4.
Click “Convert” button, video to SBS 3D MP4 conversion begins. When the process finishes, open the output folder to locate it.
The output 3D SBS video from Pavtube Video Converter Ultimate can be used on nearly all VR Headsets in the market no matter it is a lower end or higher end one only if it needs a smartphone/PC as the display. You can play the 3D SBS video on Gear VR Innovator Edition, Gear VR, Oculus Rift DK2, Rift Development Kit 2, Google Cardboard, Cardboard HeadMount 3D VR BOX, Daydream VR, ZEISS VR One, ANTVR KIT, Vitrio VR, Freefly VR, View-Master VR, DESTEK Vone 3D VR Headset, IncrediSonic M700 VUE Series VR Glasse, Baoer Cardboard Valencia Quality 3d VR, Glyby 3D VR, VIGICA VR, True Depth 3D VR, J-DEAL Large FOV 3D VR, HTC Vive, Homido Virtual Reality Headset, Findbest VR, Speck Pocket VR, Deepoon VR, Visus, Cmoar VR, AuraVisor, Project Morpheus, PlayStation VR, LG 3D TV, Samsung 3D TV, Panasonic 3D TV, etc.
Note:
1. To improve your media experience more amazing, the 2D to 3D MP4 converter additionally provides you some useful edit functions like cropping, add cool effects etc. To learn more about this, you can go to user guide of Video Converter Ultimate.
2. Click the link to learn more about differences between anaglyph 3D and Side-by-Side 3D.
Related Articles:
- How to Watch 3D ISO on Samsung 3D TV with Side-by-Side 3D Effect?
- Teach you How to Watch 3D YouTube on Oculus Rift CV1
- How to Watch a 3D Video on a VR Headset?
- Easy Solve PowerDVD Won’t Play 2D/3D movie Problem
- Can OHC play 3D Blu-ray ISO with no audio mess up
- Get 3D Blu-ray Movies running Popcorn Hour A-500 Pro
Guide to Play Youtube 3D Videos on Your Oculus Rift CV1:
1. Install Virtual Desktop.

2. Find a 3D Youtube video.
Copy the link from the 3D video. For example, you could paste the following link: https://www.youtube.com/watch?v=LdTm7Vpape0
To watch it in 3D, you better use Chrome as it’s the only browser that allows you to play it without problems.
3. Copy/paste the link to your Virtual Desktop.
Open up “Virtual Desktop” and go to VIDEO PLAYER tab. Paste the link in the “Paste URL” blank.
Virtual Desktop will take care of downloading the video at the highest quality possible (usually 4K when its available) and will play it back right away.
The videos are saved into your “My Videos\360 Videos” folder.
Virtual Desktop is good for watching Youtube 360 and Youtube 3603d videos. You paste the url and Virtual Desktop downloads the whole file and starts it playing full screen on the headset automatically. It is very interesting to see the Google Jump 3603d videos in it. You can see stitching flaws in Google Jump videos much more clearly than with anything else I think –eg. the violin bows in Resonance in the orchestra scenes.
Whirligig also works well with Oculus Rift CV1 and is more extensive in its support of various angular coverage fisheye (“dome”) stereo videos and equi (“barrel”) format stereo videos. But it is a hassle to use I think as it doesnt support mouse input (only keyboard and xbox controller),
Convert 3D YouTube Video to Oculus Rift CV1
You might have downloaded some 3D videos from YouTube a long time ago for your Gear VR. These 3D video maybe 3D FLV, 3D MKV, 3D MP4. But when you just test it with a 3D SBS .mkv file on Oculus Rift CV1, it does in fact work but possibly you will have is that you can’t get sound to play cause some .mkv uses DTS sound which the Oculus video app might not be able to process. If you have such 3D YouTube video, you maybe need to convert it to 3D MP4 for CV1.
Best 3D Oculus Rift CV1 Converter– Pavtube Video Converter Ultimate
– Convert 3D MTS, 3D AVCHD, 3D MKV video to 3D MP4 video. – Rip 3D Blu-ray/3D BD ISO to 3D MKV/MP4/WMV/AVI/MOV. – Re-encode 3D MKV DTS audio to 3D MKV AAC/AC3 audio. – Transcode any 2D video source to 3D SBS/TAB/Anaglyph video.
|
 – Convert 3D YouTube video to 3D SBS MP4 for Oculus Rift CV1.

Step 1. Add 3D YouTube Video
After running the program, load 3D YouTube videos to it by clicking Add button or simply drag & drops. You can add many files and convert them at one time.
Step 2. Choose Output Format
Click “Format” bar and find “3D Video”, there are a lot of format options for you. “MP4 Side-by-Side 3D Video (*.mp4)” is recommended for Oculus Rift CV1.
Tip: Click “Settings” which is next to “Format”, free change your target video size, bitrate, frame rate and 3D depth. If you want to get best video quality, pls switch them to “original”. 3D movies should be encoded “full side-by-side” with a 1:1 pixel aspect ratio. Content mastered at 1920×1080 compressed side-by-side 3D should be resampled to 1920×540 resolution full side-by-side resolution. Higher resolutions will not provide any better quality, meaning you’ll waste space and processing power. We also recommend using a higher bit rate than a typical web stream at that resolution, as the pixels in your video will be magnified on the phone’s screen. The optimal bit rate is content dependent, and many videos can get by with less, but 5 Mb/s should give good quality.
Step 3: Start 3D YouTube video Conversion
The last step is to press the “Convert” button to start 3D YouTube video to Oculus Rift CV1 conversion. After the conversion, click “open output folder” to quick locate the generated media file.
Read also:
Two ways to watch your converted 3D video content in Oculus Video CV1.
Method 1: You can copy your compatible video files directly to your phone or SD card* in any of the following directories:
On your phone’s internal storage (Phone): /DCIM/ /Movies/ /Oculus/Movies/
On your phone’s removable SD card* (Card): /DCIM/ /Movies/ /Oculus/Movies/
Method 2: set up an Xbox One controller with the Oculus Rift CV1

When you decide to connect your Xbox One Controller to your Windows PC you can choose to do that wirelessly or by cable. So you can have the opportunity to play games on your computer you just need to pair it with one of the two ways. This tutorial will guide you how to successfully finish the setup for your Xbox One controller with your Oculus Rift. This are the steps you will need to take to setup your Xbox One Controller :
1. How to Setup the Xbox One Controller in wireless mode
- First connect your USB wireless adapter to any available port for USB
- If you have problem with your USB port use the USB extender, that is already included. This way your wireless will go smooth without interference.
- Make the connection with the wireless adapter and the USB extender and then plug in the USB extender in the port for USB.
- Put the AA batteries in the battery bay of the controller.
- Press the Xbox button on the controller until you see that the lights are on.
- On your wireless adapter you will see a sync button, press it and then hold it for a little while so you can pair the controller with the wireless adapter.
- The light you will see on your Xbox controller shows the pairing status, this way you will know if the Xbox controller and the wireless adapter are successfully paired
- If the light flashes slowly then the pairing is not successful
- If the light flashes rapidly than the pairing is still in progress
- If the light is solid than you are finished
If the region you live in has any kind of restriction for using wireless adapters, than with your Rift you will get a micro- USB cable
2. You can connect you Xbox Controller to your PC without the need of batteries by using your micro USB cable. The cable is not included in the box. If you decide to use your controller in wired mode than be aware that this way your movements in virtual reality are going to be limited. Do this following steps to setup your Xbox Controller in wired mode:
- Put your micro USB cable into available USB port on your computer
- Wait for couple of seconds for your computer to detect the Xbox drivers
Related Articles:
- View 3D Movies with Gear VR via Galaxy S7/S7 Edge
- Convert 3D MKV/FLV/WMV/AVI to Galaxy S5/iPhone 6 For Watching on ZEISS VR One
- How to Copy 3D Blu-ray to Samsung Galaxy S5 for ZEISS VR One?
- Make 3D MKV Playable on Samsung Active 3D UE55H6400
- How to play 3D ISO files on Samsung 3D Smart TV in 3D Mode?
When you get your first VR box in hand, you must be confused how the black box can give you a VR world. Here, we will show you how to watch a 3D movie with a VR Headset, even it is a low end VR Headset at home.
Here’s what you’ll need:
A 3D movie. Please remember: If you turn a 2D movie in a 3D one, none of your existing 2D titles will work. You need to download a true 3D video from YouTube and other 3D movie sites or you can buy a 3D Blu-ray movie than rip it to right 3D SBS video for your VR Headsets.
A phone. iPhone or Android, either one will work. We’re going to assume your phone fits nicely into the VR headset you have on hand.
A VR headset. We used the Samsung Gear VR available for $98 on Amazon. (Other VR Headsets choices)
A VR Video Player: The one extra thing you might need, depending on the 3D movie you have, is an app to play it for the VR headset. The reason you need a special app to play a 3D movie because when you play any sort of video that’s meant for a VR headset, it’s split into two windows like this;

We say you might need the app because the movie may not be split into two windows. The one we tried this out with was already split into two windows. In the event that your movie isn’t, here are some free apps, one for iOS and Android each, to split the view.
VR Video Player app for iOS users:
Homido 360 VR Player – Homido itself is a VR headset maker and it has its 360 VR Videos player app too!. The Homido 360 VR Player is a really cool app for iPhone users to watch 3D SBS & 360 VR Videos.
Mobile VR Station for iOS iPhone – Mobile VR Station is another alternative or similar app to Homido 360 VR Player. It perhaps has even more features than Homido!
Carl Zeiss VR One Cinema – Carl Zeiss one of World’s best lens maker recently came out with a VR Headset and Carl Zeiss VR One Cinema app comes directly from the company.
VR Video Player app for Android users
VR Player – This VR video player can effectively play the 2D, 3D Top-Bottom, 3D SBS videos on your smartphone. If you are interested in having the experience of theatre with your smartphone, then you must install the VR Player in it.
VR Gesture Player – The most amazing feature of the app is that the inputs are made through hand gestures. The touch-less control of this app lets the users to jump into the world of virtual reality. The hand gestures are recognized by the back camera and these gestures are used to control the app.
VRTV Player Free – This player app features all the projection types like dome, cube, and more that are required to play the VR videos. Fish Eye is the best feature of this player which lets the users to split the videos in such a way that there is no strain on your eyes.
If you’ve got a movie that’s already split into two windows, just play it using VLC player.
Create 3D Video, Transfer Video to phone, Play 3D with Gear VR
Create 3D Video
As we aforementioned, the 3D movie is a key point for successfully playing 3D video with 3D VR Glasses.
You can download true 3D movie from popular 3D movie download sites. Top 3D movies download sites have:
- YIFY Torrents
- The Illustrated 3D Movie List
- The Pirate Bay
- forfree3d.com
- Kickass
- YouTube 3D Channel
You also can buy 3D Blu-ray/DVD and rip 3D Blu-ray/DVD to 3D SBS Video for VR Headsets with 3D Blu-ray Ripper.
Download and install a 3D Blu-ray Ripper: Windows Pavtube 3D Blu-ray Ripper, Mac Pavtube 3D Blu-ray Ripper
Open Blu-ray to Side-by-Side 3D converter and load your source Blu-ray movie. From the “Format” drop-down list, you are suggested to follow the path “3D Video > MP4 Side-by-Side 3D Video(*.mp4)”for ripping Blu-ray to side-by-side 3D MP4 video. Finally, click the “Convert” button on program interface to start ripping Blu-ray to side-by-side 3D MP4 video. After it finished, open output file destination, locate the created SBS 3D MP4 video and you could watch it on your VR Headsets.

Important Tips:
3D depth and video size, bitrate is very important for a 3D video effect. You HAVE TO check the user manual of your VR Headsets to learn the best compatible 3D video codec, frame rate, bitrate, audio codec, channel. AND, since the phone is the screen, you should make sure the 3D video is also supported by your iPhone 6S/6S Plus/6/6 Plus/5S/5, Samsung Galaxy S7/S7 Edge/S6/S6 Edge/Note 5/4, Blackberry, HUAWEI, LG, HTC, etc.
Supported video and audio format of iPhone, Samsung Galaxy phone, Android smartphone.
For Gear VR, we recommend using 1280×720 HD resolution to encode your videos. Higher resolutions will not provide any better quality, meaning you’ll waste space and processing power.
We also recommend using a higher bit rate than a typical web stream at that resolution, as the pixels in your video will be magnified on the phone’s screen. The optimal bit rate is content dependent, and many videos can get by with less, but 5 Mb/s should give good quality.
While H.264 is the recommended video coding, H.265 videos can also be played.
3D movies should be encoded “full side-by-side” with a 1:1 pixel aspect ratio. Content mastered at 1920×1080 compressed side -by- side 3D should be resampled to 1920×540 resolution full side -by -side resolution.
When you don’t make sure the best 3D video parameters, just keep 3D Video resolution 720p or 540p.
Transfer Video to phone
I think this step is very easy for you. If you don’t know, please read the tutorial by yourselves.
- How to Put Video, Audio files to Android Smartphone?
- How to Transfer Videos/Music to iPhone from PC/Mac?
To view your SBS 3D video files on your Gear VR with Galaxy S7/S7 Edge/S6/S6 Edge/Note5/Note 4, follow these steps:
- On your MicroSD card file directory, navigate to Oculus > Movies > Your Movies
- Create a new folder within “Your Movies” and label it “3D”
- Import or move your side-by-side 3D videos into your newly created “3D” folder
Since Galaxy Note 5 has no MicroSD card, you can simply connect it to your computer to transfer your 3D video to it.
Play 3D with Gear VR
Once you have created your 3D content folder and imported compatible video files, insert your MicroSD card into your Galaxy phone (if it isn’t already), dock the phone in your Gear VR, and don the virtual reality headset. Then:
- Navigate to Oculus Cinema from the main menu
- Navigate to “My Videos” from the Oculus Cinema content library menu
- Select the 3D video you wish to view (if you followed the above steps it should have a “3D” label in the upper righthand corner)
- Choose the cinema mode to begin playback
The software is coded to automatically convert any video in the “3D” folder for 3D playback. While the included documentation and tutorials don’t make the process completely obvious, the answer is buried in the literature accompanying the Gear VR’s Oculus Mobile SDK along with plenty of other tips on importing your own content for viewing on Samsung’s virtual reality headset.
This 3D video playing on VR Headsets tutorial is applied to nearly all VR Headsets in the market no matter it is a lower end or higher end one only if it needs a smartphone as the display. You can follow the steps to view 3D movie on Gear VR Innovator Edition, Gear VR, Oculus Rift DK2, Rift Development Kit 2, Google Cardboard, Cardboard HeadMount 3D VR BOX, Daydream VR, ZEISS VR One, ANTVR KIT, Vitrio VR, Freefly VR, View-Master VR, DESTEK Vone 3D VR Headset, IncrediSonic M700 VUE Series VR Glasse, Baoer Cardboard Valencia Quality 3d VR, Glyby 3D VR, VIGICA VR, True Depth 3D VR, J-DEAL Large FOV 3D VR, HTC Vive, Homido Virtual Reality Headset, Findbest VR, Speck Pocket VR, Deepoon VR, Visus, Cmoar VR, AuraVisor, Project Morpheus, PlayStation VR, etc.
Related Articles:
]]>
To Watch 3D VR Movies on VR Headset, What Do I Need?
The 3D VR movie you found on YouTube is split into 2 pictures since a pair of 3D VR glasses can work with the split images to create immersive Virtual Reality. So, just like watching 3D movies on computer, in order to watch 3D VR movies VR Headset like Gear VR, Oculus Rift, HTC Vive, VR One…, you need:
1. A pair of 3D VR glasses (Or 3D VR headset)
A 3D VR equipment turns any blurs, double images, distortions of a virtual video/3D VR games into touchable, interactive experience that we call reality. Without such a gadget, you won’t be able to immerse into the full scenario of a horror movie or gunplay, or interact with any object that conjures out of VR 3D.
2. A 3D VR movie
Note: A VR video player would be a must to play 3D VR movies on computer. Alternatively, if you want to watch VR videos on iPhone, you may download a VR APP like Discovery VR for iOS. If you use a Samsung or Android phone to watch 3D VR movies, Smash Hit for Samsung Gear VR, Cardboard for Android Phone would be good to go.
Create Your Own VR Video for VR Headset, How to Realize?
We can save any content on the microSD Galaxy Note 4 or S6/S7 or sync to iPhone via iTunes for using in 3D glasses, but you must be placed in the appropriate format. Because of the playable format of the 3D glasses have strict requirements, such as: some MKV movie files(downloaded from Internet or some raw Blu-ray rips in MKV) in 2D or 3D SBS(Side-by-Side) work on VR headsets, but the audio has to be encoded in AAC or MP3 for stereo. AC3 audio and DTS Dolby don’t seem to work. Some YouTube downloaded FLV are not workable in VR headsets like Google Cardboard, Gear VR, VR One, etc. What’s more, 2D/3D Blu-ray or DVD are not supported by VR headsets obviously, we need the best 3D Movie Converter for VR Headsets to do 3D Video conversion firstly.
Top VR Headset 3D Movie FAQs
Below is a easy-to-understand VR Headset 3D Movie FAQs, check it out!
Q: Can I wear my eye glasses with the 3D VR GLASSES when watching 3D movie?
A: A lot of people who wear glasses find that they don’t need to with our headset because the lenses can be adjusted. Although the adjustment is left/right (so you can match the lenses to where your pupils are), we have found it is often all the adjustment you need.
Q: Where can I find the 3D VR GLASSES app?
A: We have not yet announced when a native app for 3D VR GLASSES Start will be released. Right now, you can go to google play or Apple APP store to see the best videos, apps and experiences that can be enjoyed on the headset. (Be sure to sign up to receive updates as we add more cool stuff.)
Q: What kind of content is available for the 3D VR GLASSES?
A: The headset works with several different types of content:
1. Apps built for 3D VR GLASSES
2. Google Cardboard apps (because we have capacitive-touch inputs)
3. Any videos that are set up for side-by-side viewing on a mobile phone (e.g., YouTube videos set up for 3D viewing)
> See Media Formats Supported by Gear VR Software
Q: For Christmas, my 11 year old son requested a Viewmaster VR headset to use on my G4.. How to play my purchased DVD on that VR headset. Has anyone tried them, or any other reasonably priced goggles that are better?
A: To view DVD on any VR headset, you need convert DVD into virtual reality video with 2D/3D effect for playback on Viewmaster or other VR headsets with iPhone.
Q: Any thoughts on the Zeiss VR One? How can I view Blu-ray on VR One with 2D/3D effect?
A: No matter what you are willing to do, you need a VR Blu-ray Ripper indeed with which you can changing a 2D/3D Blu-ray to format/resolution available to VR One.
Q: What is it like to watch a movie (2D or 3D) on Oculus Rift? What kind of experience do you get?
A: There is a free application on the Oculus share page called VR Cinema. It easily let’s you play 2d or 3d movie files on the Rift, while putting you in a virtual movie theatre. You can even walk around the theatre and sit in any seat you like. Though, because the 3d effect of the Rift is so many magnitudes beyond the 3d effect of typical blockbuster films, the 3d effect from within VR Cinema is sort of lackluster in my opinion. A much more compelling experience is true made-for-Rift content, which actually makes you feel like you are there.
Other VR Headset 3D Playback Guides and Solutions:
2D/3D Blu-ray to VR Headset:
DVD to VR Headset:
YouTube to VR Headset:
3D YIFY to VR Headset: Get 3D Yify Movies to play on Gear VR
3D movie to VR Headset: 3D movie to VR One | 3D movie to Gear VR | 3D movie to ANT VR Kit | 3D movie to Google Cardboard | Create 3D SBS for Vitrio VR
Top 3D movie to VR Headset Converter
There are a number of great free and paid applications that can make the 3D movie to VR Headset conversion process one-click, or give you all the tools you need to rip and encode beautiful video. Still, you need to know which one will be the best. Then, we took a look at the five best 3D video converting tools and put them to a vote.
Pavtube Video Converter Ultimate |
Pavtube Video Converter | Xilisoft 3D Video Converter | Imtoo 3D Movie Converter | Tipard 3D Converter | |
| Price | $65 | $35 | $35.95 | $35.95 | $39 |
| Support 3D Modes | |||||
| Side by Side (Half-Width) | √ | √ | √ | √ | √ |
| Side by Side(Full) | √ | √ | √ | √ | √ |
| Top and Bottom (Half-Height) | √ | √ | √ | √ | √ |
| Top and Bottom (Full) | √ | √ | √ | √ | √ |
| Anaglyph | √ | √ | √ | √ | √ |
| Input File Formats | |||||
| 3D YIFY/YouTube | √ | √ | √ | √ | √ |
| 3D Blu-ray/ISO | √ | – | – | – | – |
| 3D MTS/MKV | √ | √ | √ | √ | √ |
| 2D Blu-ray | √ | – | – | – | – |
| DVD | √ | – | – | – | – |
| H.265/HEVC | √ | √ | – | – | – |
| H.264 | √ | √ | √ | √ | √ |
| MXF | √ | √ | – | – | – |
| XAVC/XAVC S | √ | √ | – | – | – |
| Output File Formats | |||||
| 3D MP4 | √ | √ | √ | √ | √ |
| 3D MKV | √ | √ | √ | √ | √ |
| 3D MOV | √ | √ | √ | √ | – |
| 3D AVI | √ | √ | √ | √ | √ |
| Advanced Features | |||||
| Adjust 3D Depth | √ | √ | √ | √ | – |
| Switch Left Right | √ | √ | √ | √ | – |
| Trim | √ | √ | √ | √ | √ |
| Split & Merge | √ | √ | √ | √ | √ |
| Crop | √ | √ | √ | √ | √ |
| Adjust resolution | √ | √ | √ | √ | √ |
| Adjust bitrate & frame rate | √ | √ | √ | √ | √ |
| Operating System | |||||
| Windows | √ | √ | √ | √ | √ |
| Mac | √ | √ | √ | √ | √ |
Now we’re back to crown the winner. Pavtube Video Converter Ultimate is a professional 2D/3D Video Converter Ultimate (PC and Mac) program which can helps you re-encode any 2D/3D movie files to VR Headsets (Samsung Gear VR, Oculus Rift, HTC Vive, VR One included) more compatible 3D formats and make 3D movies accepted by any VR Headsets with ease.
The best 3D Video Converter software allows you to make compatible video files for all of your VR Headsets or Android/iOS devices, even if you don’t know terms like FLV, MKV, M4V, MP4, VOB, M2TS, MTS, WMV, MPEG, DVD, Blu-ray, etc. Mac version is here.
>See Pavtube Video Converter Ultimate vs AnyDVD
Get Pavtube Video Converter Ultimate in bundle package: ByteCopy+Video Converter Ultimate with Only $79.9 which can save you $27.1, then you can transcode any SD/HD/4K movies and rip Blu-ray/DVD/ISO for VR headsets freely playback on Windows 7/Vista/XP/8/8.1/10.
More Tips for VR Headsets:
Virtual Desktop For Rift DK2 | Setup Kodi on Gear VR | Things about Gear VR & Oculus Rift
Related Articles:
]]>
For those who get their first Gear VR, they may don’t know how to watch 3D movies on Gear VR via Galaxy S7/S7 Edge. So here, we gathered around all the tips and tricks about viewing 3D movies with Gear VR via Galaxy S7/S7 Edge. We hope it will be helpful.
Gear VR Supported Media Formats
.mp4 .m4v .3gp .3g2 .ts .webm .mkv .wmv .asf .avi .flv. In our opinion, .mkv is best, while audio is aac. Only audio which Android standardly supports work and that is AAC and MP3. AC3 and DTS were removed because of high licensing costs.
Make sure your movies are in 720p. John Carmack said the best format for movies is 720p, and when John Carmack says something, you better listen.
If you find your movie to be not in the right format, you can download video converter program to convert your moviefile for Gear VR playback via S7/S7 Edge. I have personally used Pavtube Video Converter Ultimate, and am still amazed at how well it performs for a freemium program.
In Addition: Apart from Galaxy S7, Samsung Gear VR also works on the following Samsung Galaxy smartphones: Galaxy Note 5, Galaxy S6/S6 Edge/S6 Edge+.
When you make sure your 3D video is supported by Gear VR, you can transfer the 3D videos to Galaxy S7 or Galaxy S7 Edge to view on Gear VR. There are some steps below to teach you how to enjoy 3D movies on Gear VR via S7/S7 Edge successfully.
There are two ways to watch your own video content in the “My Videos” section of Oculus Cinema with Gear VR via Galaxy S7/S7 Edge. First, any movies you record using your Galaxy Galaxy S7/S7 Edge′s camera will automatically appear in the “My Videos” section. The other way is to copy Gear VR compatible video files directly to your Galaxy S7/S7 Edge phone or SD card in any of the following directories:
On your phone’s internal storage (Galaxy S7/S7 Edge):
/DCIM/
/Movies/
/Oculus/Movies/
On your phone’s removable SD card (Card):
/DCIM/
/Movies/
/Oculus/Movies/
On a PC, your S7/S7 Edge’s storage can be accessed from Windows Explorer by simply plugging in the USB data/charging cable – no software is required. On a Mac, files can be transferred to your phone using Android File Transfer (https://www.android.com/filetransfer/), which is a free utility provided by Google.
When downloading 3D movies, you’ll notice that they come in either Side-by-Side (SBS) format, which comes in Full SBS and Half SBS, or Over/Under (or Top/Bottom) format. For the non-techie people, they refer to the resolution of the movies and the way the two frames are separated (vertically for the former and horizontally for the latter).
A Side-by-Side format comes in 1920 x 1080. Full SBS nets you the full resolution in both frames, while Half SBS gives you 960 x 1080 for each frame. On the other hand, the Over/Under format comes in 1280 x 720, with each frame coming in at 1280 x 360.
The Gear VR automatically assumes that all files in the “3D” folder are in the SBS format. If you have a movie in Over/Under format, you must create a text file to have it correctly read. Simply copy and paste the following to Notepad and save it in the EXACT name of the movie:
{
“format”: “3DTB”
}
Yes, the quotes are included. So, Over/Under movies in your 3D movies folder should have two accompanying files: the .png file for the poster image (assuming you got one) and the aforementioned text file.
Except for that last part which borders on the technical side, watching movies on your Gear VR is a simple matter. All you really need to do is copy your movies in the correct folder and you’re good to go.
Convert 2D, 3D TB Video to 3D SBS MP4/MKV for Gear VR viewing via Galaxy S7
Just like we said above, the perfect compatible 3D for Gear VR is SBS MKV and MP4. So if you have some 3D movies download from YIFY, YouTube, forfree3d.com, 3dmoviesstreaming.com or you have some 3D Blu-ray, DVD and want to view these videos on Gear VR via Galaxy S7/S7 Edge, you can use a video transcoder to re-encode videos to 3D SBS for Gear VR.
We aforementioned that we love to use Pavtube Video Converter Ultimate to convert unsupported video to 3D SBS MP4/MKV for Gear VR. Because it can rip all Blu-ray/DVD to 3D SBS MP4/MKV for Gear VR and convert any 4K/SD/HD video, TV shows and music dramas to 3D SBS video for Gear VR viewing on S7/S7 Edge. It offers three kinds of 3D effect: SBS, TB and Anaglyph and can switch 3D effect to another. It can transfer AC3/DTS audio to AAC/MP3 audio file accepted by Gear VR software without quality loss. (Review)
Free download and install
Steps to convert videos to 3D SBS video for Gear VR
Step 1: Import source video.
Run this 3D Video Converter for Gear VR (Mac version)on your computer. For disc-based concent,insert your 3D/2D Blu-ray/DVD movie to disc drive, and click “Load from disc” button to load Blu-ray or DVD from ROM. For video file, click the “Add video” button, browse to computer hard drive and import video into this app.Batch conversion feature allows you to import multiple source videos to converted to Gear VR.
Step 2: Select 3D SBS format for Gear VR
Tap on “Format” bar and find “3D Video”, there are a lot of format options for you. “MP4 Side-by-Side 3D Video (*.mp4)” is recommended for Samsung Gear VR.Or you can choose 3D SBS MKV for Gear VR playing with Galaxy S7/S7 Edge.
Tip: We recommend using 1280×720 HD resolution to encode your videos. Higher resolutions will not provide any better quality, meaning you’ll waste space and processing power.
We also recommend using a higher bit rate than a typical web stream at that resolution, as the pixels in your video will be magnified on the phone’s screen. The optimal bit rate is content dependent, and many videos can get by with less, but 5 Mb/s should give good quality.
While H.264 is the recommended video coding, H.265 videos can also be played.
3D movies should be encoded “full side-by-side” with a 1:1 pixel aspect ratio. Content mastered at 1920×1080 compressed side -by- side 3D should be resampled to 1920×540 resolution full side -by -side resolution.
You can click “Settings” near the “Format” to adjust the video resolution and bitrate to get more compatible format with Gear VR.
Step 3: Convert 3D Content to SBS 3D MP4 for Gear VR
Click “Convert” button, video to SBS 3D MP4 or 3D SBS MKV conversion begins. When the process finishes, open the output folder to locate the 3D SBS video for Gear VR.
Now, setup your Gear VR and put these converted SBS 3D MKV/MP4 video files in the ‘MyVideos’ folder miscroSD of VR Gear and start your theatric 3D experience at home!
Related Articles:
- Play Digital Copy in Galaxy S6 with Gear VR Innovator Edition
- Convert 3D MKV/FLV/YouTube/Blu-Ray To 3D MP4 For ANTVR Kit
- How To Copy ITunes Movies To IPhone 6 For ZEISS VR One?
- Put 3D FLV Contents on Google Cardboard Via Android/iOS Devices
- Convert 3D MKV/FLV/WMV/AVI to Galaxy S5/iPhone 6 For Watching on ZEISS VR One
”Hello! I have a 1080P SBS mkv file, with a resolution of 3840*1080. I have that file in an external USB hard drive, connected with my Samsung Active 3D UE55H6400 smart tv. Whenever I try to play that 3d mkv file with my Samsung 3D TV I get the error that the resolution 3840*1080 is not supported. My TV is Active 3D Full HD. So why can’t I play the movie? Any ideas what I am doing wrong?”
Samsung Active 3D UE55H6400 is a top 3D TV that many users would like to choose. It comes a couple of pairs of Samsung’s SSG-5100 active shutter 3D eyewear. For those who love to watching 3D movies at home, Samsung 3D UE55H6400 Smart TV is a good choice. More thoroughly & accurately, the TV has to be able to handle/support:
1. USB
2. the Filesystem (FAT32, NTFS, etc)
3. the Container (MKV, MP4, AVI, etc)
4. the Video Codec (h.264, Divx/Xvid, MPEG2, DV, etc)
5. the Audio Codec (AAC, AC3, DTS, MP3, etc)
6. the Stereoscopic Layout (SbS, T/B, Interlaced, Dual-stream, Dual-File, etc)
If it does all those for the MKV files you’re using, you are good to go. If not, you will need to re-configure & (likely) recompress. In addition, if the source 3D MKV’s resolution is too big, normal 3D TVs including Samsung Active 3D UE55H6400 TV perhaps can’t handle. Simple as that. Most hardware decoders on 3D TVs have similar HD limitations (usu. due to economizing). Put it easier, if you want to play 3D MKV files on your Samsung Active 3D UE55H6400, make your 3D MKV files in 1-6 your 3D TV supports.
To solve the original question here, you can resize 3D MKV files to 1920×1080 (squeezed, HSBS) for Samsung Active 3D UE55H6400 TV. Half SBS must do the trick, but if you think you have an active 3D TV and would like to watch in Full HD (and not half the resolution). You can try Full SBS (aka 1920×2160). Those dimensions might still be within the decoders’ limitations of Samsung Active 3D UE55H6400 TV (depends on which profile/levels are supported). This way may make you play a Full HD (1920*1080 for both eyes) 3D movie with the internal TV media player on Samsung Active 3D UE55H6400 TV.
You can use Pavtube Video Converter Ultimate to resize the original 3840*1080 3D MKV to 1920*1080 or 1920*2160 3D MKV for your Samsung Active 3D UE55H6400 TV. It also can convert Full SBS 3D MKV to Half SBS 3D MKV, 3D MP4, 3D AVI for Samsung Active 3D UE55H6400. Or it can convert HSBS 3D MKV to Full SBS/TB MKV/MP4/AVI for Samsung Active 3D UE55H6400 playback in 1920*1080 or 1920*2160 resolution. As one of the best 3D Video to TV Converter, it also has the following functions:
– Easily create 3D movies for top 3D TVs including Samsung UE55H6400 3D TV from 2D/3D Blu-ray/DVD with abundant 3D effects: Side by Side, Anaglyph, Top/Bottom.
– Convert 3D ISO, 3D MTS, 3D MOV, 3D WMV, 3D MKV to Samsung LED F6400 Series, Samsung LED F8000 Series, Samsung LED F7500 Series, Samsung LED F7100 Series 3D Smart TV and LG 3D TV, Sony 3D TV, Panasonic 3D TV, etc.
– The 3D Depth of output 3D movies could be adjusted from 20 to 100 for more vivid 3D effect.
– It can help you freely convert between different 3D modes, such as convert between Side by Side (Half-Width/Full), Top and Bottom (Half-Height/Full) and Anaglyph.
– Allows you to choose video codec from H.264, H.265, DivX, XviD, MPEG choices and adjust output video resolution to 3840*2160, 3840*1080, 1920*2160, 1920*1080, 1920*720, 960*540, etc.
– Enables you to choose audio codec to AAC, AC3, MP3, DTS, etc and audio channel to stereo, mono, surround 5.1 channel, 7.1 channel.
Free download and install
How to Make 3D MKV Playable on Samsung Active 3D UE55H6400?
Step 1: Add 3D MKV files
Click “File” > “Add Video” to load your 3D MKV files to the app. Or you can simply drag and drop the 3D MKV files to the 3D MKV to Samsung 3D TV converer. Batch conversion is supported by the 3D MKV converter.
Step 2: Choose 3D format for Samsung H6400 3D TV
Navigate to “Format” > “3D Video” > “MKV Side-by-Side 3D Video (*.mkv)” or “MP4 Side-by-Side 3D Video (*.mp4)” for Samsung UEH6400 3D TV.
Step 3: Adjust 3D MKV/MP4 video resolution
Press on “Settings” icon to open a new window. Here, you can adjust 3D depth, 3D mode, video resolution, video bitrate, video codec, audio codec, audio channel, audio bitrate, etc. If you want to test 3D MKV in 1920*2160 on your Samsung Active 3D UE55H6400, just tap 1920*2160 in “Size” box. Otherwise, just choose 1920*1080 3D MKV which can be played on Samsung Active 3D UE55H6400. Make sure your audio codec is AAC or AC3.

Step 4: Convert 3D MKV for Samsung Active 3D UE55H6400
Finally, click on right-bottom “Convert” button to start to convert 3D MKV to 3D MP4 or 3D MVK with suitable resolution for Samsung Active 3D UE55H6400. After the process, open the output folder to locate the genetated 3D MKV/MP4 video.
Put the 3D MKV/MP4 file to an external USB hard drive then connect with your Samsung Active 3D UE55H6400 smart tv. The 3D MKV/MP4 video should be played on Samsung Active 3D UE55H6400 smart tv successfully. If you still can’t play your 3D MKV on Samsung Active 3D UE55H6400 smart tv, just e-mail us at dvdwinsupport@pavtube.com.
Related Articles:
- Rip and Backup Family DVD to NAS for Viewing via Kodi on Samsung TV 55 inches
- How to Stream DVD from computer to HD TV Using chromecast?
- Get 3D Blu-ray (MVC) onto Plex for Perfect Streaming in Panasonic VT65
- How to Watch Any 4K Video on Sony Bravia 4K TV?
- Convert Oscars Blu-rays to Samsung BD-JM57C Blu-ray Player for Vizio TV