"I’ve got an .mkv file with embedded subtitles, but when I play the movie they look like crap. When I play other movies and DL the subs from OpenSubtitles or whatever, they look way better. Anyoone have any ideas on how to fix this? I’ve not found anything online, and it’s driving me crazy. Thanks for any help!"
Some subtitles are text based (like .srt and .ass) which means KODI renders them onto the screen. These often look great. Other subtitles are graphic /video based (like original DVD VOBSUB and BluRay PGS subtitles) and can look pretty bad as KODI has no control over them (they are simply a video containing the subtitles to be overlaid onto the picture). So when your MKV video is played with bad subtitles in Kodi, you can do as below shown.
Step 1: Check MKV subtitle format
You can use a program like Media Info to check what type of subtitles they are. You can enter into Media Info official site from here: https://mediaarea.net/en/MediaInfo
Step 2: Add Subtitle Add-on in Kodi
If your MKV subtitles are VOBSub and Blu-ray PGS graphic subtitles, you should use SRT subtitles. You can try downloading and installing any of the Subtitle add-ons that will download new .srt in the same folder as your movie in Kodi. OpenSubtitles.org is suggested here.
To install this add-on you must do so from the Add-on manager from within Kodi by going to:
- Settings
- Add-ons
- Install from repository (v15/v16) / Get add-ons (v14)
- Kodi add-on repository
- Subtitle services
- OpenSubtitles.org
- Install
Apart from installing subtitle add-on, you also can download subtitles from subtitle sites online on your own and name the subtitle files as the same name as the video files then put the subtitle files in the same folder as your movie manually. Below are some eputable Subtitle Download Sites.
Top 10 Subtitle Download Sites
|
No. |
Subtitle Sites | Overview |
|---|---|---|
1 |
This site has the biggest advantage of offering many languages for movies subtitles. If you want the latest one in the market, the search options allow for that as well as those that have been downloaded for many times. | |
2 |
The search for subtitles in this site is very simple once you know the right name and title. Furthermore, you will have the choice of using language to sieve your results to a manageable number. If you want to upload a movie subtitle or even rate it, subscene.com will allow for all that. | |
3 |
This site has subtitles arranged in an orderly manner. There are those from 0-9 in the numerical order while others are arranged alphabetically from A-Z. You will have the freedom to choose the one that suits your movies. | |
4 |
It is well detailed with crucial information on all the latest movie subtitles in the market. There is the date of release, title of the movie, language used and its uploader. That makes it easy for you to choose the best subtitles to download. | |
5 |
There are thousands of movie subtitles that you will come across at Opensubtitles.org/en. Language is the most effective option for making searches and downloading is done in a direct manner. It is also possible to upload fresh movie subtitles using this site. | |
6 |
All 4 DIVX does not link directly to subtitle files, it provides links to other independent web page that host subtitles files. This is a perfect subtitles download site, worth to have a free trying. | |
7 |
At SubsMax, there are over one million subtitles that you can use for thousands of movies. You just need to make searches using the right language and names to end up with the most suited one for your use. This site allows for uploading of new subtitles. | |
8 |
This is a more limited site form where you can download subtitles for movies and TV series. They have only two languages; Greek and English with the common format being DVDrip. | |
9 |
This is one of the popular sites where TV shows and movies subtitles can be downloaded for free and in a stress-free manner. They always have the most popular links and other relevant links to use in downloading suitable subtitles. | |
10 |
This site supports three main formats namely XviD, DivX and x264. They are all well suited for TV series and movies so make sure your searches are precise in relation to quality and language. |
When you download subtitles and want to attach external subtitles to videos, you can refer to these guides:
- Burn Subtitles To 1080P X264 MKV Video Permanently
- Add SRT/ASS/SSA Subtitles to MP4 Video – Pavtube Studio
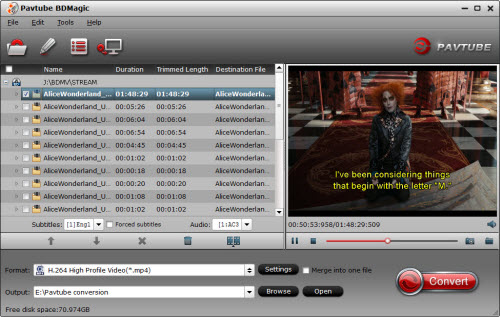
Convert MKV PGS subtitles and VOBSub to MKV SRT subtitles
Apart from download subtitles from sites, you also can directly convert MKV PGS subtitle and DVD VOBSub to srt subtitles directly with some subtitle converter. SupRip lets you OCR and detect text within subtitles as used by HD-DVD and Bluray movies. You can then save the text as a SRT file to be included in reencoded movies.
Download: Download SupRip 1.16
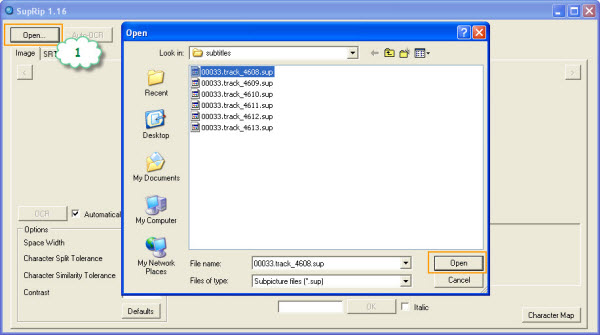
Step 1. Start SupRip, load the SUP file with the “Open” button.
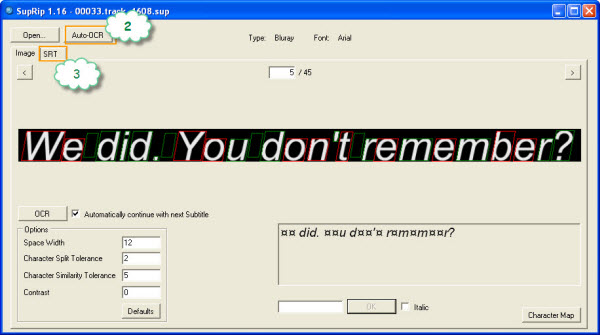
Step 2. Click “Auto-OCR” to automatically scan the whole file and leave any unknown characters alone.
Step 3. Go to the SRT tab.
Step 4. Review the subtitles and statistics. Change some options there if you want.
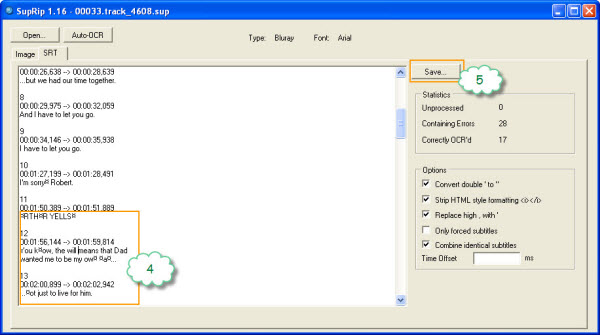
Step 5. Save the SRT file with the “Save” button.
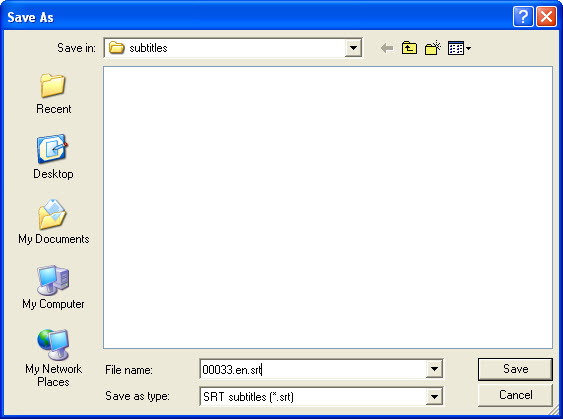
How to name multiple srt files so that the language shows to select:
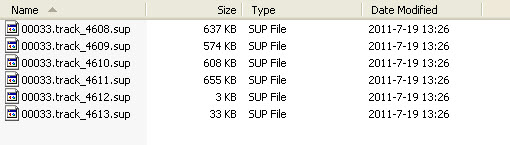
1. name the subtitles exactly as the video stream. E.g. 00033.m2ts-> 00033.srt
2. give an id to subtitles with different languages. E.g. name English subtitles xxx.en.srt and German subtitles xxx.de.srt
Learn More:
If your MKV is ripped from Blu-ray and DVD, Pavtube ByteCopy/Pavtube ByteCopy for Mac can directly help you extract SRT subtitles from Blu-ray and DVD movies and it also allows you to add external srt/ass/ssa subtitles to Blu-ray and DVD movies. It can directly convert Blu-ray to lossless MKV with converting Blu-ray PGS subtitles to DVDSUB. If you only want subtitles when actors are saying a foreign language, you also can rip Blu-ray and DVD with forced subtitles.


Related Articles:
]]>
Does Kodi support H.265/HEVC? Actualy, the short answer should be YES. Kodi gives its explanation about HEVC supporting on Wiki as below:
H.265/HEVC Support in Kodi
Kodi v14 introduced software decoding support for HEVC. Kodi v15 introduced limited hardware decoding support for some devices, such as a few Android-based video decoders, for Linux on Amlogic SoCs and for Windows via DXVA. Kodi v16 further improved hardware decoding on Android and Windows and introduced it via VAAPI and VDPAU API on linux. Most HTPCs do not have hardware decoding support for HEVC, so they will need a fairly powerful desktop class CPU in order to playback HEVC videos.
So, the reasons for Kodi H.265/HEVC playback issues will be various.When you can’t play H.265/HEVC files on Kodi, you can try the mothods below.
Method 1: Upgrade older Kodi version to the latest Kodi v16/v17 beta
Kodi uses ffmpeg as its video decoder, so I’d guess that whatever version of Kodi you are running is using an older version of ffmpeg. Try using the latest Kodi v16 beta (beta 2 currently) which may have improved performance. You might also give OpenELEC a try if you don’t need Windows, since it’s far more optimal than Windows for running Kodi (esp the Intel/VAAPI/EGL builds)
Method 2: Set the video cache
If you have some issues popped up – got a bunch of HEVC/H.265 files and the audio was severely behind and your PC has no hardware support either. You can drop a RAM in it and set the video cache to something like 4 or 5 GB. Afterward, the video playback / audio sync was a non issue again. Audio sync seemed to be more prevalent in movies than tv shows encoded.
Method 3: Install Hevc Bluray add-on in Kodi
Hevc Bluray is a new add-on that is available through the Entertainment repo. It is a great add-on for Movies new & old in HD 720p, 1080p & 3D in High Efficiency Video Coding (HEVC). Also has some 1080p tv episodes. Read Top 15 Addons for kodi 2016
This add-on is not supported by the KodiTeam or XBMC foundation. Please do not post questions on the forum.kodi.tv website relating to this add-on
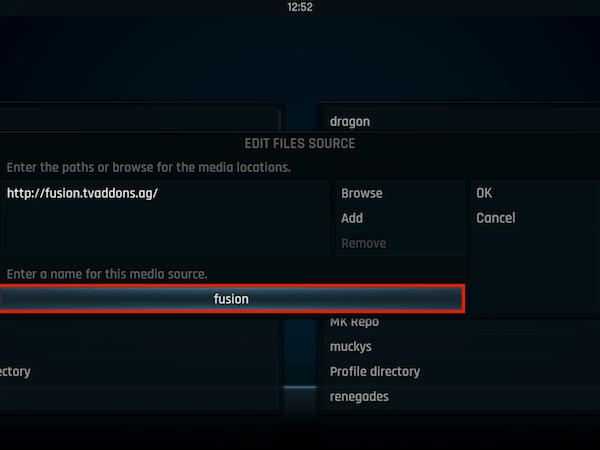
- Open Kodi
- Select SYSTEM > File Manager
- Select Add Source
- Select None
- Type the following EXACTLY http://fusion.tvaddons.ag and select Done
- Highlight the box underneath Enter a name for this media Source & type fusion
- Select OK
- Go back to your Home Screen
- Select SYSTEM
- Select Add-Ons
- Select Install from zip file
- Select fusion
- Select xbmc-repos
- Select english
- Select repository.entertainmentrepobackup-x.x.x.zip
- Wait for Add-on enabled notification
- Select Install from repository or Get Add-Ons on Helix
- Select Entertainment Repo
- Select Video Add-Ons
- Select HevcBluray
- Select Install
- Wait for Add-on enabled notification
HevcBluray is now installed and ready to use. As usual the add-on can be accessed via VIDEOS > Add-Ons > HevcBluray
Method 4: Transcode H.265 to H.264 for Kodi
If you tried all the ways above and still can’t play H.265 videos with Kodi, this way must be effective. You can re-encode H.265 video to H.264 video for Kodi playback. With Pavtube Video Converter Ultimate, you can easily convert H.265/HEVC video to H.264/AVC files. This video transcoder can transcode H.265 MKV, H.265 MP4 and other H.265 files to H.264 MKV, H.264 MP4 for Kodi playing. It even can convert 2D video to SBS 3D for Kodi 3D playback. Pavtube Video Converter Ultimate is also a Blu-ray Ripper that can bypass Blu-ray AACS, BD+, up to MKV V61 and MKB V62 to convert H.264/AVC and H.265/HEVC Blu-ray to H.264 MP4/MKV for Kodi.


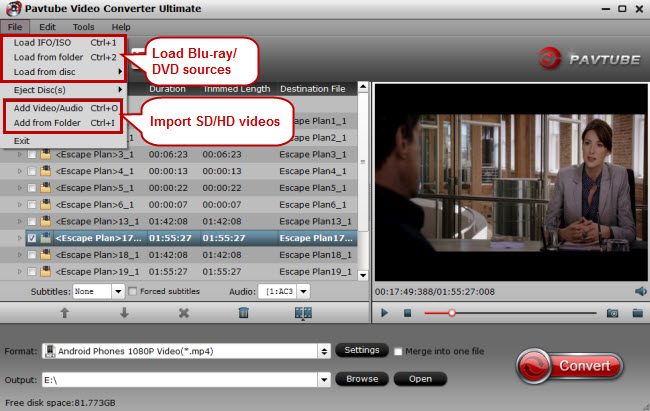
Step 1. Import H.265 video files.
Launch H.265 to H.264 converter on Windows. click “File” to import your H.265 video files. If you want to convert H.265/H.264 Blu-ray to Kodi, you need a Blu-ray drive to read Blu-ray disc.

Step 2. Choose target format
Click “Format” bar to open the format profile list, you can choose H.264 video from “Common Video” and “HD Video” categories. Each category contains many format, like MP4, MOV, AVI, etc. You can choose any one you need. Here, we take H.264 MP4 as instance.
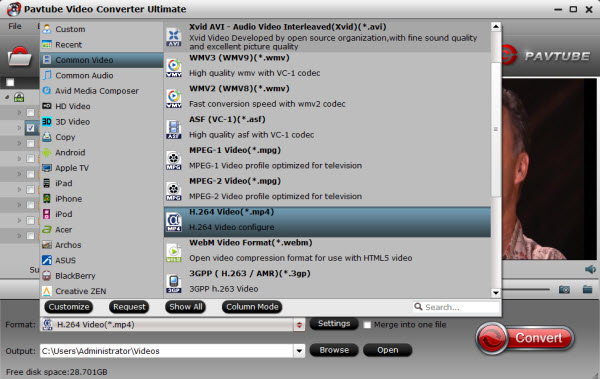
Tip: You are allowed to adjust video and audio parameters if you are not satisfied with the default settings. Presets like size, bitrate, frame rate, audio channels, etc. can be customized in your own way.
Step 3. Start transcoding H.265/HEVC video files to H.264/AVC MP4 for Kodi
Now hit on the “Convert” button on software main interface to start the H.265 to H.264 conversion. When it finished, just open the output folder to find the generated video.
If your Kodi and hardware is normal, there won’t be any issues to play H.264 video on Kodi. In addition, Pavtube Video Converter Ultimate also can convert VC-1 MKV to Kodi, compress 4K to Kodi and even rip any DVD to Kodi.
Hope you can solve your problem of Kodi can’t play H.265/HEVC files here.
Related Articles:
- Rip Blu-ray to NAS for HiMedia Q5/Q10 Pro Playing with Kodi
- Copy Blu-ray to MKV for using Kodi on Open Hour
- Copy Blu-ray to Kodi Playing on Sony Android TV
- Rip and Backup Family DVD to NAS for Viewing via Kodi on Samsung TV 55 inches
- Play iTunes Movies/TV Shows with Kodi/XBMC Media Player
Related articles
]]>


So how to rip DVD to PC for kodi streaming around house? Of course, you need a DVD Decrypter in that standard commercial DVDs have protection. DVD Ripper can remove DVD copy protection and convert DVD to Kodi supported media. Web searching "DVD to Kodi converter", you will be recommended many softwares.
Through comparing and testing, we finally suggest you Pavtube ByteCopy, I remove the copy protection from DVD and backup DVD to PC in Kodi format like MP4, MKV, MOV, AVI, etc. It can quickly remove DVD encryption including CSS, region code, RCE, Sony ArccOS, UOPs, Disney x-project DRM, etc and copy, rip, convert DVD to computer hard drive for kodi streaming throughout the house.
Main features of ByteCopy:
- Best DVD ripping software on the market
- Rip DVD to Kodi supported file formats
- Rip and convert DVD movies to MP4/AVI/MKV/WMV,etc with high quality.
- Makes 1:1 copy of original DVD Disc without quality loss with all audio streams, subtitle tracks, extras, etc.
- With CUDA/AMD GPU acceleration, and you will take short time of converting and get hours of enjoyments.
It’s simple to use and well worth the investment.- Also supports to rip Blu-ray to Kodi.
- Rip DVD to lossless/uncompressed MKV
- Convert DVD to multi-track MP4 for Kodi.
You can free download and install here:
How to Rip DVD to PC for Kodi Streaming Around House?
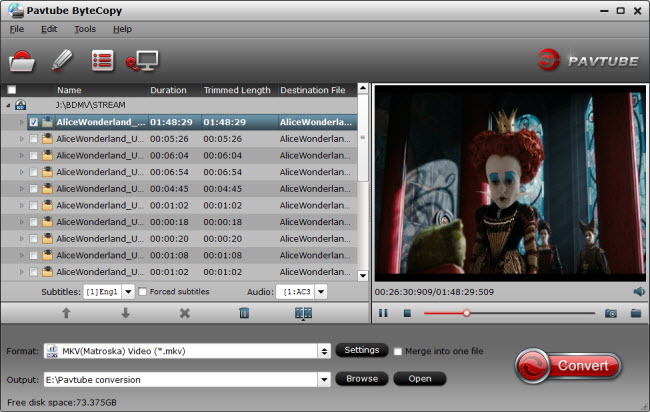
Step 1: Install ByteCopy and Load DVD.
Free download Pavtube ByteCopy, install and launch it. Insert DVD into disc drive, click the “Load file(s)” icon to browse to disc drive and import DVD into this app.
Note: If you are using a Mac, Please download Pavtube ByteCopy for Mac.
Step 2: Select video format and set profile.
Choose from “Format” menu for Kodi playable video. In order to get Kodi file, you are suggested to follow the path “HD Video” > “MP4 HD Video(*.mp4)” as output format.If you want to rip DVD to Kodi with multiple subtitle and audio tracks, you can choose multi-track MP4 from "Multi-track Video".

Tip: Parameters including video codec, video file size, bitrate, frame rate, audio sample rate, audio channels, and more in Settings can be reset to get a satisfying video/audio enjoyment on Kodi.
Step 3: Start to backup DVD to PC for Kodi
Click the big “Convert” to start the conversion. The conversion speed also depends on your computer configuration. My suggestion is not to play nor edit videos when it’s converting. After conversion, click “Open” or “Open output folder” to quick locate converted files.
Once you have ripped your DVD movie to PC hard drive in MP4, it is time to add it to your Kodi movie library as the part one steps. After that, you just can freely enjoy all your DVD movies on Kodi around your house.
Related Articles:
]]>Similar Search: Blu-ray to Kodi | 4K to Kodi | DVD to Kodi | iTunes to Kodi
Problems of VC-1 mkvs playback issue in Kodi
“Hi all, I’m experiencing issues with mkv files encoded in VC-1 (Blu-ray rips) in Kodi. Playback’s fine for a few minutes then it gets all jittery/stuttering.” – From wetekforums.com
“I have a kdlinks a300 and am having issues playing blu-ray rips in Kodi 15.2. All of my files were created with Make MKV, but I’ve noticed that the ones that are h.264 seem to play fine, while the ones that are VC-1 stutter and artifact and play at a low frame rate – around 13 fps or so – making them unwatchable. The audio seems to work okay, but the video looks terrible.” – From forum.kodi.tv
“I have recently built a HTPC in which I’m using the on board Intel 4600 graphics. All my blu rays are folder rips , the majority of which play perfectly OK. However, all the VC1 format movies are unwatchable in Kodi with severe blocking and flashing artefacts.” – From forum.kodi.tv
“Hi, I am experiencing playback problems with VC1 mkv’s using XBMC. I have tried same source files in powerdvd and they work fine.” – From forum.kodi.tv.
From all the AC-1 MKVs troubles in Kodi, you can see when you change changed Kodi to PowerDVD, your AC-1 MKVs can be played fine. So the main reason is likely Kodi problem. When you meet AC-1 MKVs playback issue in Kodi, you can download MX Player App and try playback from a USB stick to Eliminate Kodi from the equation.
Or software decoding should be used to change AC-1 to H.264 cause Kodi can play H.264 MKV finely.
Pavtube Video Converter Ultimate is recommended here to help you convert AC-1 mkvs to H.264 for Kodi/XBMC playing. This video encoder/decoder can convert AC-1 MKVs, even AC-1 Blu-ray to H.264 MP4, MKV to play in Kodi on Amazon Fire TV (2015), Open Hour Chameleon, Nvidia Shield, etc. It allows you to adjust video bitrate, frame rate, codec, size and audio channel, bitrate, sample rate, codec so that you can change your 23.976 AC-1 MKVs to lower 24 fps for Kodi. It has more other functions, you can read its review.
If you are using a Mac, please turn to the equivalent Pavtube iMedia Converter for Mac which can help you remux AC-1 MKVs to H.264 video for Kodi on Mac OS X 10.11 El Capitan, Mac OS X 10.10 Yosemite, 10.9 Mavericks, 10.8 Mountain Lion, 10.7 Lion, 10.6 Snow Leopard, 10.5 Leopard. learn >>the top 5 reasons to choose Pavtube iMedia Converter for Mac.
Free download and install
How to Convert AC-1 MKVs to H.264 for Kodi?
Step 1. Import AC-1 MKV videos
This program offers you two ways to upload your AC-1 MKV videos. You can either click the “Files” button to browse your hard disk or local directories and load the target files or simply drag your localAC-1 MKV videos onto the interface. The software supports batch conversion.

Step 2: Choose H.264 Codec vidoe for Kodi
Click “Format” to open the drop-down list. Here you can choose HD MKV or HD H.264 MP4 video for Kodi playback.
Note: The newest Kodi version supports H.265, so you can choose “Format > HD Video” to select “H.265 Video (*.mp4)” as the output format.
Step 3: Custom Video (Optional)
If needed, you can open “Settings” window. Here you can make sure the output video size to be 1080p. And you can adjust video frame rate from 30 to 24 or other number.

Step 4. Convert AC-1 MKVs to Kodi
Click the “Convert” button at the bottom-right corner of the interface to convert the AC-1 MKV files to your Kodi. This Video Converter will finish AC-1 MKV video to Kodi supported video conversion in just a few minutes.
After transcoded AC-1 MKVs to H.264 video, your Kodi on Amazon Fire TV, Open Hour, Samsung TV, Nvidia Shield, etc should be able to play them finelly.
Hot News!!: Pavtube Studio is holding on Summer Vacation Promotion. In the promotion period, you can get $10 Amazon gift card only if you are the first 30 people to buy Pavtube Video Converter Ultimate. You can contact our customers service staff after you purchased the software at support@pavtube.com.
Warm Tip: If you use Pavtube ByteCopy for Windows/Mac, you can directly rip Blu-ray to H.264 MKV then you won’t have MKVs playback issue in Kodi.
Related Articles:
]]>
As of version 14, XBMC has been renamed “Kodi”. If users have XBMC v13 installed, they can install Kodi separately to use its beautiful unified interface to enjoy pictures, videos and music. Both versions can be installed to provide users with greater choice.
“Multimedia entertainment has become a major part of QNAP NAS, and we will continue to offer up-to-date applications and technology to provide our users with the best multimedia experience,” said Ken Cheah, product manager of QNAP.
QNAP will also rename XBMC v13 to “HD Player” in its HD Station platform. HD Player introduces a revamped user interface for more intuitive operations and integrates the QTS Media Library and user authentication for securing NAS data.
HD Station is a free app available in QTS, and integrates multiple applications including Kodi, HD Player, YouTube, Spotify, Google Chrome, Mozilla Firefox, DeaDBeeF, and more. By installing HD Station and connecting the QNAP NAS to an HDMI display, users can directly enjoy the video, music and photo collections stored on their QNAP NAS, surf the web, and even control the entire experience from their mobile devices.
Availability
Kodi is available for the following QNAP NAS models:
TS-251, TS-451, TS-451S, TS-651, TS-851, HS-251, TS-253 Pro, TS-453 Pro, TS-653 Pro, TS-853 Pro, SS-453 Pro, SS-853 Pro, TS-EC880U-RP, TS-EC1280U-RP, TS-EC1680U-RP, TS-EC2480U-RP, TS-EC880 Pro, TS-EC1080 Pro, TVS-EC880, TVS-EC1080, TVS-EC1080+, TVS-471, TVS-671, TVS-871, TVS-871U-RP, TVS-1271U-RP, TS-470, TS-670, TS-870, TS-470 Pro, TS-670 Pro, TS-870 Pro, TS-879U-RP, TS-1279U-RP, TS-1679U-RP, TS-879 Pro, TS-1079 Pro, TS-470U-RP/-SP, TS-870U-RP, TS-1270U-RP, IS-400 Pro
Kodi for TVS-x63 series will be available in end of this April.
Go to the App Center to download from the QNAP website
For more information regarding the full QNAP NAS lineup, including where to buy, please visit www.qnap.com.
About QNAP Inc.
QNAP, Inc., as its brand promise “Quality Network Appliance Provider”, aims to deliver comprehensive offerings of cutting edge network attached storage (NAS) and network video recorder (NVR) solutions featured with ease-of-use, robust operation, large storage capacity, and trustworthy reliability. QNAP integrates technologies and designs to bring forth quality products that effectively improve business efficiency on file sharing, virtualization applications, storage management and surveillance in the business environments, as well as enrich entertainment life for home users with the offering of a fun multimedia center experience. Headquartered in Taipei, QNAP delivers its solutions to the global market with nonstop innovation. More information is at www.qnap.com.
Source: https://www.qnap.com/i/useng/news/con_show.php?op=showone&cid=416
Check out More Guides on Kodi
- Play 4K on Kodi – Install 4K Media Add-On for Kodi
- Rip and Backup Family DVD to NAS for Viewing via Kodi on Samsung TV 55 inches
- Top 15 Addons for kodi 2016
- How to Add Incompatible MOV videos to Kodi for playing?
- Watch 3D Movies on 3D TV via Kodi
- Play iTunes Movies/TV Shows with Kodi/XBMC Media Player
- How to Add Videos and DVD Movies to Kodi (XBMC) Movie Library?
- How to Watch Encrypted Blu-ray on Kodi via USB Flash Drive?
- Play DVD IFO ISO on Kodi
- Watch Blu-ray to Kodi for Amazon Fire TV 2
The content is dual audio. There is a link at the top of each section saying click to change audio. If that doesn’t work then you can change the audio stream when the content is streaming via the context menu.
To Install:
● Download the Pipcan Repo and save to a location you can easily access from your Kodi device
● Open Kodi
● Select SYSTEM
● Select Add-Ons
● Select Install from zip file
● Navigate to where you downloaded the zip in the first step and select repository.pipcan-1.0.1.zip
● Wait for Add-on enabled notification
● Select Get Add-Ons or Install from repository on Isengard
● Select My Kodi Repo
● Select Video Add-Ons
● Select 4K Media
● Select Install
● Wait for Add-on enabled notification
The 4K Media add-on is now installed and ready to use. As usual the add-on now can be accessed via VIDEOS > Add-Ons > 4K Media from your home screen.
Src: https://seo-michael.co.uk/tutorial-how-to-install-4k-media-add-on-for-kodi/
Best 4K to Kodi Converter to Compress 4K to 1080P for Kodi
If you don’t insist on 4K resolution on Kodi but just want to play your 4K source on Kodi, there is a another way to help you – compress 4K to 1080P for Kodi with Pavtube Video Converter Ultimate:
Features
- Compress 4K to 1080P, 720P video for Kodi
- Batch convert 4K MP4/MKV/AVI, etc to Kodi supported MP4, MKV, AVI format in 1080p
- Add SRT/ASS/SSA subtitle to video while transcoding 4K to Kodi
- Cut out unwanted segment in 4K video
- Enables users to get rid of the black edges and unwanted area of the 4K file
- You can add images or videos as watermark onto selected 4K video file. The location can also be set by dragging on the preview screen.
- Compatible with Windows 2003/XP/Vista/Windows 7/Windows 8/Windows 8.1/Windows 10
- Has the equivalent Mac version which can make you compress 4K to Kodi supported 1080p on Mac OS X El Capitan, Yosemite, etc.
>> Read in-depth tutorial
Screenshot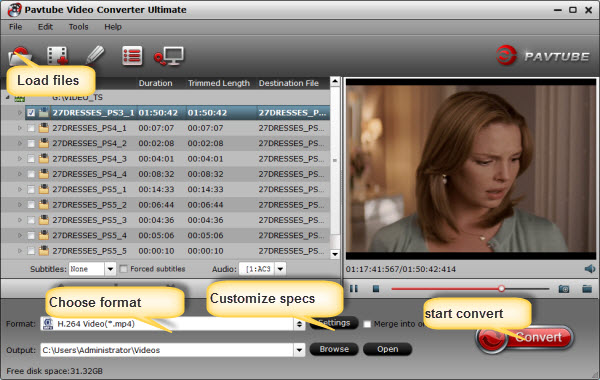
Download links:
– Pavtube new official address: http://www.multipelife.com/download/video-converter-ultimate/video_converter_ultimate_setup.exe
– Pavtube old official address: http://www.pavtube.cn/blu-ray-video-converter-ultimate/
– Cnet Download: http://download.cnet.com/Pavtube-Video-Converter-Ultimate/3000-2194_4-75938564.html
Check out other Kodi posts; you’ll find plenty to improve your Kodi experience
- Rip and Backup Family DVD to NAS for Viewing via Kodi on Samsung TV 55 inches
- Watch 3D Movies on 3D TV via Kodi
- How to Add Incompatible MOV videos to Kodi for playing?
- Play iTunes Movies/TV Shows with Kodi/XBMC Media Player
- How to Add Videos and DVD Movies to Kodi (XBMC) Movie Library?
- How to Watch Encrypted Blu-ray on Kodi via USB Flash Drive?
- How to Play Video_TS Folder Files on Fire TV with Kodi Windows Mac
- Use QNAP NAS on a TV Via HD Station and Kodi
- Stream Video from Kodi/XBMC to Chromecast
“I want to convert family DVD to MP4 video film to be put on a NAS for Media playback into the entertainment room, on the TV, at my house (personal use). Also, some commercial DVD that we bought and want to make them available also on my NAS so that I can play them with Kodi Media Player on the Samsung TV 55 inches connected directly to the NAS thru HDMI..”
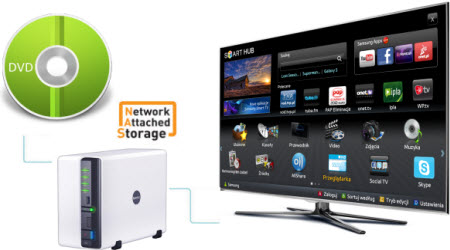
If your DVD have no copy protection, Handbrake would be a nice choice for its free. But for commercial DVDs, you have to search for a powerful enough DVD Ripper that can succeed in breaking down the DVD encryption. Pavtube BDMagic should be your first consideration. It can convert any commercial and region-locked DVD to NAS with both Kodi and Samsung TV supported format. What’s more, it has optimized preset for Samsung TV so that you needn’t adjust video/audio size, bitrate, frame rate, channel on your own in “Settings”.
Hot Search: Sony 4K XAVCS on Samsung TV | Blu-ray on Samsung 4K TV | MKV to Samsung TV
Free download and install:
Other Download:
– Pavtube old official address: http://www.pavtube.cn/blu-ray-ripper/
– Cnet Download: http://download.cnet.com/Pavtube-BDMagic/3000-7970_4-75922877.html
How to Convert Family DVD to NAS for Viewing via Kodi on Samsung TV 55 inches?
Step 1. Add DVD disc movies.
Insert yourDVD disc into an DVD drive, run the program on your computer, on the main interface click “File” > “Load from disc” to import the DVD disc to the program.
Step 2: Specify output file format.
Click “Format” drop-down bar, scroll down to select “TVS” > “Samsung TV (*.MP4)” as the output file format for directly playing on Samsung TV.

Step 3: Start DVD to Samsung TV format conversion process.
One click the big button “Convert” on bottom-right corner to start conversion.
After the conversion, click Open button to find the output files. Make sure the wireless network connection is accessible among the NAS and Samsung TV. Then just enjoy the high quality DVD movies with Kodi player on Samsung TV.
Get Christmas Pavtube BDMAgic Coupon on Pavtube Official Site and Pavtube Facebook.
Related Articles: ]]>

As with the other ‘best of’ pages this will be a constantly updated page where I will add any new add-ons that come along and remove any old ones that go down.
Genesis – An add-on that everybody knows. This is without a doubt the most popular add-on for Kodi. Great features include: integrates well with Trakt and IMDB; Kodi Library integration; add accounts from Real Debrid, Ororo TV and many more; allows downloads
SALTS – Another of the more popular movie add-ons for Kodi. Features include: Trakt integration; Kodi Library integration; allows downloads; enable/disable scrapers
123Movies – A nice one click and watch movie add-on from the Mucky Duck repo
1Channel – One of the oldest movie add-ons but still going strong and very popular. Features include: Kodi Library integration
Movie Night – A decent source for one click movies. Available through the Metal Kettle repo
HuluBox – For fans of the one click and watch type add-ons this is a good choice. Categorised in genres and recently added.
IceFilms – Everybody nows IceFilms, nothing really needs to be said about this except for you will find everything you want. Features include: Add Real Debrid account; Downloads; Create watch queue; Resume support
Latest Dude – A relatively new add-on but a nice option for 1080 and 720 movies
Movie4k.to – Nice movie add-on that gets content from the Movie4k.to website. (Updated Dec 4th)
Movie Hut – Another relatively new movie add-on. Nothing great but something you can fall back on for reliability.
Navi-X – You can search for any movie on here and find lots of different versions including 3D, 4K, 1080
Phoenix – One of the most famous Kodi add-ons. This has various sections ran by different members of the Kodi community. The Rockcrusher section is constantly updated with high quality movies. The Her Place section offers a more female-friendly choice of movies (I know you ladies like the same as us but there are some which you definitely prefer more), there is also a kids section in Her Place too. The One242415 section offers a nice set of collections for those who like to browse by genre. The Staael section offers HD movies from 2013, 2014 & 2015 (Updated Dec 4th)
UK Turks – There are 2 sections in here dedicated to movies: Classic Movies and Turkish movies. The classic movies section offers classic movies from various genres and decades and the Turkish section offers Turkish movies
Yify Movies HD – The name of the add-on is slightly misleading as it’s not HD quality, it’s good and movies load quickly and it is a one click and watch rather than click and pick a source. A decent add-on to have.
XMovies8 – A nice one click movie add-on from Metal Kettle. Gets content from the xmovies.co website (Updated Dec 4th)
Source: https://seo-michael.co.uk/the-best-movie-add-ons-for-kodi/
Check out other Kodi Articles:
- How to re-encode MKV to MP4 for Roku 3?
- Play Blu-ray via Kodi in MKV With DTS 5.1 Audio
- Watch 3D Movies on 3D TV via Kodi
- Play iTunes Movies/TV Shows with Kodi/XBMC Media Player
- How to Add Videos and DVD Movies to Kodi (XBMC) Movie Library?
- How to Watch Encrypted Blu-ray on Kodi via USB Flash Drive?
- How to Play Blu-ray Movie on XBMC Kodi
- Hot Search: MKV to Kodi| iTunes Movies to Kodi | DVD to Kodi | Passthrough AC3 DTS with Kodi | ISO to Kodi
Tutorial How to Install Phoenix Kodi XBMC
- Open Kodi
- Select SYSTEM > File Manager
- Select Add Source
- Select None

- Type the following EXACTLY http://fusion.tvaddons.ag and select Done

- Highlight the box underneath Enter a name for this media Source & type fusion
 h
h
- Select OK

- Go back to your Home Screen then slect SYSTEM.
- Select Add-Ons

- Select Install from zip file

- Select fusion

- Select xbmc-repos

- Select english. Select repository.xbmchub-x.x.x.zip

- Wait for Add-on enabled notification

- Select Get Add-Ons or Install from repository on Isengard

- Select TVADDONS.ag Addon Repository

- Select Video Add-Ons

- Select Phoenix
- Select Install

- Wait for Add-on enabled notification

Phoenix is now installed and ready to use. Once you have it installed, check out the 3D movies on Kodi that Phoenix and staael2014 have available. Access Phoenix from your video add-ons and then go into the staael2014 section and then click on the 3D Movies section.
When you hit the 3D button on your TV Remote (if you run Kodi off a Kodi box through your TV) or enable 3D on whatever display you use, your side by side image will convert into a properly 3D overlay and you can put on your 3D glasses and watch! This is a great solution to make use of your 3D TV.
From the feedbacks in koditips.com, many people respond that after they installed the add-on, they get something like stream unplayable. Some even can’t load the 3D movies at all. Please ensure that your Phoenix must be 2.0 or higher and make sure your internet connection runs well. After that if you still have the problem with 3D films, maybe you should try a video converter.
With Pavtube Video Converter Ultimate, you can convert any 3D films to Kodi supported 3D format with excellent video quality. You can download some 3D movies to hard drive from some torrent sites and transcode them to 3D SBS MP4 for Kodi. This won’t cost you any money on Blu-ray disc cause you can download Blu-rays in “FHD3D” format from internet.
For Mac users, the equivalent product is iMedia Converter for Mac, which has updated to support OS X El Capitan.
Free Download Pavtube Video Converter Ultimate:
Other Download:
– Pavtube old official address: http://www.pavtube.cn/blu-ray-video-converter-ultimate/
– Cnet Download: http://download.cnet.com/Pavtube-Video-Converter-Ultimate/3000-2194_4-75938564.html
How to convert 3D movies to Kodi with 3D video converter?
Step 1: Add source video
For disc users, click “Load from disc” to insert your Blu-ray/DVD movies to the software while you can simply drag and drop the 3D movies on computer hard drive to the app.
Step 2: Select output format and folder
For outputting 3D SBS MP4 for playing 3D via Kodi on 3D TV, you can choose “MP4 Side-by-Side 3D Video(*.mp4) ” under “3D Video” category. Then turn to “Browse”to decide the output folder.
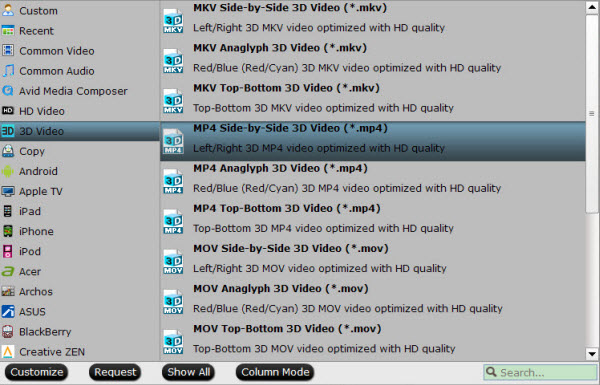
Tip: The most common Side-by-Side 3D TV format is the Side-by-Side Half where each sub-frame occupies just half the horizontal resolution of a full HD frame, resulting in a 3D image with 960pixels by 1080 lines instead of the 1920×1080 required for full 1080p content. This simplifies the electronics while making it compatible with HDMI 1.3 devices. So click “Settings” to make sure the video size is 1920×1080 for Half SBS.

Step 4; Finish the conversion
Simply click “Convert” on the interface to finish the 3D video conversion for 3D TV. You can locate the generated 3D content in output folder.
Add 3D Movies to Kodi
Step 1: Download and install Kodi on your computer. After that, open Kodi.
Step 2: Select “Videos” in the home screen menu.

Step 3: Seclect Files, then select “Add Videos”.
Step 4: Click on “Browse” button. From This requester you can select the location where your Movies are located on your system. You can also choose a network drive if your Movies are there, this tutorial will use the network drive option and we will select “Windows network (SMB)”.
Step 5: In the next screen you should see the directories within your selected directory. If this is the right directory select “OK”. If all is ok then select “OK” again. In the next screen is where we tell Kodi what our source directory contains, in this case its “(Movies)”. When your happy with the settings select “OK”.
Step 6: Next screen is refresh info for contents of selected directory, select “Yes”. When you’ve selected ok you will be presented with this next screen, keep an eye on very top almost to the right as this updates the database with info about the films it finds. This item can take a long time depending on how many Movies you have in your collection.
Step 7: When finished, some your movie library should be listed on the interface.
Now, try play 3D movies on Kodi and it should work.
Related Articles:
]]>Many of you may wonder why there’s no iTunes movie channels available on Kodi. Here in the following article we’ll introduce a simple way for you who like to buy movies and TV shows from iTunes to stream iTunes videos via XBMC for watching.
Although XBMC supports most common audio and video formats, we can’t deny the fact that it won’t play any DRM-protected videos purchased from iTunes Store since the iTunes movies are protected-M4V files and restricted to be played on Apple’s devices only. See video formats supported by XBMC as below.
XBMC Support Video Formats: MPEG-1, MPEG-2, H.263, MPEG-4 SP and ASP, MPEG-4 AVC (H.264), HuffYUV, Indeo, MJPEG, RealVideo, RMVB, Sorenson, WMV, Cinepak.
Hot Search: Best Home Media Servers in 2015 | Blu-rays to XBMC | HD Videos to XBMC | Video_TS Folder to Kodi |
Top Solution to View iTunes Movies via XBMC(Kodi)
To accomplish this goal, Pavtube best DRM Converter and Removal – ChewTune is highly recommended for its easy-to-use interface, straight workflow and reliable video quality. It can easily get rid of Apple’s DRM protection from those iTunes downloaded m4v video, and transfer it to various video formats including MP4 profiles for XBMC. (Here is the review).
Step by Step Guide on Converting iTunes DRM M4V for Kodi(XBMC) Player
Step 1. Download Pavtube ChewTune as the Best DRM removal software. 

There would be a command window pop up during the installation to install specific soundcard drive for DRM Removal, please do not shut down it and let it running until the installation completed. 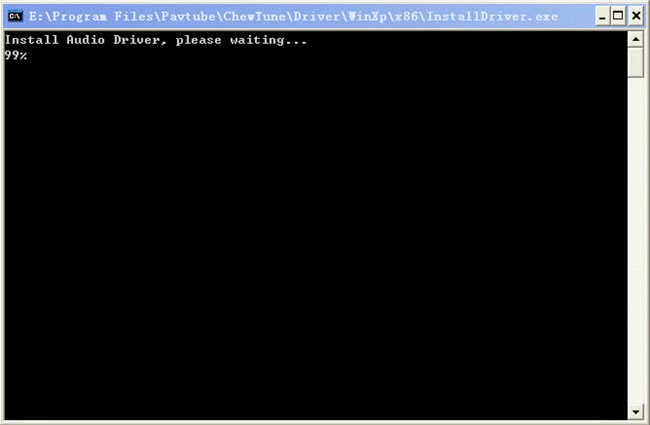
Step 2. Run Pavtube ChewTune, drag and drop the source iTunes video and music from local computer to ChewTune. Or hit the “Add Video” button to import your iTunes DRM contents. 
Step 3. Let’s click the drop-down-list besides “Format” and move to “Common Video” column and choose “H.264 Video(*.mp4)” as output format for your XBMC. 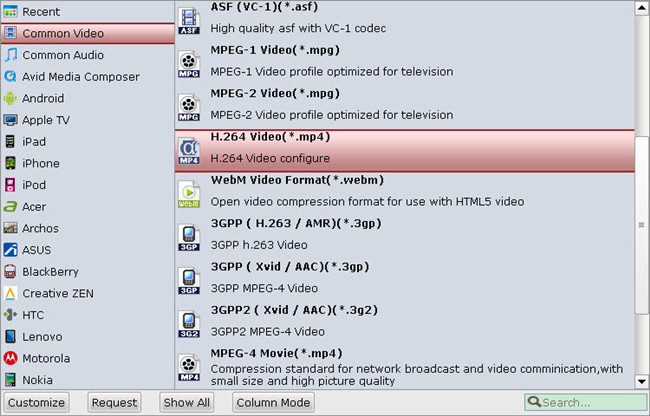
Step 3. You can click “Settings” to enter Profile Settings window and customize target video spec, you can find settings for video size, codec, bitrate and frame rate.
Step 4. Click the big “Convert” button on software main UI to start iTunes to XBMC conversion. After the conversion completes, you may find the iTunes movies in MP4 format and add them to XBMC as freely as you like.
Tips:
1. The DRM removing process may mislead your anti-virus software to falsely report virus/worm. Please ignore the report to keep on ripping.
2. This product cannot convert unplayable video (damaged, unauthorized, etc).
After that, you can directly play the movie on your PC or you can stream the movie to your HDTV for playback with families and friends via XBMC home theater system.
Read More: