Whether you bought a 3D TV but never play 3D movies on it? If so, you can consider to install an add-on on Kodi that you can watch 3D movies without buying premium Blu-rays. One of the best add-ons for Kodi is Phoenix. Now, learn how to install Phoenix 2.0 add-on in Kodi for watching 3D movies on 3D TV.
- Hot Search: MKV to Kodi| iTunes Movies to Kodi | DVD to Kodi | Passthrough AC3 DTS with Kodi | ISO to Kodi
Tutorial How to Install Phoenix Kodi XBMC
- Open Kodi
- Select SYSTEM > File Manager

- Select Add Source
- Select None

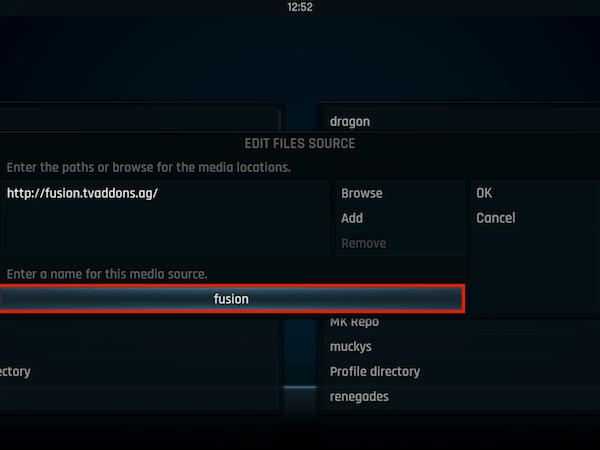
- Type the following EXACTLY http://fusion.tvaddons.ag and select Done

- Highlight the box underneath Enter a name for this media Source & type fusion
 h
h
- Select OK

- Go back to your Home Screen then slect SYSTEM.
- Select Add-Ons

- Select Install from zip file

- Select fusion

- Select xbmc-repos

- Select english. Select repository.xbmchub-x.x.x.zip

- Wait for Add-on enabled notification

- Select Get Add-Ons or Install from repository on Isengard

- Select TVADDONS.ag Addon Repository

- Select Video Add-Ons

- Select Phoenix
- Select Install

- Wait for Add-on enabled notification

Phoenix is now installed and ready to use. Once you have it installed, check out the 3D movies on Kodi that Phoenix and staael2014 have available. Access Phoenix from your video add-ons and then go into the staael2014 section and then click on the 3D Movies section.
When you hit the 3D button on your TV Remote (if you run Kodi off a Kodi box through your TV) or enable 3D on whatever display you use, your side by side image will convert into a properly 3D overlay and you can put on your 3D glasses and watch! This is a great solution to make use of your 3D TV.
From the feedbacks in koditips.com, many people respond that after they installed the add-on, they get something like stream unplayable. Some even can’t load the 3D movies at all. Please ensure that your Phoenix must be 2.0 or higher and make sure your internet connection runs well. After that if you still have the problem with 3D films, maybe you should try a video converter.
With Pavtube Video Converter Ultimate, you can convert any 3D films to Kodi supported 3D format with excellent video quality. You can download some 3D movies to hard drive from some torrent sites and transcode them to 3D SBS MP4 for Kodi. This won’t cost you any money on Blu-ray disc cause you can download Blu-rays in “FHD3D” format from internet.
For Mac users, the equivalent product is iMedia Converter for Mac, which has updated to support OS X El Capitan.
Free Download Pavtube Video Converter Ultimate:


Other Download:
– Pavtube old official address: http://www.pavtube.cn/blu-ray-video-converter-ultimate/
– Cnet Download: http://download.cnet.com/Pavtube-Video-Converter-Ultimate/3000-2194_4-75938564.html
How to convert 3D movies to Kodi with 3D video converter?
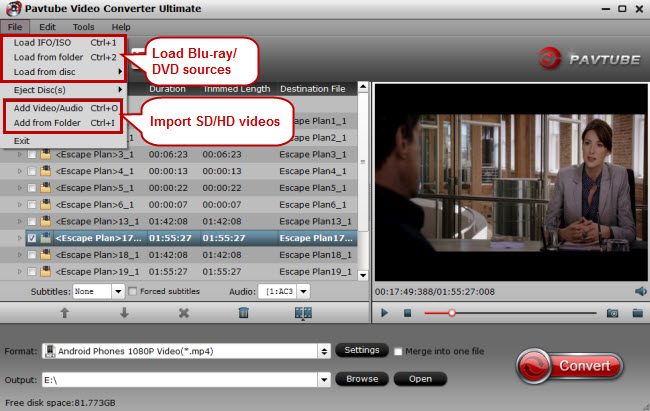
Step 1: Add source video
For disc users, click “Load from disc” to insert your Blu-ray/DVD movies to the software while you can simply drag and drop the 3D movies on computer hard drive to the app.
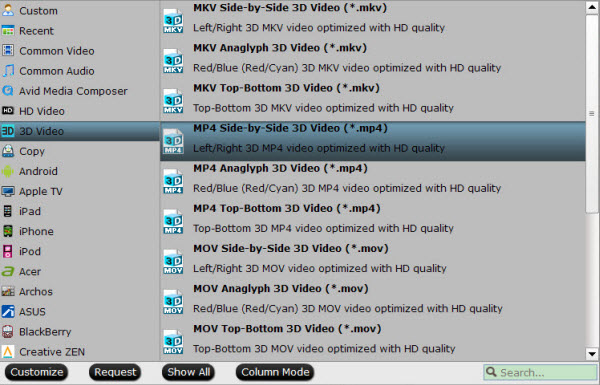
Step 2: Select output format and folder
For outputting 3D SBS MP4 for playing 3D via Kodi on 3D TV, you can choose “MP4 Side-by-Side 3D Video(*.mp4) ” under “3D Video” category. Then turn to “Browse”to decide the output folder.
Tip: The most common Side-by-Side 3D TV format is the Side-by-Side Half where each sub-frame occupies just half the horizontal resolution of a full HD frame, resulting in a 3D image with 960pixels by 1080 lines instead of the 1920×1080 required for full 1080p content. This simplifies the electronics while making it compatible with HDMI 1.3 devices. So click “Settings” to make sure the video size is 1920×1080 for Half SBS.

Step 4; Finish the conversion
Simply click “Convert” on the interface to finish the 3D video conversion for 3D TV. You can locate the generated 3D content in output folder.
Add 3D Movies to Kodi
Step 1: Download and install Kodi on your computer. After that, open Kodi.
Step 2: Select “Videos” in the home screen menu.

Step 3: Seclect Files, then select “Add Videos”.
Step 4: Click on “Browse” button. From This requester you can select the location where your Movies are located on your system. You can also choose a network drive if your Movies are there, this tutorial will use the network drive option and we will select “Windows network (SMB)”.
Step 5: In the next screen you should see the directories within your selected directory. If this is the right directory select “OK”. If all is ok then select “OK” again. In the next screen is where we tell Kodi what our source directory contains, in this case its “(Movies)”. When your happy with the settings select “OK”.
Step 6: Next screen is refresh info for contents of selected directory, select “Yes”. When you’ve selected ok you will be presented with this next screen, keep an eye on very top almost to the right as this updates the database with info about the films it finds. This item can take a long time depending on how many Movies you have in your collection.
Step 7: When finished, some your movie library should be listed on the interface.
Now, try play 3D movies on Kodi and it should work.
Related Articles:
- Watch YIFY Movies Without Movies Official Codec on Devices
- Edit iTunes DRM Videos Movies with Edius Pro 6/7/8
- iPad Pro vs. Microsoft Surface Pro 4
- Can I play Commercial DVDs on WD TV Mini Media Player?
- Put 3D FLV Contents on Google Cardboard Via Android/iOS Devices
 Pavtube New Official Site