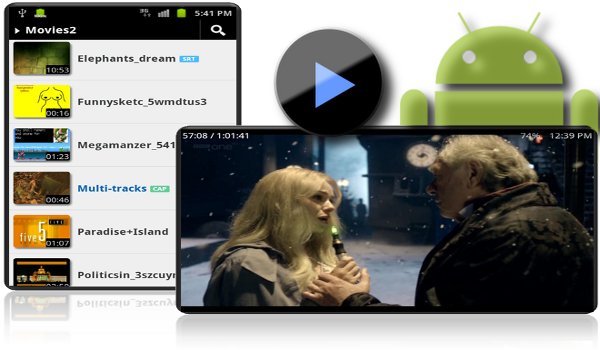
Question 1. I have a 4K MP4 video recorded by a 4K camera, but can’t import it into Final Cut Pro. So, how can I convert the 4K MP4 video for common video editing software?
Question 2. Some video-sharing sites like YouTube have some gorgeous 4K sample videos, but how can I download the 4K videos in MP4 for offline watching without buffering and ads?
Question 3. I want to play my 4K MP4 video clips on my iPad Pro, but it seems that the iPad can’t play 4K MP4 video. Any suggestion?
These are some questions from some forums. If you have similar questions about 4K videos, you have come to this right place to find answers. In this article, we will show you how to play 4K MP4 on computer and portable devices, and how to edit 4K MP4 with NLEs without any problems.

It is a little difficult to get that done. But Pavtube Video Converter Ultimate(Mac) can done well. It is a professional 4K video converter which can convert any 4K MP4 to any video you want like H.264 MP4, AVI, MKV, M3U8, 3D MP4, Apple ProRes, etc on Windows so that you can play them on various Apple (iPhone, iPad, Apple TV) and Android devices (Samsung, HTC, Sony, Amazon Kindle Fire, Google, Lenovo, etc) and edit them with FCP, iMovie, Premiere Pro, etc. Besides, professional editing functions are provided to you: split, merge, trim, crop, add watermark, adjust video effect, edit audio and insert subtitles.
Free Download and Install


How to Convert/Compress 4K MP4 Videos for Editing, Uploading, Playing?
Step 1. Launch this 4K MP4 converter, and hit the “Add Video” button to load one or more 4K MP4 video clips. Alternatively, you can directly drag and drop target 4K MP4 source video(s) to the main window.
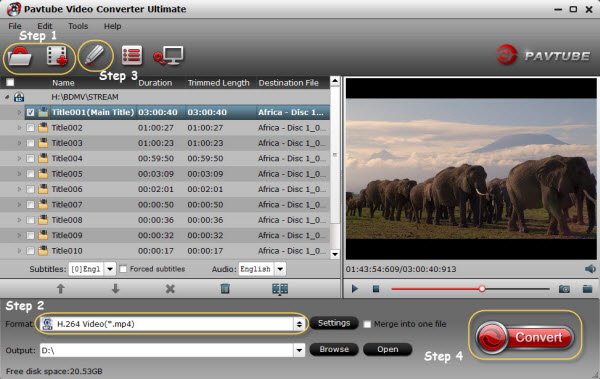
Step 2. From the Format panel, you should choose one from hundreds of options based on your own needs.You can select .mp4/.avi/.mkv etc from “Common video” or “HD video” to fit your devices, TVs, 3D glasses, NLEs, etc.

Edit MP4 video
You can click Edit button to customize output files at your own will. Video editing features provided include: Trim, Crop, Text Watermark, Image/Video Watermark, Effect, and Audio Replace.
- Trim: Allowing users to decide where to start and where to end when converting the selected clip, so that unwanted segments will be cut out after conversion.
- Crop: Getting rid of the black edges and unwanted area of the image.
- Text Watermark: Here, you can create a text watermark to personalize your video. For a text watermark, select the “Enable” box below the preview screen and type whatever text you want in the text watermark area.. You may strikeout, underline and transparent effect for the text. The font, color, size, and style of the text can be adjusted too. Click “Apply to All” to apply the settings to all the videos that are listed in file list.
- Image/ Video Watermark: Here, you can import an image or video watermark to personalize your video.
- Effect: Customize the output effect. Here, you can adjust brightness, contrast and saturation, apply gray, flip color, invert or Aged film effects and apply a number of deinterlacing options.
- Audio Editor: Adding audio to target video file so that you can replace the original audio track with favorite melody.
Step 3. When all settings are done, you can click “Start conversion” button to begin converting/compressing 4K MP4 video.
After the conversion, you can locate the generated video files in output folder. Then you can play these MP4 videos on iPad, iPhone, Samsung TV, LG TV, Sharp TV, Samsung Galaxy S8, Galaxy TabPro S, etc.
Related Articles:
]]>So, here let’s teach you how to rip DVD to iPhone/iPad with Handbrake. Before start, you should know that Handbrake only can convert unprotected DVDs. If you want to rip protected commercial DVDs, you should install libdvdcss in Handbrake.
Download and install libdvdcss for Handbrake 1.0.0 on Windows/Mac
On Windows, you can download the Libdvdcss file separately (here for 32-bit systems and here for 64-bit systems), leave the filename as libdvdcss-2.dll, and put it in your Handbrake program folder (C:\Program Files\Handbrake).
If you’re on a Mac, download this file and double-click to install it. For Mac users who runs OS X El Capitan, there will be a few more steps to install libdvdcss on El Capitan. The main reason is that the SIP (Sytem Integrity Protection), a security feature on Mac OS X El Capitan is designed to protect critical system files and processes. Unfornately, SIP removes the libdvdcss file that Handbrake needs in order to work. You could disable SIP or use the following complicated way to install libdvdcss on El Capitan.
1. Close Handbrake, and open a new Finder window.
2. Type cmd+shift+G, and paste in this path: /Library/SystemMigration/History
3. Inside this folder should be a folder named “Migration-[random letters and numbers].” Open that folder and you’ll find “QuarantineRoot.” Open that folder, and you should see yourlibdvdcss.2.dylib file.
4. Open a second Finder window.
5. Type cmd+shift+G, and paste in this path: /usr/local/lib (If you get an error saying this folder doesn’t exist, go to /usr/local instead, create a new folder called “lib”m and open it.
6. Drag and drop the libdvdcss.2.dylib file from the first window into the /usr/local/lib folder. You should be prompted for your admin password. Type that in and wait for the copy to finish.
Steps to use HandBrake to Rip DVD to iPhone/iPad
Note: Here the tutorial is for Windows users. If you are a Mac use. Please refer to Handbrake DVD Rip Tutorial on Mac.
Step 1: Open Handbrake and click on the “Source” button at the top left. Select DVD / VIDEO_TS folder from the drop down list. Select the DVD you want to rip to Android and click “OK.”

Step 2: You may be prompted to set a default path in Handbrake. This is an optional step. Click “OK.” If you’d like to set a default destination folder, Go to Tools on the top menu, select Options. On the General tab, click “Browse” to select a destination output folder. Click “Close” when Finished.

Step 3: Next, click the dropdown list next to “Title.” Select the title that matches the length of the movie. It’s possible you may have see more than one title with a similar length. If so, consult the DVD information, or a site like IMDB.com, to find the proper movie title length. Select your container under Output Settings. This will be your final output file extension. We will be using MP4 for this example.

Step 4: If you didn’t set up a default destination folder, you’ll need to select one by clicking the “Browse” button. You can manually customize the output file name and change the output file extension to .mp4.
Step 5: When you’ve finished any customizations you are ready to begin the conversion process. Click “Start.”A Command window will open and you can follow the process. You’ll probably want to find something to do in the meantime as the process could take a couple of hours. When the process completes, you’re ready to watch your MP4 video on iPad/iPhone.

Handbrake 1.0.0 Alternative to Rip DVD to iPhone/iPad With 3 Clicks
You have to know, when you installed libdvdcss, you can only remove the CSS encryption equipped on DVD disc, however, as for other DVD protection such as Sony ArccOS, UOPs, and Disney X-project DRM, you will fail to do the job even you have installed libdvdcss. In addition, the process of ripping commercial DVD on macOS Sierra with Handbrake and libdvdcss is too complicated for most Mac users. In addition, if you want to rip DVD to iPhone/iPad presets, you need to install optimized iPhone and iPad presets in Handbrake.
With Handbrake alternative, you can easily convert DVD to iPhone/iPad presets with simple 3 cliks. Pavtube ByteCopy for Mac/Windows would be the best Handbrake alternative, which removes DVD encryption including CSS, region code, RCE, Sony ArccOS, UOPs, Disney x-project DRM, etc then convert DVD to 1080p/720p MP4/MOV/M4V for iPhone 7, iPhone 6S (Plus), iPhone SE, iPad Pro, iPad Air 3, iPad Mini 4, etc. It also can rip DVD to iPhone and iPad presets. You can adjust video size, bitrate, frame rate and audio codec, channel to get more compatible video for iPhone and iPad.
Free Download and Install:

Step 1: Load DVD movies
Launch the best DVD to iPad/iPhone Converter, click the “DVD disc” icon to navigate the videos. You can also add ISO file, IFO file or DVD folder. Press the selected main title you can preview the whole DVD movies on the preview window on the right, which works like a media player.

Step 2. Choose the output format for iPad/iPhone
Click on “Format” box, a list will appear, you can easily find the “iPad” and “iPhone”categories, to enjoy DVD files on iPad or iPhone with high quality, you are suggested to choose “iPad > iPad Full HD Video H.264(*.mp4)” and “iPhone 6 Plus H.264 Full Screen/Full HD 1080P(*.mp4)” format for output format.
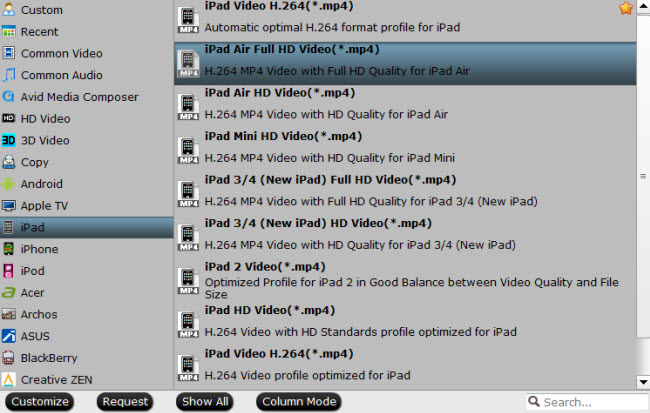
Tip: You can configure the output video parameters by clicking Settings. For iPad readable MP4 videos, you can just resolution, codec, frame rate, etc. For example, iPad Pro resolution is 2732 x 2048, so you can adjust video size to larger, but no larger than 2732 x 2048.
Step 3. Start DVD to iPad/iPhone
Start the conversion by clicking on “Convert” start conversion button on the interface of this converter. After it completes, click the “Open” button on program interface to locate the created MP4 file.
There are many other iOS compatible external hard drive that can expend your iPhone and iPad storage. Beside transfering DVD to Leef USB Flash Drive for iOS Devices, you also can put DVD to Leef iAccess, LaCie Fuel 1TB Wireless, etc for watching movies o iPad and iPhone.
Buy Pavtube ByteCopy

They Also Downloading:If you have some MKV, AVI, 4K, WMV, TS, ISO, VOB, MOV, AVCHD, XAVC videos, Blu-ray movies and DVDs and want to put onto to USB Flash Drive for iPad Pro, iPad Air 3, iPad Mini 2/3/4, iPhone 6S, 6S Plus, iPhone 5S, etc streaming. You can use the all-in-one Pavtube Video Converter Ultimate program to convert various video to MP4/MOV/M4V for iPhone/iPad. If you are running a Mac OS X computer, iMedia Converter for Mac is the alternative. And there are a software bundle that can help you save money: ByteCopy($42) + Video Converter Ultimate($65) = Only $79.9, Save $27.1 |
Related Articles:
]]> 
As you know, commonly purchased Blu-rays are restricted by various copy protections to prevent being used for commercial profit, but at the same time, it also discourages us from the kind intention of ripping the Blu-ray for personal use and backup. Then the best possible way to avoid it, I assume, is to rely on a professional Blu-ray Copier and Ripper. Here Pavtube BDMagic is in need to rip Blu-ray The Walking Dead for enjoying all episodes of this amazing zombie TV series for a long-time backup or a smooth enjoyment on iPhone, iPad, Android with no hassle at all.
As one of leading Blu-ray ripper in the market, it is capable of ripping any Blu-ray to MP4, H264, AVI, WMV, MOV etc, and fashionable devices, like iPhone 7/7 Plus, iPad Air 3/Mini 4, Samsung Galaxy Note 7, Google Nexus series, Kindle Fire, PS3/4, Xbox One/360 etc, at a very high speed. It is powerful on removing any copy-protections on latest released Blu-ray movies and TV shows (for example Guardians of the Galaxy, Hannibal, Stranger Things,Dawn of the Planet of the Apes, The Expendables 3) and deliver possible highest audio/video quality. Moreover, it is available to1:1 copy Blu-ray to BDMV folder and backup main Blu-ray movie into ISO file. For mac users, get mac version. Here, the guide of how to rip Blu-ray The Walking Dead using a great Blu-ray ripper will be introduced.How to watch The Walking Dead Blu-ray (American Zombie TV Series) on Portable Devices?
Free download and install:


How to Rip Blu-ray The Walking Dead to Portable Device for Playback?
Step 1. Run Best Blu-ray Converter and import disc.
Click this icon to load Blu-ray disc from Blu-ray-ROM, or Blu-ray folder, ISO/IFO images files. (Read BDMagic review)
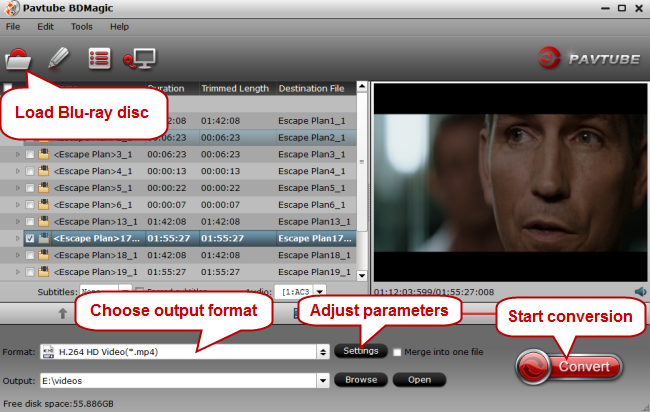
Step 2. Choose format.
Click on the dropdown menu of “Format”, and then choose your needed one from the multiple output format presets. You can rip Blu-ray to MKV, MP4, MOV, WMV, or rip Blu-ray for playback on iPad, iPhone, PS4, Nook HD, Galaxy Tab and more other portable devices you can think of.
Step 3. Adjust video specs (Optional)
If you are not satisfied with default specs, then click “Settings” to enter Profiles Settings windows; here you can customize video frame rate, bitrate,size and other settings freely.
Step 4. Start conversion.
Click the big red “Convert” to start converting your The Walking Dead Blu-rays to your portable devices .When the copying/ripping task is completed, you can click “Open” button to get the ripped files for video transferring from computer.
Then, you can play, share Blu-ray The Walking Dead on iPad, iPhone, Android devices, etc. with your families anywhere you want!
Related Articles:
]]>
Toshiba’s Canvio AeroMobile portable Wi-Fi media streamer delivered 128GB of storage where its platter-based competitors offer 500GB, 1TB, or more. It’s outfitted with an SD card slot, so you can augment its internal storage, as well as play media on iPhone and iPad you’ve stored on SD cards. This huge storage allows you put plenty of DVD movies for iPhone and iPad streaming. Of course, the premise is that you have changed DVD to iPhone/iPad playable format.
As we all know, iOS devices only can read .mp4 .mov .m4v video. So if you want to play DVD on iPhone/iPad via Toshiba Canvio AeroMobile Wireless SSD, you should convert DVD to .mp4 .mov .m4v in advance.
Pavtube ByteCopy is stronly recommened here to rip DVD to iPad/iPhone readable video formats with No.1 fast ripping speed while removing all copy protection in commercial DVD discs. This means you can rip any hottest DVD to iPad Pro, iPad Air and iPad Mini, iPhone 7, iPhone 6S, etc supported video smoothly, such as DVD The martian, Revenant, The Spectre 007 and other DVD movies you like. This DVD to iPad/iPhone converter offers iPad and iPhone preset for those we don’t know how to adjust settings to get better media antertainment on iPhone/iPad via Toshiba Canvio AeroMobile Wireless SSD. It has many other functions, learn more about ByteCopy, please read ByteCopy review.
You May Also Interested: DVD to Android Converter, Blu-ray to iPad Air/Pro/Mini Converter
Free Download top Pavtube DVD Ripper for iPad/iPhone:
How to Copy DVD to Toshiba Canvio AeroMobile Wireless SSD for iPad/iPhone?
Step 1: Load DVD movies
Launch the best DVD to iPad Converter, click the “DVD disc” icon to navigate the videos. You can also add ISO file, IFO file or DVD folder. Press the selected main title you can preview the whole DVD movies on the preview window on the right, which works like a media player.
Step 2. Choose the output format for iPad/iPhone
Click on “Format” box, a list will appear, you can easily find the “iPad” category, to enjoy DVD files on iPad with 1080p image quality, you are suggested to choose “iPad > iPad Full HD Video H.264(*.mp4)” format for output format. For iPhone streaming, you can choose format form "iPhone" category. Normally, MP4 format from "Common Video" and "HD Video" aare supported by all iPad and iPhone models.
Tip:
You can configure the output video parameters by clicking Settings. For iPad readable MP4 videos, you can just resolution, codec, frame rate, etc. For example, iPad Pro resolution is 2732 x 2048, so you can adjust video size to larger, but no larger than 2732 x 2048.
Step 4. Start DVD to iPad/iPhone conversion
Start the conversion by clicking on the green arrow start conversion button on the interface of this converter. After it completes, click the “Open” button on program interface to locate the created MP4 file.
Setting Up Your Toshiba Canvio AeroMobile Wireless SSD
Step 1: Charge Your Device
• Connect your device to the AC adapter and plug it into a power source.
• When connected, the battery will start blinking.
• When the light goes off, the device is fully charged and ready to use.
Step 2: Load Content
• Make sure the device is powered off before you attach it to your computer.
• To attach it, connect one end of the USB cord to your device and plug the other
end into your computer.
• Once connected, the Canvio AeroMobile Wireless SSD will be identified
as a Toshiba EXTERNAL drive (either in "My Computer" on a PC, or in "Finder"
on a Mac®).
• PC Users: Navigate to find the pictures, videos or music you want to add
to your Canvio AeroMobile Wireless SSD. Drag and drop your content to the
default user folder.
• Mac® Users: Navigate to the Mac® driver folder and install the free NTFS for Mac
driver. After installing the driver, you can now quickly drag and drop your files.
Step 3: Install the "Wireless SSD for Toshiba App" for Your iPhone®, iPad®
• Apple® device users: Download the app from the iTunes® store.
• Android™ device users: Download the app from Google Play™.
• Once inside the app store, search the applications for "Wireless SSD"
and select download.
Step 4: Turn on Your Canvio AeroMobile Wireless SSD
• Press and hold the power button for two seconds.
The green power indicator will illuminate.
• When the blue wireless light is solid, your device is ready to go.
Step 5: Connect Your Mobile Device to Your Wireless Network
• Access the wireless settings on your mobile device.
• Find and connect the network that reads TOSHIB WSSD
(followed by four numbers).
• Enter the default password: 12345678
• You should now be connected.
• Exit the settings and tap on the Wireless SSD icon.
You’re now ready to stream your DVD MP4 videos on iPhone/iPad—all wirelessly from your Canvio AeroMobile Wireless SSD.
Toshiba Canvio AeroMobile Wireles SSD Info:
| Toshiba Canvio AeroMobile Wireles SSD | |
| Capacity | 128GB |
| Drive Type | Solid-State Drive |
| Interface | USB 3.0 802.11 b/g/n SD Card slot |
| Battery Life | 8 hours (video streaming) |
| System Requirements (PC) | PC or Mac: Windows 8.1, Windows 8 and Windows 7; Mac OS X 10.7 and 10.8 with included NTFS driver for Mac. Available Wireless LAN interface |
| System Requirements (Mobile) | Smart phone or tablet: iOS version 5.1 to 7; Android version 2.3 to 4.2. Available Wireless LAN interface |
| Dimensions | 2.5 in. x 4.8 in. x 0.49 in. |
| Weight | 4.2 oz |
| Finish | Light Gold |
Related Articles:
- Rip Blu-ray to NAS for HiMedia Q5/Q10 Pro Playing with Kodi
- Play Supported/Unsupported Videos on PS4 with Plex via NAS
- Rip and Backup Family DVD to NAS for Viewing via Kodi on Samsung TV 55 inches
- How to Play DVD Ripped IFO and ISO image file on Kodi
- Copy DVD to Exteral Hard Drive For Streaming on TV/Laptop/PC

How to create copies of DVDs for Android devices? A DVD Ripper is simply designed for this goal. Considering the situation that DVD has unprotected and protected two kinds, the DVD ripping tool we choose can be various. For unprotected DVD discs, Handbrake seems to be the first choice since it is a free open souce. As for commercial DVDs, Pavtube ByteCopy will be the best selection to copy protected DVD to Android devices. Now, read below two methods to learn how to put unprotected and protected DVD into Android phone/tablet.
Method One: Copy Unprotected DVD to Android with Handbrake
Handbrake is a free DVD ripping tool that can convert unprotected DVD to MP4 for Android playback. The steps are easy to operate. Read >> Handbrake Review and Alternatives
Note: Here the tutorial is for Windows users. If you are a Mac use. Please refer to Handbrake DVD Rip Tutorial on Mac.
Step 1: Open Handbrake and click on the “Source” button at the top left. Select DVD / VIDEO_TS folder from the drop down list. Select the DVD you want to rip to Android and click “OK.”
Step 2: You may be prompted to set a default path in Handbrake. This is an optional step. Click “OK.” If you’d like to set a default destination folder, Go to Tools on the top menu, select Options. On the General tab, click “Browse” to select a destination output folder. Click “Close” when Finished.
Step 3: Next, click the dropdown list next to “Title.” Select the title that matches the length of the movie. It’s possible you may have see more than one title with a similar length. If so, consult the DVD information, or a site like IMDB.com, to find the proper movie title length. Select your container under Output Settings. This will be your final output file extension. We will be using MP4 for this example.
Step 4: If you didn’t set up a default destination folder, you’ll need to select one by clicking the “Browse” button. You can manually customize the output file name and change the output file extension to .mp4.
Step 5: When you’ve finished any customizations you are ready to begin the conversion process. Click “Start.”A Command window will open and you can follow the process. You’ll probably want to find something to do in the meantime as the process could take a couple of hours. When the process completes, you’re ready to watch your MP4 video on Android.
Method Two: Rip Protected DVD to Android with Pavtube ByteCopy
Pavtube ByteCopy enables you to play DVD on Android with No.1 fast ripping speed while removing all copy protection in commercial DVD discs like CSS encryption, region code, Sony ARccOS, UOPs, APS, RCE, etc. This means you can rip any popular DVD movies to Samsung Galaxy phones, Galaxy Tablets, HTC, Lenovo, BlackBerry, LG, Sony smarpthone and tablets. It can convert DVD to MP4, WMV, 3GP, AVI for Android tablet and Android phones and it also offers optimized presets for Android devices. You can adjust A/V parameters such as size, bitrate to fit more in your Android device. It surprises us that ByteCopy also can convert unprotected DVD to Android like Handbrake. Read the review.
The following is a step-by-step guide teaching you how to rip and convert DVD to Android with Pavtube ByteCopy.
Free Download top Pavtube DVD Ripper for Android:
Step 1: Load DVD movies
Launch the best DVD to Android Converter, click the “DVD disc” icon to navigate the videos. You can also add ISO file, IFO file or DVD folder. Press the selected main title you can preview the whole DVD movies on the preview window on the right, which works like a media player.
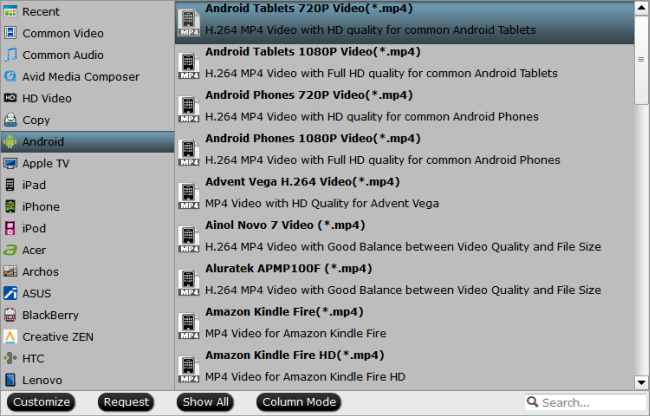
Step 2. Choose export format
You can click the dropdown menu between “Format” and “Settings”, you will see many presets sorted of different device models and programs.
Basically the “Common Video -> H.264 Video (*.mp4)” is a universal format for Android tablets and smartphones. Or depends on your device, you can choose a suitable video format from “Android” catalogue
Step 3. Adjust specs or edit video before conversion (Optional)
Click “Settings” button to configure target file quality. After entering “Profile Settings” panel, you are allowed to adjust video and audio parameters such as bit rate, frame rate, sample rate, etc..
If you think the video size this not suitable for your Android Tablet or Phone, you can first choose any one of the provided type, then change the settings. Generally speaking, the higher video bit rate will result in the larger output file size, and vice versa.
Step 4. Start conversion
Now hit the big red “Convert” to start converting purchased DVD movies to MP4 with best settings for playback on different Android -based devices. After the conversion, you can get the converted DVD rips in *.mp4 format by clicking the “Open” or “Open output folder” icon. Then transfer generated MP4 videos from PC to Android Phone/Tablet for watching.
You can use this way to transfer DVD movies to Galaxy Note 7, Galaxy S7/S7 Edge, Galaxy J7, Galaxy A9 Pro, HTC One M10, OnePlus 3, BlackBerry Priv and other popular Android tablets and Android phones. Besides Pavtube ByteCopy, there are many other DVD ripping tools that can help you decrypt DVD to Android devices. Below are top 5 DVD to Android Converter.
Top 5 DVD To Android Converter
|
Software Compare |
|
|
|
|
|
| Supported OS: | Windows 2003/XP/Vista/ 7/8/8.1/10 | Windows 2003/XP/Vista/ 7/8/8.1/10 | Microsoft Windows XP (SP2 or later) |
Windows XP/2003/Vista/7. |
Windows Vista or later |
|
Supported Source |
|||||
| Unprotected DVD |
√
|
√
|
√
|
√
|
√
|
| Protected DVD |
√
|
√
|
–
|
√
|
–
|
|
Output Formats |
|||||
| H.264 MP4 |
√
|
√
|
√
|
–
|
√
|
|
H.265 MP4 |
√ |
√ |
–
|
–
|
–
|
| Multi-track MP4/AVI | √ |
–
|
–
|
–
|
–
|
| Lossless MKV | √ |
–
|
–
|
–
|
–
|
| MKV |
√
|
√
|
–
|
–
|
√
|
|
AVI/WMV/MPEG/DivX |
√
|
√
|
√
|
√
|
–
|
|
MOV/FLV/3GP |
√ |
√ |
√
|
–
|
–
|
| M3U8 |
√ |
√ |
–
|
–
|
–
|
| 4K MP4/MKV |
√ |
√ |
–
|
–
|
–
|
| 3D MP4/MKV/MOV |
√ |
√ |
–
|
–
|
–
|
| MP3/AAC/AC3/FLAC |
√
|
√
|
√
|
–
|
√
|
| WMA/WAV/OGG/DTS |
√
|
√
|
√
|
–
|
–
|
| Android/Samsung/Sony/LG |
√
|
√
|
√
|
√
|
–
|
| HTC/Blackberry/Archos |
√
|
√
|
–
|
–
|
–
|
|
Other Functions |
|||||
| Batch Conversion |
√
|
√
|
√
|
√
|
–
|
|
Trim & Crop DVD |
√ |
√ |
√
|
–
|
–
|
|
Merge and Split DVD |
√ |
√ |
√
|
–
|
–
|
| Adjust bitrate, size, channel |
√
|
√
|
√
|
–
|
√
|
| Select Subtitle |
√
|
√
|
√
|
√
|
√
|
| GPU Acceleration |
√
|
√
|
√
|
–
|
–
|
| Extract subtitle | √ |
–
|
–
|
–
|
–
|
|
Add srt.ass.ssa subtitle |
√ |
√ |
–
|
–
|
√
|


Verdict:
Although you have these many choice to copy DVD to Android devices. But obviously Pavtube ByteCopy is the best performer due to multiple funtions and DVD decryption power. Besides DVD to Android conversion, it is also the best assistant to copy DVD to iPad, backup DVD to TV, convert DVD to Media Players, etc.
Related Articles:
]]>Loading DVD to iPad, you need to extract iPad supported digital files like MP4, MOV from DVD discs. DVD has two kinds of unprotected one and commercial protected one and the DVD Ripping tool you can choose will be different. Here, we are going deep into two ways to copy protected and unprotected DVD to iPad Pro, iPad Air, iPad Mini separately with different DVD Rippers.
Before the tutorial, you need to learn >> iPad Supported Formats | DVD Ripper Comparison
Part One: Copy Unprotected DVD to iPad with Handbrake
Handbrake is a free DVD ripping tool that can convert unprotected DVD to MP4 for iPad playback. The steps are easy to operate. Read >> Handbrake Review and Alternatives
Note: Here the tutorial is for Windows users. If you are a Mac use. Please refer to Handbrake DVD Rip Tutorial on Mac.
Step 1: Open Handbrake and click on the “Source” button at the top left. Select DVD / VIDEO_TS folder from the drop down list. Select the DVD you want to rip to iPad and click “OK.”
Step 2: You may be prompted to set a default path in Handbrake. This is an optional step. Click “OK.” If you’d like to set a default destination folder, Go to Tools on the top menu, select Options. On the General tab, click “Browse” to select a destination output folder. Click “Close” when Finished.
Step 3: Next, click the dropdown list next to “Title.” Select the title that matches the length of the movie. It’s possible you may have see more than one title with a similar length. If so, consult the DVD information, or a site like IMDB.com, to find the proper movie title length. Select your container under Output Settings. This will be your final output file extension. We will be using MP4 for this example.
Step 4: If you didn’t set up a default destination folder, you’ll need to select one by clicking the “Browse” button. You can manually customize the output file name and change the output file extension to .mp4 (Unless you prefer the iPod friendly .m4v extension).
Step 5: When you’ve finished any customizations you are ready to begin the conversion process. Click “Start.”A Command window will open and you can follow the process. You’ll probably want to find something to do in the meantime as the process could take a couple of hours. When the process completes, you’re ready to watch your MP4 video on iPad.
Part Two: Rip Protected DVD to iPad with Pavtube ByteCopy
Pavtube ByteCopy enables you to play DVD on iPad with No.1 fast ripping speed while removing all copy protection in commercial DVD discs. This means you can rip any hottest DVD to iPad Pro, iPad Air and iPad Mini smoothly, such as DVD The martian, Revenant, The Spectre 007 and other DVD movies you like. Most importe, this program constantly upgrade to support the newest devices like iPad Air 2/Air 3, iPad Mini 4/Mini with Retina display, iPod touch, Apple TV 4, Apple TV 3/2/1, etc without any other program assistance. The surprise us that ByteCopy also can convert unprotected DVD to iPad like Handbrake. Read the review.
The following is a step-by-step guide teaching you how to rip and convert DVD to iPad with Pavtube ByteCopy.
Free Download top Pavtube DVD Ripper for iPad:
Step 1: Load DVD movies
Launch the best DVD to iPad Converter, click the “DVD disc” icon to navigate the videos. You can also add ISO file, IFO file or DVD folder. Press the selected main title you can preview the whole DVD movies on the preview window on the right, which works like a media player.
Step 2. Choose the output format for iPad
Click on “Format” box, a list will appear, you can easily find the “iPad” category, to enjoy DVD files on iPad with 1080p image quality, you are suggested to choose “iPad > iPad Full HD Video H.264(*.mp4)” format for output format.
Step 3. Optimize output profile parameters
You can configure the output video parameters by clicking Settings. For iPad readable MP4 videos, you can just resolution, codec, frame rate, etc. For example, iPad Pro resolution is 2732 x 2048, so you can adjust video size to larger, but no larger than 2732 x 2048.
Step 4. Start DVD to iPad conversion
Start the conversion by clicking on the green arrow start conversion button on the interface of this converter. After it completes, click the “Open” button on program interface to locate the created MP4 file, and transfer the converted files to iPad with iTunes.
This way can be used to import DVD to iPad Pro 12.9/9.7, iPad Air 3, iPad Air 2, iPad Air, iPad Mini 4, iPad Mini 3, iPad Mini 3, iPad Mini. A warm tip is that normally an iPad only has 32GB, 64GB, 128GB storage. If you want to transfer more DVD to an iPad, you can use an iPad-compatible External Hard Drive such as Toshiba Canvio AeroMobile Wireless SSD, LaCie Fuel 1TB Wireless, iPocket Drive, Leef iAccess iOS Micro SD, etc.
Related Articles:
“I created a movie using Adobe Lightroom 3. It creates an MP4 video file. It plays in iTunes and all my other video players. However, when I try to synch to my iPad I am told that the file was not copied to my iPad because the file will not play on it.”
“Moved some local MP4 files to my iPad Pro but they cound’t be played. Strange.”
To make the issue clear, you should know which MP4 files are supported by iPad (including iPad Pro, iPad Air 3, iPad Air 2, iPad Mini 4, iPad Mini 3, etc):
iPads supports MP4 encoded with H.264/MPEG-4 with AAC-LC audio while MP4 video can be encoded with H.263, H.264/AVC, H.265/HEVC, XviD, MPEG-4, etc. So H.265 MP4, Xvid MP4 and other MP4 with iPads unsupported codec won’t be played on iPads. Even H.264/MPEG-4 MP4 with non-AAC audio can’t be streamed well on iPad. You maybe only have video but no sound or video and audio out of sync issue. When you can’t move MP4s to iPads or you can’t play MP4 on iPads but the MP4 files can be played on iTunes well, you can try the tips below:
1. You might want to try some simple stuff like restarting such.
2. To create an iPad version — go to File –> Create New Version –> Create iPad version.
3. Just Use VLC and drag’n Drop any kind of video files. >> See other iPad Video Players.
From time to time, your MP4 videos from HD torrent site or 4K source will be encoded with new H.265/HEVC codec or some old MP4 is XviD codec, the tips above seems to be useless. In this case, the following way will be the last try. It must be effective unless your iPad is broken. That is to re-encode any MP4 files to H.264/MPEG-4 MP4 with AAC audio using MP4 Video Converter for any iPad models: iPad Pro, iPad Air 3, iPad Air 2, iPad Air, iPad Mini 4, iPad Mini 3, iPad Mini 2, iPad Mini 1, iPad 4/3/2/1, etc. If you have “MP4 Can’t be Played on iPhone/Apple TV” issue, this way is also useful. Now lets’ start the solution.
Convert MP4 to iPads for Playing without any Hassle
Step 1: Download and install Pavtube Video Converter Ultimate.
Features of Pavtube Video Converter Ultimate
- Ren-encode any H.263, H.264/AVC, H.265/HEVC, XviD, MPEG-4 MP4 to H.264/MPEG-4 MP4 for iPads
- Convert MP4, MKV, AVI, WMV, ISO, etc to iPad playable MP4, MOV, M4V.
- Convert SD/HD/4K video to iPad optimized preset.
- Allows you adjust video size, codec, bitrate, frame rate and audio codec, channel.
- Add external srt/ass/ssa subtitle to video.
Mac users, please download Pavtube iMedia Converter for Mac. Learn >> top 5 reasons to choose Pavtube iMedia Converter for Mac.
Step 2. Load MP4 files
Run the MP4 to iPad Converter for iPad. Click “File” to load one or multiple .mp4 file(s) into the program. Batch conversion is supported so that you can add multiple files for conversion at a time.

Step 3. Set video format for iPad
Set output video file format for your device. Here you can go to Format > iPad and then select your iPad model like “iPad > iPad Air HD Video (*.mp4)”. If there is no your iPad models, you can click format bar and choose common video format mp4 supported by any iPad model.

Tip:
a. If the preset video/audio parameters can’t meet your needs, just click Settings icon to adjust the video bitrate, codec, frame rate, audio sample rate, audio channel, etc.
b. If you wanna keep your original subtitle or add new, you can click on “Edit” button, the video editor will pop up. Tap “Subtitle” option and check the “Enable” icon. Then, by clicking on “Browse” to add *.srt, *.ass, *.ssa subtitle file you’ve downloaded.
Step 4. Start the MP4 files conversion
You can hit the big red “Convert” to start converting MP4 files to MP4 with best video settings for iPad.
After the conversion, click “Open output folder” in the conversion window, then transfer them to iPad, then you will be able to play MP4 files on iPad Air, iPad Pro and iPad Mini.
Related Software:
Pavtube ByteCopy for Windows/Mac – It can rip Blu-ray and DVD to iPad Pro, iPad Air, iPad Mini, iPhone, Apple TV playable MP4, MOV and M4V with original video quality.
Related Articles:
]]>"I am trying to download some movies onto our external hard drive so that I can plug it into my laptop and watch movies on the plane. Can anyone help me with this and will it work?" – from tomshardware.com
" I’ve got hundreds of DVDs at my apartment but get tired of lugging them around so I wanted to get an external hard drive and just watch my movies Via that, plus I’ll have them all with me at the same time which will be cool. I’ve got zero experience with this sort of thing so was hoping I could just get a quick list of what I’ll need to accomplish this, I.e. programs, etc. All of these are store purchased and not burned DVDs if that makes a difference in what you have to use? Also how many movies could someone potentially store on a 1TB drive ?" – from .tomsguide.com
So just let’s start to copy DVD to Exteral Hard Drive For Streaming on TV/Laptop/PC/PS4/PS3, ETC.
Preparation
A DVD Ripping Tool – You can rip unprotected DVDs with Handbrake but for commercial DVDs, you have to turn to a professional DVD ripping tool to remove the copy protection. If you don’t mind all the DVD rips are MKV files, you can use MakeMKV. But I prefer Pavtube ByteCopy for its DVD (and Blu-ray) decryption power. It supports to decrypt AACS, BD+ up to v61 while MakeMKV only supports up to v60. And ByteCopy can 1:1 backup DVD movies, main title copy DVDs and convert DVD to lossless MKV, Multi-track MP4/AVI/MOV, SD/HD MKV, MP4, WMV, AVI, 3GP, 3D SBS MKV/MP4, H.265 MKV/MP4, 4K MP4, etc. For more functions, you can refer to its review.
DVD discs – It depends on what DVD ripping software you choose. If you choose Handbrake, your DVDs should be unprotected. If you are using ByteCopy, you can copy any DVD to External Hard Drive like the new released House Of Cards, Hannibal, The Walk, Spectre 007, The Martian, Game of Thrones Complete Seasons (1-6), etc.
A Computer – Note: If you are using a Mac, you shoulf use Pavtube ByteCopy for Mac.
Start to Copy DVD to Exteral Hard Drive
Firstly, please download and install your DVD ripping tool:
.
Step 1: Run DVD ripping tool and insert your DVD to internal/external drive and click “File” to load the DVD discs to copy DVD to External Hard Drive. DVD discs, DVD folders, DVD IFO/ISO are all supported.
Tips:
1.You can add more than one DVD movies at a time for its batch conversion function.
2. You can choose desired subtitle and audio track and forced subtitle below the chapter list.
Step 2: Now you should choose a way to copy DVD to External Hard Drive.
Here, you have three choices:
Option A – Full Disc Copy DVD to Exteral Hard Drive
You can keep all the information in DVD movies, including main title, advertisement, chapter markers, review and the whole audio/subtitle streams.
Click ![]() on the top of the menu.
on the top of the menu.
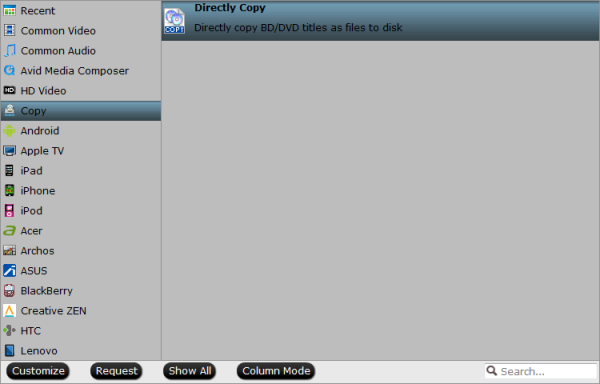
Option B – Directly Copy DVD to Exteral Hard Drive
Just the main title of the original DVD disc will be preserved in this way. It will save many space on your hard drive.
Navigate to “Format” > “Copy” > “Directly Copy”
Option C – Convert DVD to MP4/MKV/MOV to Exteral Hard Drive
Transforming DVD to MP4, MKV, MOV, AVI, etc popular format gives you wide playback on different devices such as Samsung TV, LG TV, PS4, PS3, Xbox One, Tablet, Laptop, etc via Exteral Hard Drive.
Click “Format”, you can choose the desired format in “Common Video” or “HD Video” profiles. On the other hand, you can choose the optimized preset for mainstreaming multimedia players, like PS3/PS4, TV, HD Media Player, etc. If your devices support MKV format, you also can choose lossless MKV format.
Note: In the third way, you can adjust the video/audio parameters in “Settings” to determine the output video size.
Step 3: If you chose the latter two ways, click big red “Convert” on the UI to begin copying DVD to External Hard Drive. Locate the generated video in output folder.
Copy DVD to Different External Hard Drive for Different Devices Playing
Copying DVD to LaCie Fuel allows people to stream DVD movies with a Mac or PC However, it also has built-in wifi too, which will allow you to transfer files to or from an iPhone or iPad when you need to.
Saving DVD movies to iPocket Drive also can make you playing your DVD movies on Mac and PC. But it also can enable you to play movies on iOS devices. It’s compatible with the iPhone 5/5s/5c/6/6 Plus, the iPod Touch (fifth generation), the iPad 3/4/Air/Air 2 and the iPad mini 2/3.
There are some other best external desktop and portable hard disk drives that can save your DVD backups.
1. Best external desktop hard disk drive
- Maxtor D3 Station
- Seagate 5TB Expansion
- Seagate STEB4000200 4TB Expansion
- WD My Book 8TB
- Seagate Innov8 8TB
- WD My Book Duo 16TB
2. Best external portable hard disk drive
- Maxtor M3 4TB hard disk drive
- WD My Passport 2TB
- Seagate Wireless Plus 2TB
- iStorage diskAshur 2TB
Of course, there must be other excellent External Hard Drive to store your DVD rips. When you copied DVD to External Hard Drive, you can stream your DVD movies on TV/Laptop/PC freely. Apart from External Hard Drive, saving DVD to NAS is another great way to store and play your DVD movies.
Related Articles:
]]>Microsoft is rumored to be releasing the Surface Book 2 in 2016 or 2017, which is likely to sport a 13.5-inch screen with 4K resolution support and its performance is said to be improved with better battery life and graphics support. However, it has been complained for incapability of playing 2K/4K MKV videos on Surface Book (2).
What programs would you guys recommend to play 4k and 2k mkv files on Surface Book? VLC is limping along with a ton of visual artifacts.
– I hope there are 3rd party apps or driver updates for the Surface Book 2/1 to play more than just mp4 and avi format. Can’t believe it won’t play MKV out of the box.
– When I click play now, the program indicates ‘now playing’. However, there is no sound or video playback. Does anyone know what this conflict is with Windows 10 Surface Book and my mkv videos?
– Any Apps for Surface Book 2/1 that can play .mkv files smoothly?
– What is the best MKV file Media Player for Surface Book (2) in the Windows store?
Reason Why MKV can’t be played on Surface Book 2/1
MPEG-4, H.264, H.263, MEPG-2, VC-1, WMV 9 can be supported by Surface Book (2), but MKV, the Matroska Multimedia Container is a media format that can hold a number of video, audio and subtitle tracks in one single file, and serves as a popular format for storing movies or TV shows. It is not included in the Surface Book 2/1 supported video formats list, this is why MKV is not supported by Surface Book 2/1. Living up to the promise to provide native support of MKV codec in Windows 10, the inability to play MKV files without MKV codec on Surface Book 2/1 seems to remain there unchanged.
Which is the best way to play MKV files on Surface Book 2/1? We’ll see here.
Surface Book 2/1 can open MKV when getting the help from additional programs, like MKV player for Surface Book and MKV to Surface Book converter. Here, we will show you the best program to enable MKV playback on Surface Book 2/1, to help you play MKV files on Surface Book (2) tablets, including MKV files backed up from Blu-ray, downloaded online, received from others, etc.
Download Surface Book 2/1 MKV Player? No Hurry
When we have some MKV files for playing on Surface, going to Google Play and downloading an Surface Book MKV player seems to be the most direct way the majority could think of.
Option 1: PressPlay Video
Editor rating: 8.4| User rating: 7.5| Supported OS: Windows 8.1, Windows 10
Overviews: PressPlay Video is a free media player for Windows 8 providing the best experience for playing your local MKV and FLV files. It is a full featured Windows 8 MKV player that supports advanced touch, mouse and keyboard controls. Integrated with an explorer, it also displays the folders in your libraries, portable devices, HomeGroup and media servers.
Pros: Easy to use; play MKV/FLV videos side-by-side; remember playing position; advanced touch, mouse and keyboard controls.
Cons: Often start with an error message.
Option 2: DAPlayer
Editor rating: 8.5| User rating: 7.7| Supported OS: Windows 8/8.1/10/7, Mac OS
Overviews: DAPlayer is a sleek and powerful MKV player that comes with 400+ video and audio codecs, so that you can play almost any video on Windows 8/8.1 64 bit or 32 bit. Thanks to the support for high definition video, you are allowed to watch full HD 1080p MKV, AVCHD, H264 videos with this free MKV player for Windows 8. Besides, DAPlayer provides a wide selection of configuration options.
Pros: Play lots of video audio formats; support more than 400 built-in codecs; Complete setting menu.
Cons: The default skin is too dark to browse.
And unfortunately, there are only few apps that bolster MKV playback on Windows Store, excluding those paid ones. So we particularly compiled the best free MKV players for Windows 8, 8.1 64/32 bit.
There is no denying that it is a fix, but you need to figure out a few things before any further.
1. Installing an extra player on storage-limited Surface will take up precious memory footprint and may make your device run slower. Do you really need to use a special video player just to play a few MKV files on Surface Book 2/1?
2. Most players are not compatible with all video audio codecs. Even if a player is advertised to support for MKV file format, it may be unable to play all MKV files flawlessly. This is also why some people submitted posts online saying “Surface Book player play MKV with DTS without sound”, “Surface player play MKV with sound only, but in a black screen” or other similar questions.
Play MKV on Surface Book 2/1 Using MKV Converter
Apart from downloading MKV player on Surface Book, a video converter that can convert MKV files and others to Surface Book will be also a good solution. Besides MKV, you are likely to meet other formats incompatible with your Surface Book (2) and your player.
If you try to use HandBrake to free convert MKV to Surface Book (2), you will find there is no specific profile for Surface, since HandBrake is no more than a video transcoder freeware for Apple (and has few Android profiles).
To play 2K/4K video (.mkv) on Surface Book (2) tablet, there is another video tool that can do it for you. As one of the alternatives of Handbrake, Pavtube Video Converter Ultimate converts MKV to Surface Book 2/1 supported MPEG4, AVI or WMV video file in low, mid and high video resolutions, and it compress 2K/4K movie size to fit for Surface Hub. Only several mouse clicks are required: load downloaded 2K/4K movies -> select output profile for Surface Book -> hit “Start conversion” to begin compressing/converting -> once finished, simply transfer the compressed/converted movies to Surface Book.
Meanwhile, this tool also enables you to convert MKV to all popular mobile devices directly, like Surface Book 2/1, Surface RT, Surface Pro, Samsung Galaxy Note 5/S7, iPhone SE/6S/6S Plus, Kindle Fire, Google Nexus, etc. In addition to help play MKV on Surface Book 2/1, it can also help play other incompatible videos like AVI, FLV, MOV on Surface Book 2/1 with no limits via converting.
Free Download and Install Pavtube Video Converter Ultimate:
Other Download:
– Pavtube old official address: http://www.pavtube.cn/blu-ray-video-converter-ultimate/
– Cnet Download: http://download.cnet.com/Pavtube-Video-Converter-Ultimate/3000-2194_4-75938564.html
How to Convert 2K/4K MKV for Playing on Surface Book 2/1
Firstly, you should download and install a MKV to Surface Book converter on your computer. Here, let’s take Pavtube Video Converter Ultimate as an example. It is fully compatible with Windows 10, 8.1, 8, 7, etc. And the Mac version can work well on Mac OS X 10.6 and higher including OS X 10.10 Yosemite and 10.11 El Capitan. And then follow the steps below to convert 2K/4K MKV for watching on Surface Book 2/1.
1. Add 2K/4K MKV files
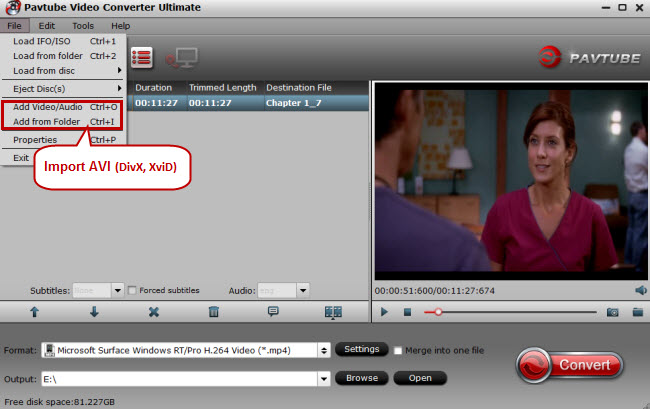
Install and run MKV to Surface Book Converter. To import MKV files that you want to convert, you can click “File” > “Add Video/audio” or “Add from folder” button or directly drag and drop them into the main display window of this program. Batch conversion is supported so you can add many files at a time to save the conversion time.
Tips:
a. You can join several MKV files for Surface Book 2/1 via checking the “Merge into one file” box.
b. If you have a large MKV files and wanna split the video to several small parts, tap the “Split selected task” icon on the main interface to make it.
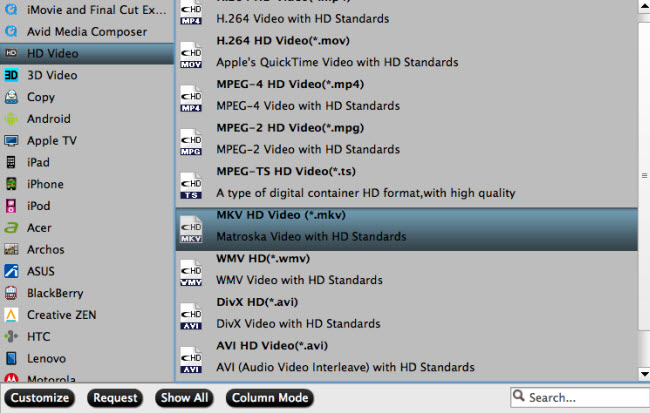
2. Choose output video format for Surface Book 2/1
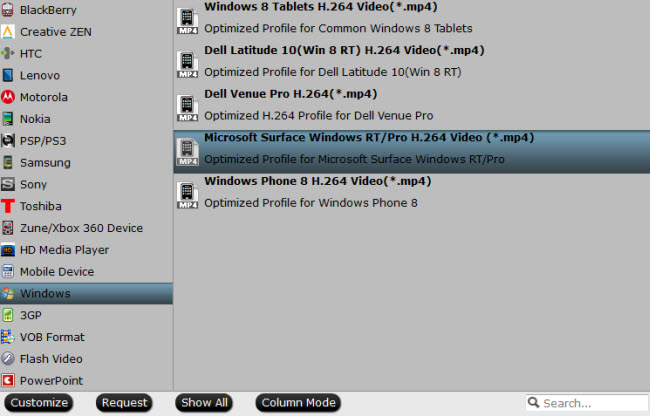
Generally speaking, H.264, MPEG-4, AVI, WMV are supported by Surface Book 2/1. Also, this MKV converter provides optimized formats for Microsoft branded Surface devices; choose “Microsoft Surface Windows RT/Pro H.264 Video (*.mp4)” from “Surface” catalogue.
Tip 1: Profile Settings (Optional)
Click “Settings” to change the video resolution, bit rate, etc. for full screen playback smoothly or select the corresponding device as the output format. Please remember the file size is based more on bitrate than resolution which means bitrate higher results in bigger file size, and lower visible quality loss. You can compress/downscale 2K/4K MKV files to lower resolution in this way.
Tip 2: Video Editing (Optional)
Click “Edit selected task” to trim, crop, add special effects/watermark/subtitles to your videos. Just customize the videos as you like. If you want to keep the original video effects, just skip to the next step.
a. Trim: You can trim your 2K/4K MKV files to capture and convert your favorite video clips for playing on Microsoft Surface Book 2/1.
b. Crop: You can crop 2K/4K MKV area to remove the black video sides for playing on Microsoft Surface Book 2/1 in full screen.
c. Effect: You can adjust 2K/4K MKV effects by setting video contrast, brightness and saturation.
d. Watermark/Subtitle: Add image/video watermark or insert .srt, .ass, .ssa subtitle to 2K/4K MKV
3. Start converting MKV to Surface Book 2/1
When all the settings are OK, tap “Start conversion” button to start the MKV to Surface Book (2) conversion. After the conversion, you can click “Open” to get the result videos. Then you can easily transfer the converted mkv files to your Surface Book 2/1 for playback without any limit.
Related Software:
BDMagic for Windwos/Mac – The best Blu-ray solution to rip and backup any commercial and region-locked Blu-ray to Surface Book (2).
DVDAid for Windows/Mac – Capacity of ripping copy-protected DVD to Surface Book (2) with suitable format.
ByteCopy for Windows/Mac – It can rip Blu-ray/DVD to lossless MKV keeping all chapter markers for playback on Surface Book (2).
ChewTune– Remove DRM from Rental & Purchased iTunes movies, Digital Copy, Amazon videos, etc and easy get the DRM-Free for Surface Book (2) playback.
Related Articles:
]]>
However, it doesn’t mean that if you have 4K videos no matter download them or record them by yourself, you can’t play the 4K video on Android phone/tablet. You can use some 4K video players for Android to stream 4K videos on Android devices. Some top 4K video players for Android devices are listed below:
Top 4K Video Players for Android phone/tablet
1.VLC Player
VLC was recently updated to include support for 4K video playback in version 2.1. This player has support for a very large range of codecs, making it possible to play back virtually any type of video file (as well as audio).
2. MX Video Player for Android
It is a free video player that supports almost every video file format as well as subtitle files such as MKV subtitle track, .srt, .sub, .ass, .mpl, .psb etc. MX Player is the first Android video player which supports multi-core decoding. And with the help of the new H/W decoder, its hardware acceleration feature can be applied to more videos, which also enables itself to support 4K video playback (though sometime the 4K video playback will be a little stumble).
3. ALLPlayer 6.6
Similar to VLC media player, ALLPlayer is ideal for playing stubborn video files including 4K video that won’t play in your usual video player. It supports subtitles and plays just about anything and if it can’t play a file, it will try to download the appropriate codec from the ALLPlayer website.
Apart from 4K video player, you also can use some 4K file converter to help you play 4K video on Android phone/tablet.
4K File Converter to Make you Play 4K video on Android phone/tablet
Pavtube Video Converter Ultimate<4K File Converter for Mac>, a professional convertor for 4k videos/files. Pavtube Video Converter Ultimate can convert any video of any resolution in 4k format to Android tablet/phone supported video. Also, it can convert any 4k video into any common video formats of AVI, MP4, MOV, WebMD, WMV, FLV, DivX as well as the same in HD.
Key features:
- Like any other converting program, it can convert different file formats like AVI to WMV and so on.
- Also, you can covert videos to YouTube friendly format which will allow faster upload of videos to YouTube.
- As an editor, you can trim a video or crop it to suit your requirement.
- Changing the brightness or adding subtitles is another key feature of this program.
- In addition, you can have a backup of Blu-ray 3D movies to 3D/2D video files like MP4, AVI and others.
- Pavtube Video Converter Ultimate also supports NVIDIA CUDA and ATI Stream acceleration technologies.
Free download and install
Other Download:
– Pavtube old official address: http://www.pavtube.cn/blu-ray-video-converter-ultimate/
– Cnet Download: http://download.cnet.com/Pavtube-Video-Converter-Ultimate/3000-2194_4-75938564.html
Compress 4K to 1080p/720p for Android phone/tablet
Step 1: Load 4K Files
Run 4K File Converter for Android. Start up the program, click “File” menu, and select “Add Video/Audio” or “Add from folder” to import source YouTube 4K video files.
Step 2: Set output format for Android
Clicking the Format bar, you can choose to select “Android Phones 1080p Video(*.mp4)” or “Android Tablets 1080p Video(*.mp4)” video under “Android” main category. This format will be compatible with all Android phones and tablets. You can also opt to output device preset file formats according to the device that you are desire to play 4K videos on.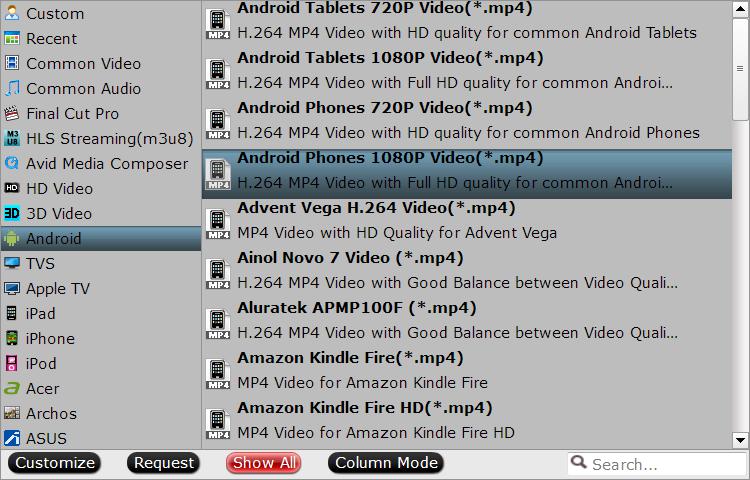
Step 3: Compress 4K video to 1080p for Android
Click “Settings” on the main interface to pop out “Profile Settings” window, under “
“Size(pix)” drop-down options, select “1920*1080” to compress 4K to 1080p or 720p for your Android phone/tablet.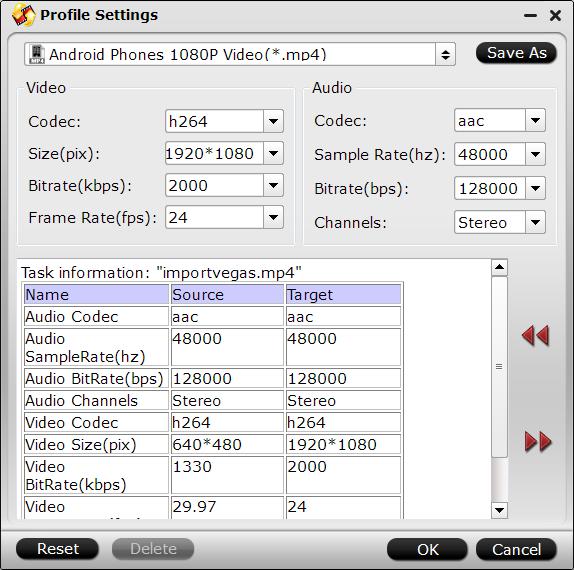
Step 4: Start 4K video to Android conversion
Clicking the Convert button on main interface to start When the conversion is completed, you will get no problem to transfer and play converted 4K files on Android phones or tablets.
Where to get 4K Video for Android phone/tablet
Currently, people can download 4K video from YouTube 4K channel or record 4K video with 4K recorder.
Which camcorders can produce “4K videos”?
Sony: FS700, CineAlta F5, CineAlta F55, CineAlta F65
Canon: EOS C500, EOS-1D C DSLR
Astrondesign AH-4413, Point Grey Flea3 8.8 MP, GoPro HERO3 Black, Nvidia GTX Titan, AMD Radeon HD 7970
How to Download 4K video from YouTube for Android devices?
1.Download and Install the 4K Video Downloader application.
2. Go to YouTube and find the content, you can use 2160p as additional search term. Copy the video link from the browser.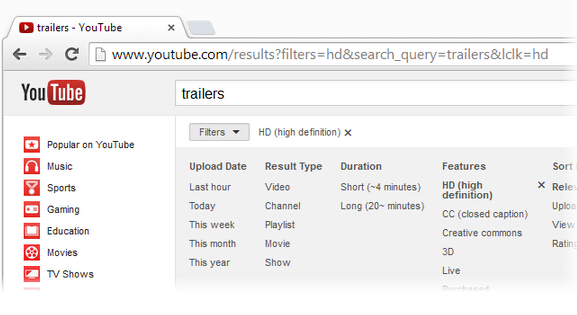
3. Press “Paste Link” button in 4K Video Downloader application.
4.Select “MP4” as a format and “2160p” as a quality in the download window and press “Download” button.
5. Then it remains only to wait until the downloading is completed and play downloaded video.
In Addition: 4K Android phones and tablets
There are some Android phone/tablets that can play 4K video directly without needing 4K File Converter. Lets’s see some Android phone/tablet that support 4K.
1.Samsung 4K phone
Samsung Galaxy S6/S5, Samsung Galaxy S6 edge, Samsung Galaxy S5 Plus, Samsung Galaxy S5 Sport, Samsung Galaxy S5 Active, Samsung Galaxy Note Edge, Samsung Galaxy Note 4/3, Samsung Galaxy Alpha, Samsung Galaxy S5 LTE-A
2.Sony 4K phone
Sony Xperia Z4/Z3/Z2, Sony Xperia Z3V, Sony Xperia Z3 Compact, Sony Xperia Z2A
3.HTC 4K phone
HTC One M9, HTC One E9+, HTC One M9+
4.LG 4K phone
LG G Pro 2, LG G Flex 2, LG G3
5.Motorola 4K phone
Motorola DROID Turbo, Motorola Moto X
6.ZTE
ZTE Star II, ZTE nubia Z7 Max, ZTE nubia Z7 mini, ZTE nubia Z7, ZTE Nubia Z5S
7.Google 4K phone
Google Nexus 6
8.Meizu
Meizu MX4 Pro, Meizu MX4
9.Oppo
OPPO U3, OPPO R5, OPPO Find 7a, OPPO Find 7
10.Xiaomi
Xiaomi Mi 4
11.OnePlus One
12.Lenovo
Lenovo Vibe Z2 Pro
13.Asus
Asus PadFone X, Acer Liquid S2
As to 4K tablets, the only 4K tablet we can find now is Panasonic’s Toughpad, despite the 20″ screen which is bigger than usual tablets.
Related Articles: