You can import your favorite DVD movies to iPad, a iPad Pro, a iPad Air or a iPad Mini for playing. Putting a DVD movie on a iPad enables you watch loved DVD movies in the countryside when you don’t have a DVD player and view DVD movies on iPad on a car trip, in a camping, etc.
Loading DVD to iPad, you need to extract iPad supported digital files like MP4, MOV from DVD discs. DVD has two kinds of unprotected one and commercial protected one and the DVD Ripping tool you can choose will be different. Here, we are going deep into two ways to copy protected and unprotected DVD to iPad Pro, iPad Air, iPad Mini separately with different DVD Rippers.
Before the tutorial, you need to learn >> iPad Supported Formats | DVD Ripper Comparison
Part One: Copy Unprotected DVD to iPad with Handbrake
Handbrake is a free DVD ripping tool that can convert unprotected DVD to MP4 for iPad playback. The steps are easy to operate. Read >> Handbrake Review and Alternatives
Note: Here the tutorial is for Windows users. If you are a Mac use. Please refer to Handbrake DVD Rip Tutorial on Mac.
Step 1: Open Handbrake and click on the “Source” button at the top left. Select DVD / VIDEO_TS folder from the drop down list. Select the DVD you want to rip to iPad and click “OK.” 
Step 2: You may be prompted to set a default path in Handbrake. This is an optional step. Click “OK.” If you’d like to set a default destination folder, Go to Tools on the top menu, select Options. On the General tab, click “Browse” to select a destination output folder. Click “Close” when Finished. 
Step 3: Next, click the dropdown list next to “Title.” Select the title that matches the length of the movie. It’s possible you may have see more than one title with a similar length. If so, consult the DVD information, or a site like IMDB.com, to find the proper movie title length. Select your container under Output Settings. This will be your final output file extension. We will be using MP4 for this example. 
Step 4: If you didn’t set up a default destination folder, you’ll need to select one by clicking the “Browse” button. You can manually customize the output file name and change the output file extension to .mp4 (Unless you prefer the iPod friendly .m4v extension).
Step 5: When you’ve finished any customizations you are ready to begin the conversion process. Click “Start.”A Command window will open and you can follow the process. You’ll probably want to find something to do in the meantime as the process could take a couple of hours. When the process completes, you’re ready to watch your MP4 video on iPad. 
Part Two: Rip Protected DVD to iPad with Pavtube ByteCopy
Pavtube ByteCopy enables you to play DVD on iPad with No.1 fast ripping speed while removing all copy protection in commercial DVD discs. This means you can rip any hottest DVD to iPad Pro, iPad Air and iPad Mini smoothly, such as DVD The martian, Revenant, The Spectre 007 and other DVD movies you like. Most importe, this program constantly upgrade to support the newest devices like iPad Air 2/Air 3, iPad Mini 4/Mini with Retina display, iPod touch, Apple TV 4, Apple TV 3/2/1, etc without any other program assistance. The surprise us that ByteCopy also can convert unprotected DVD to iPad like Handbrake. Read the review.
The following is a step-by-step guide teaching you how to rip and convert DVD to iPad with Pavtube ByteCopy.
Free Download top Pavtube DVD Ripper for iPad: 

Step 1: Load DVD movies
Launch the best DVD to iPad Converter, click the “DVD disc” icon to navigate the videos. You can also add ISO file, IFO file or DVD folder. Press the selected main title you can preview the whole DVD movies on the preview window on the right, which works like a media player. 
Step 2. Choose the output format for iPad
Click on “Format” box, a list will appear, you can easily find the “iPad” category, to enjoy DVD files on iPad with 1080p image quality, you are suggested to choose “iPad > iPad Full HD Video H.264(*.mp4)” format for output format. 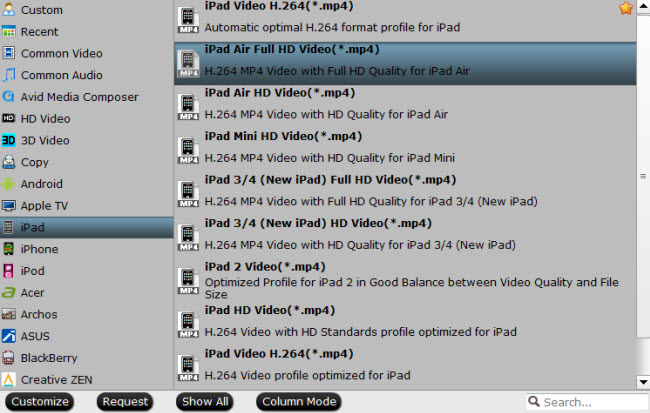
Step 3. Optimize output profile parameters
You can configure the output video parameters by clicking Settings. For iPad readable MP4 videos, you can just resolution, codec, frame rate, etc. For example, iPad Pro resolution is 2732 x 2048, so you can adjust video size to larger, but no larger than 2732 x 2048.
Step 4. Start DVD to iPad conversion
Start the conversion by clicking on the green arrow start conversion button on the interface of this converter. After it completes, click the “Open” button on program interface to locate the created MP4 file, and transfer the converted files to iPad with iTunes.
This way can be used to import DVD to iPad Pro 12.9/9.7, iPad Air 3, iPad Air 2, iPad Air, iPad Mini 4, iPad Mini 3, iPad Mini 3, iPad Mini. A warm tip is that normally an iPad only has 32GB, 64GB, 128GB storage. If you want to transfer more DVD to an iPad, you can use an iPad-compatible External Hard Drive such as Toshiba Canvio AeroMobile Wireless SSD, LaCie Fuel 1TB Wireless, iPocket Drive, Leef iAccess iOS Micro SD, etc.
Related Articles:
- VLC Media Player on iPhone iPad Not Accepted AC3 Codec? Solved!
- How to Play Downloaded YouTube Video on iPad Pro 9.7?
- Watch 2015 Oscars Winners on Tablet/PC/iPad
- How to Play TiVo Recordings on Android Tablet/iPad while traveling?
- Backup Blu-ray/DVD to Windows Home Server for Viewing via iPad
 Pavtube New Official Site