WD TV Live Plus

Transcoding audio in MKV from AAC to AC3 5.1 to play on WDTV

Camille Wesley No Comments

As we all know, AAC is a common audio codec which is mainly used in MKV or MP4 format container. However, sometimes MKV with AAC may not work very well on WDTV in the following situations.

Why my MKV in AAC cannot be played with media players like WDTV? I’m only getting 2 channel sound from 5.1 MKV files. I have a WDTV live, Pioneer VSX-1021, and Epson projector. I have tried optical pass thru and digital pass thru, but I’m only getting 2 channel sound. Any ideas?

I’m not sure what the best way would be to change MKV audio track from AAC to AC3 files for playback with 6-channel on WDTV. Does anyone know the solution?

I have a problem with AAC 5.1 to AC3 5.1 conversion for WDTV. Do any of you have any idea on how to get around this problem?

My WDTV device does not support AAC audio format. It does support MP3 and AC3. What would be the best option to transcode it to AC3 with Dobly AC3 Audio?

The audio of MKV in AAC is lag behind of video in WDTV. Any solution?

It seems that the audio quality of MKV video in AAC is unbearable by WD TV. Why?

So does WDTV play MKV with AAC 5.1 audio track? Actually, WDTV can easily open MKV files unless your AV Receiver supports decoding 5.1 AAC. If it doesent … then you will either get No Sound or only 2 Channel Sound at the very least. This article will introduce a powerful AAC Converter and a full tutorial on how to convert 5.1 channels AAC or 6 channels AC3 on Mac and Windows while keeping the video format or changing the video format.

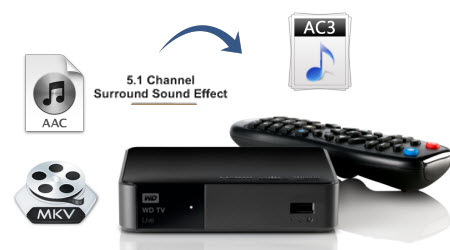
Solution: Convert AAC 5.1 to AC3 5.1 in MKV to WDTV for playback

In order to successfully play MKV with AAC 5.1 audio on WDTV anywhere, a recommended solution is transcoding audio in MKV from AAC to AC3 5.1 to play on WDTV.

Preparation:

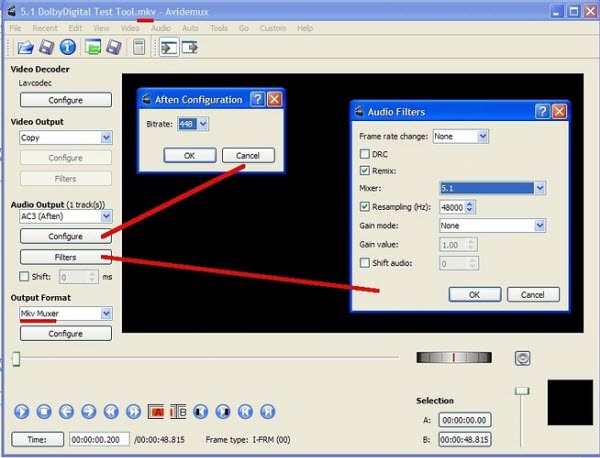
You can finish the task by using software. eg. PopCorn MKV AudioConverter– a top Matroska MKV DTS/AAC to MKV AC3 converter or Avidemux: Open your video file (Video OutputCopy) Audio Output AC3 (Aften)select configure and filters (see picture for settings) * Output Format If your video is MKV then select MKV Muxer File > Save …. wait about 10-15 Minutes (depends on the size of your video) * usually i dont change the audio filters…

But to perform AAC to AC3 with Dobly Digital 5.1 Audio conversion in simple steps while still keeping the original quality, Pavtube iMedia Converter for Mac is what you need. It is simple to use and features fast conversion speed. With this excellent AAC to AC3 audio converter, you can convert not only convert AAC to the audio format you need incllucing AC3, MP3, AIFF, M4A, etc., but also transcode MKV, MP4 videos with AAC audio to play on WDTV, Chromecast, iTunes, iPhone, iPad, iPod, Xbox 360, PlayStation 3, Nintendo Wii, PowerPoint, or edit in iMovie.

What’s more, it offers solutions to merge AC3 files, split AC3 files, adjust the bitrate/sample rate of AC3 files, change the channels of AC3 files 5.1 channels, stereo or mono depending your source audio and more wait to experience, and you are provided some useful edit functions cropping, trimming, adding watermark, attaching subtitles for watching with best results. If you’re using a Windows, you can get the equivalent Windows version entitled Pavtube Video Converter Ultimate which can help you transcode MKV AAC to AC3 5.1 audio on Windows (Windows 10 included). (Read review) Just get it and follow the step-by-step guide to achieve your goal smoothly.

Free download and install Pavtube iMedia Converter for Mac:


Other Download:

– Pavtube old official address: http://www.pavtube.cn/imedia-converter-mac/

– Cnet Download: http://download.cnet.com/Pavtube-iMedia-Converter/3000-2194_4-76177788.html

Transcoding audio in MKV from AAC to AC3 5.1 for WDTV

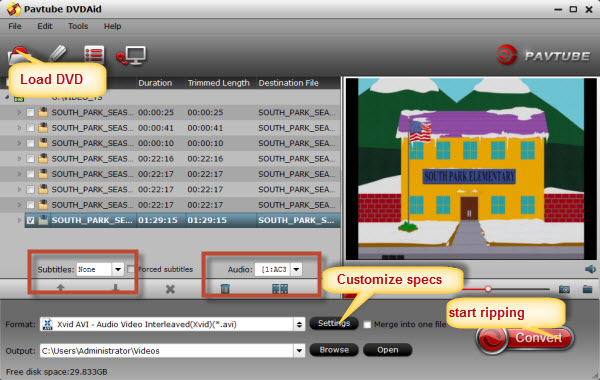
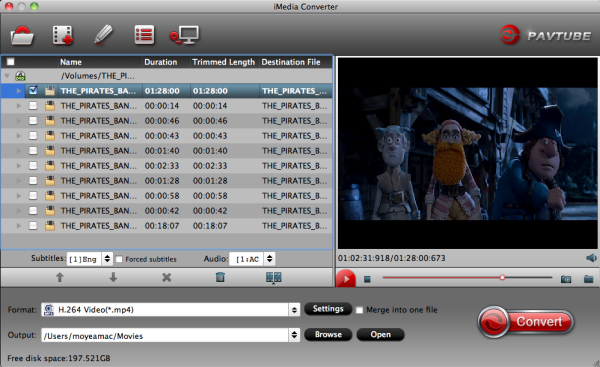
Step 1: Add source MKV video files with AAC

Install the launch the AAC converter. Click the “Add video: button to import MKV AAC files into it for converting. The AAC to AC3 Converter is multi-task based and supports batch conversion, this means you can load in multiple video files to convert at one time. (Besides MKV/MP4, H.265 MP4 Blu-ray is supported)

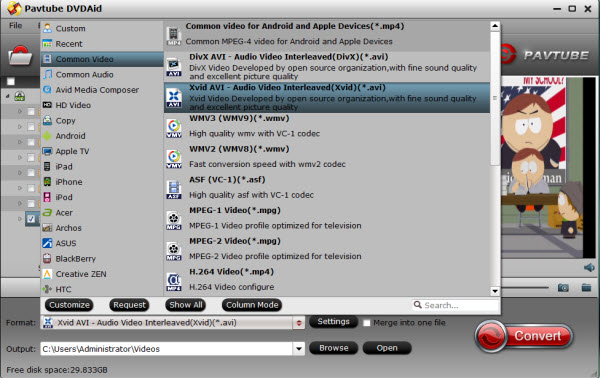
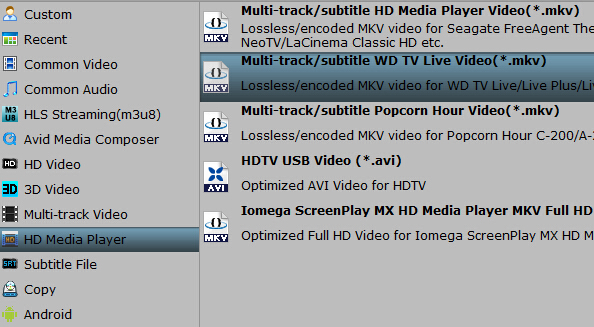
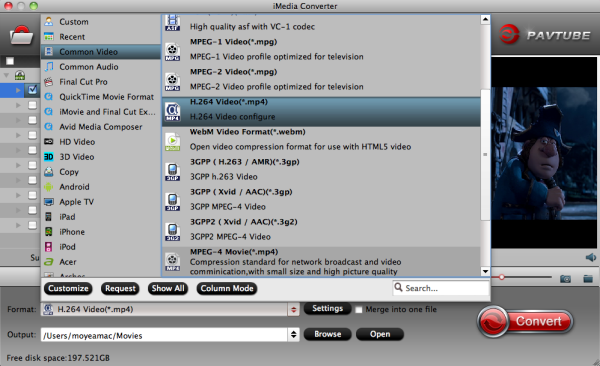
Step 2: Set output profile for WD TV

If you want to keep MKV format as your original one, just choose MKV as output format from “Common Video” or “HD Video” in the drop-down list “Format”. Or you can change source MKV to MP4 files which is suitable for playback on WDTV, navigate to “Common Video” or “HD Video” catalogue and choose H.264 format.

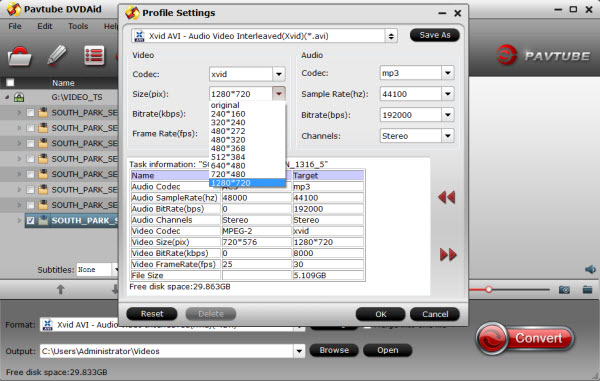
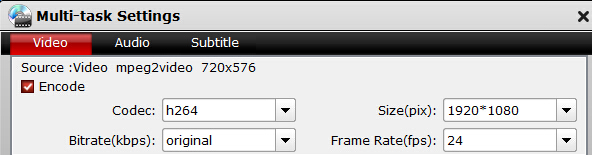
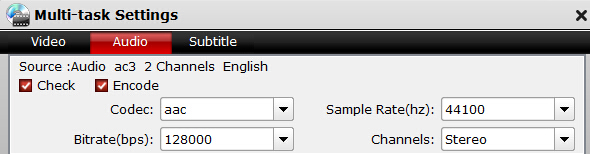
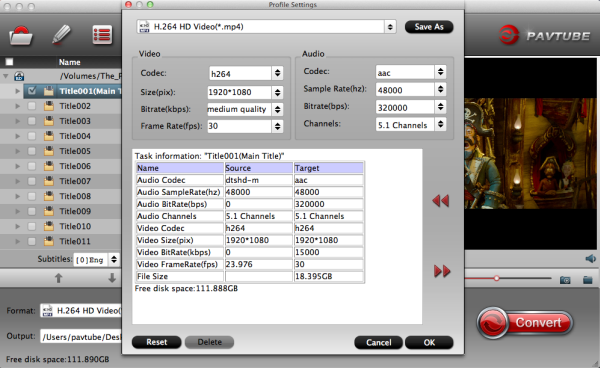
Step 3: Set audio as AC3 5.1

Click “Settings” button, the “Profile Settings” windows pops up, on which you can set the Audio Codec to AC3 and Channels to 5.1 Channels. This ensures your output audios to be encoded with ac3 5.1. Otherwise, you can keep your channels as Stereo.

Step 4: Transcode MKV AAC to AC3 5.1 for WDTV

Hit the Convert button to start converting MKV AAC to AC3 with 5.1 channels. Another good thing about Pavtube iMedia Converter for Mac is, it offers a “Shut down computer after conversion” option, so if you don’t want to wait around in front of your computer for the entire conversion process, you can tick off it and go away to do other things. After the conversion, you can stream the converted files to TV via WDTV.

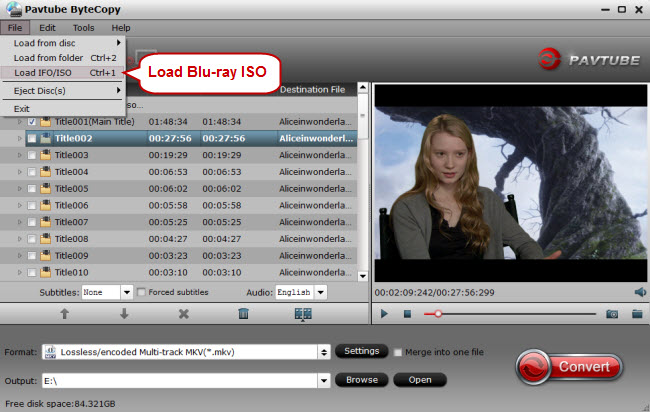
Need to convert copy-protected Blu-ray/DVD and ISO  files to WDTV for watching? Pay extra $14.9 to get ByteCopy for Mac + iMedia Converter for Mac software bundle. Save you $27.1! What are you waiting for?

What Is AC-3 Audio Format

AC-3 is an audio codec for surround sound audio files used on DVDs format. The AC-3 compression method was created by Dolby Labs for use in a Dolby Digital audio on DVD, Blu-ray and other digital video formats. AC-3 stands for Audio Coding 3.

AC-3 increases fidelity over its previous surround sound standard, Pro-logic, with independent tracks for each of the 6 speakers, a 16bit sampling at 48kHz rate compressed by 10-12 times, making for a total bit rate of 384kbps.

Related Articles:

Can I play Commercial DVDs on WD TV Mini Media Player?

Camille Wesley No Comments

Do you want to play commercial DVDs on WD TV Mini Media Player? If you’re interested in doing likewise while having no idea about how-to, keeping reading a brief guide below. Here, you can simply connect WD TV Mini to your TV, plug a USB-connected storage into the player and you are ready to enjoy all your digital media in DVD for smothly playback. 

When we’re eagerly awaiting the WD TV HD Media Player rumoured sequel, WD has launched an alternative that supposedly complements both its original and forthcoming players, called the WD TV Mini. As we know, the WD TV can not support commercial DVDs, so you have to rip them. How to make it possible for you to watch commercial DVDs on your wide screen TV via WD TV Mini Media Player. What you will need is Pavtube DVDAid forWindowsMac, it not only rips, but it encodes too. Below is a step-by-step detailed operating steps: 

How to play commercial DVDs on WD TV Mini Media Player? 

Step 1: Load DVD source. 

First of all, Download it and insert your commercial DVD to WD TV Mini Media Player. Now it’s time to import DVDs into the software after launching it. Click “Load files” icon to choose DVD discs for loading. 


Step 2: Select subtitle and audio track 

Click on the pull down menu of “Subtitle” and “Audio” respectively to select your needed subtitle and audio language. 

Step 3: Select output format for WD TV Mini Media Player 

Click on the drop-down list at the end of “Format” to choose an output format for WD TV Mini Media Player. Your selection should be in the range of AVI (Xvid, AVC, MPEG4), MPG/MPEG, VOB/ISO, MP4/MOV (MPEG4), RM or RMVB 8/9/10. Here I select “Commen Video – Xvid AVI – Audio Video Interleaved(Xvid)(*.avi)” as an example: 


Step 4: Click “Settings” button to adjust video and audio parameters 

The user manual tells us that when playback .avi (Xvid) video files, WD TV Mini need to choose the size as “1280*720”, so we need to follow the manual while ripping a DVD. 


Step 5: Start ripping commercial DVDs . 

Click “Convert” button to start conversion. Once finished, you can get the generated files for WD TV Mini via clicking on “Open” button with ease. Afterwards, just copy the output files to My Passport portable hard drive or other USB drive, and then connect WD TV Mini to your TV, plug your USB drive into the player and you are ready to enjoy the movies ripped from your commercial DVDs. 

Further more information: 

Media File Formats Supported on the WD TV Mini Media Player (Based on Firmware Version 1.00.60) 
Video — AVI (Xvid, MPEG1/2/4), MPG/MPEG, VOB, MP4/MOV (MPEG4), RM or RMVB 8/9/10 
RMVB supports up to 1024x576x24, 1024x576x30, or 800x600x30 compressed video resolution. 
MPEG1/2/4 supports up to D1 resolution (720×480 in NTSC, 720×576 in PAL) 
RMVB videos will play on the WD TV Mini Media Player only. They are not supported on the original WD TV HD Media Player, or the WD TV Live HD Media Player. 
FLV file extensions are NOT supported. You will need to use conversion software to convert them to a supported format. (You can use Pavtube FLV to WD TV converter to slove this problem). 

Audio — MP3, WAV/PCM/LPCM, WMA, AAC, FLAC, MKA, OGG, APE


Releated Articles: 

How to Play Blu-ray on WD TV Live Plus Smoothly?

Camille Wesley No Comments

Blu-ray not only can be played via Blu-ray Player. It also could be ripped and streamed on other multimedia players, which natively don’t support Blu-ray, like Windows Media PlayerQuicktimePopcorn Hour A-400, WD TV Live Plus, etc. This operation is easy with the help of Blu-ray ripping products on the market. And no matter ripping Blu-ray to what device, the process is nearly the same. Here, we take WD TV Live Plus as an instance.

Firstly, backing up Blu-ray to WD TV Live Plus, you should know clearly the video and audio support of WD TV Live Plus. This can be found in the User Manual and Official site. Below is what I searched: 

Media File Formats Supported on the WD TV Live Plus HD Media Player:

Video: MPEG1/2/4, WMV9, AVI (MPEG4, Xvid, AVC), H.264, MKV, MOV (MPEG4, H.264), M2TS, TP, TRP, TS, MP4, ASF, VOB (unprotected or unencrypted)

  • MPEG2/4, H.264, and WMV9 support up to 1920x1080p 24fps, 1920x1080i 30fps, 1280x720p 60fps resolution.
  • FLV file extensions are supported (using a video codec of H.264 and an Audio codec of AAC only) in the latest firmware version for all of the above devices besides the WD TV HD Media Player (Gen 2).
  • RMVB videos from Real Media are not supported. You will need to use conversion software to convert them to a supported format.

Audio: MP3, WAV/PCM/LPCM, WMA, AAC, FLAC, MKA, AIF/AIFF, OGG, Dolby Digital, DTS.

Secondly, make sure your computer has a internal or external Blu-ray drive to carry out Blu-ray conversion process.

Thirdly, find a Blu-ray ripping tool, like Handbrake or ByteCopy. Considering that Handbrake can’t solve copy protected Blu-ray disc and it has output format limitation, I suggest you choose Pavtube ByteCopy (Mac version).

This software can rip and backup Blu-ray to nearly all kinds of video and audio format: H.265,  M3U8, FLV, MOV, M4V, WMV, WMA, etc including lossless MKV with all multiple audio and subtitle tracks, and chapter markers keeping. It offers full disc copy and directly disc copy Blu-ray. What’s more, it allows consumers to adjust video frame rate, codec, size, and audio codec, channel to adapt to WD TV Live Plus. (More reasons to choose ByteCopy)

You can download here to try this amazing program:
          

Other Download:
– Pavtube old official address: http://www.pavtube.cn/bytecopy/
– Cnet Download: http://download.cnet.com/Pavtube-ByteCopy/3000-7970_4-76158512.html

Fourthly, using Blu-ray ripping tool to backup Blu-ray to WD TV Live Plus:

Steps to rip Blu-ray to WD TV Live Plus with ByteCopy

Step 1. Load Blu-ray files.

Launch Blu-ray to WD TV Ripper, click “Load file” to choose Load from disc. It will recognize the Blu-ray main title automatically to rip.

Step 2: Choose optimized profile for WD TV Live Plus

Pavtube ByteCopy offers users various choices for different devices and you are able to find the perfect profile for WD TV Live Plus following the path “HD Media Player” > “Multi-track/subtitle WD TV Live Video(*.mkv)”.(why choose MKV)

Step 3 : Set video parameters

According to the supported format list of WD TV Live Plus we searched before, when format is in H.264 codec, the frame rate should be set to 24. And the size can be set up to 1080p.

And audio AC3 codec is not supported, you should also change the codec to AAC.

Step 4: Start ripping Blu-ray to WD TV Live Plus

Click the “Convert” button to start converting Blu-ray to MKV for WD TV Live Plus. Once completed, go to “Open” the generated MKV files.

Fifthly, you can connect the WD TV Live Plus with your HD TV using HDMI and then to watch Blu-ray via WD TV Live Plus.

Although the devices maybe different, the process is similar. You can use this way to transfer your Blu-ray to other devices for streaming such as iPhone, iPad, tablet, game consoles.

Related Articles: