Whenever meeting video playback troubleshooting on Windows or Mac, people are accustomed to turn to VLC. It seems like VLC can play every video with any extension and codec. Unfortunately, VLC isn’t powerful as you imaged, even a AVI file can encounter playback issue on VLC. Let’s look at an example:
“VLC is crashing trying to playback AVI files created from a particular camera. These played back with 2.2.2. I’m not sure if all AVI files cause the problem.
The Camera is a WirePath WPS-750-DOM-IP security camera.
OS 10.11.5, iMac 27″ Retina 5k.” 
Sometimes, some video playback troubleshooting can be solved easily with an update. So try to update to VLC 2.2.4 to create the crash. Normally, the update on VLC would solve “AVI Can’t Play” issue. Not only for AVI, but for MKV, MP4, especially for H.265 MP4, lower version VLC maybe meet playback troubles. When meet the trouble, just try to update VLC.
VLC Tips: Blu-ray to VLC |DVD to VLC |4K to VLC | 3D to VLC
Another solution to solve AVI issue on VLC is under the help of a third party application – video coverter. AVI is a video container supporting a range of video and codec. When AVI can be played on VLC, the main reason is the video codec incompatibility. So transcoding AVI to VLC with right A/V codec or just demux AVI to MP4 for VLC with video converter is a excellent way.
Pavtube iMedia Converter for Mac <Pavtube Video Converter Ultimate > is recommended here to help you re-encode AVI to VLC. It can remux AVI for VLC, or convert AVI to MP4/MKV for VLC. It can keep AVI format but change the video, audio codec, size, bitrate, frame rate, sample rate. It also can keep the original A/V parameters but output more compatible format for VLC. You can deinterlacing your original AVI file, trim/crop/split/merge your AVI videos and add subtitle to your AVI files. More features are in Pavtube Video Converter Ultimate review.
Free download and install 

How to transcode AVI to VLC?
Note: The steps are suitable for both Windows and Mac products. But considering the platform is OS system (the questioner is using iMac 27″ Retina 5k), we take snapshot from Mac application.
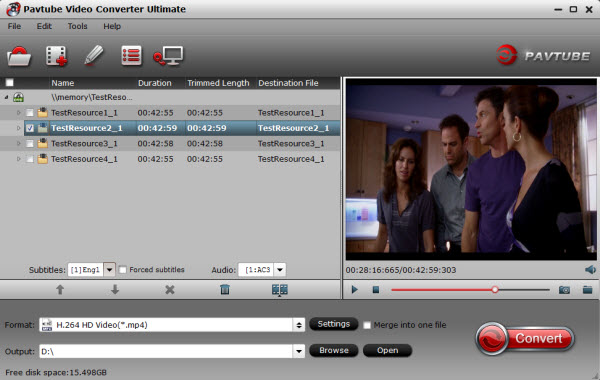
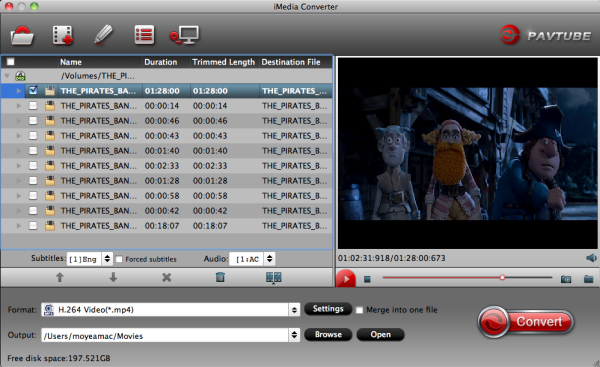
Step 1: Add AVI files
Open the program, click “File” menu, from its drop-down option, select “Add Video/Audio” to load AVI videos to the program. You also can simply drag and drop AVI files to the interface of the app. Pavtube product supports batch conversion so you can add multiple AVI files. 
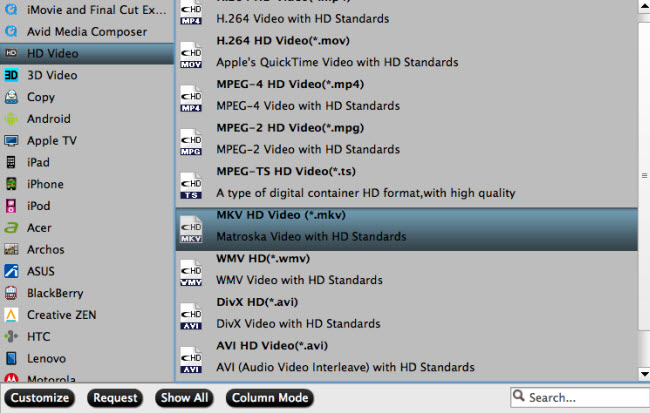
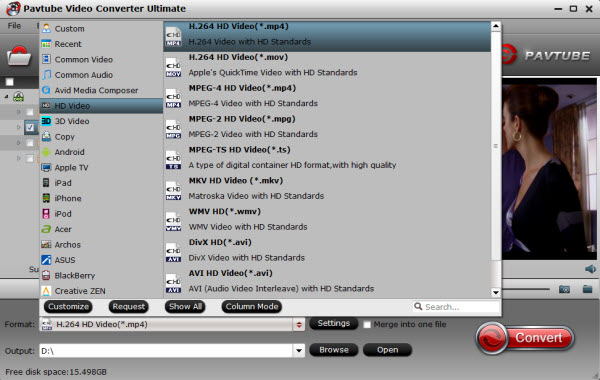
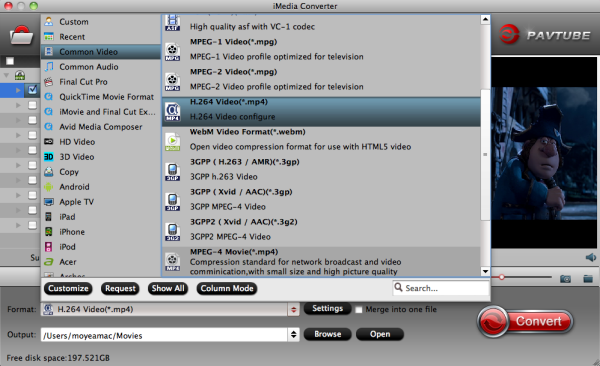
Step 2: Choose output format for VLC
If you plan to re-encode AVI to VLC with more compatible format like MP4, just navigate to “Format” > “HD Video” > “H.264 HD Video (*.mp4)” as output file format. 
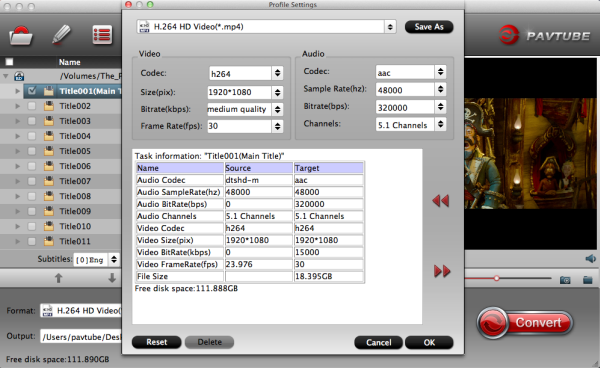
Step 3: Adjust A/V parameters
When selected MP4 as the output format for VLC, you can open “Settings” window to check the settings. If you still keep AVI format in the former step, you maybe need to reset the settings to more compatible one for VLC. 
Step 4: Start to convert AVI to VLC
After all the settings, just click “Convert” button to start to transcode AVI to VLC supported format. If you added many AVI files at the first step, you can turn on “Shut down computer after conversion”. Then you can go to sleep or do other things without waiting in front of the computer.
Follow the steps then you can easily fix “Can’t Play AVI on VLC” issues. For free, I suggest you to try the update method. But if you get a Pavtube Video Converter Ultimate/iMedia Converter for Mac, you also can solve MP4 trouble on VLC, audio issue on VLC, MKV bug on VLC, 4K/H.265 not playing problem on VLC. So it is a bargain, right?
Related VLC Software
Pavtube ByteCopy for Windows/Mac – If you can’t play Blu-ray/DVD disc, Blu-ray/DVD ISO images on VLC, you can use Pavtube ByteCopy to rip Blu-ray/DVD to VLC supported digital MP4, MKV, AVI,etc videos. And to save money, you maybe interested in the software bundle:
ByteCopy($42) + Video Converter Ultimate($65) = Only $79.9, Save $27.1
Related Articles:
Jun
Jun
Have you prepared the Father’s Day gift for your dear Dad? If not, Pavtube gives you the best idea. You can record the happy time with your father and add your thanks in the video using a video editing program. Then show the love video to your daddy. To release the idea, Pavtube Studio prepares 2016 Father’s Day Facebook Special Offer where you can get the best tool to help you achieve the video produce. 
Pavtube will offer you the professional and top-rank Video/BD/DVD software at a lower price than ever in the Father’s Day promotion activity. The top all-in-one Video/Blu-ray/DVD Converter tool is Pavtube Video Converter Ultimate <Mac version>. This program helps you convert your shoot to iMovie, FCP, Premiere Pro CC, etc to edit and rip DVD/Blu-ray movies about fathers to your Premiere Pro CC, CS6, CS5, etc supported digital files. You even can trim a video footage in movies with them to add your own thanksgiving record.
More Features of Pavtube Video Converter Ultimate
1) 1:1 Backup Blu-ray/DVD without region code or protection limit in two clicks.
2) Rip Blu-ray/DVD into H.265/HEVC, M3U8, MP4, Apple ProRes, DNxHD, MOV, M4V, MOV, MKV, AVI, Xvid, Divx, VOB, MPEG-2, SWF, FLV… for playback on smartphone, tablet, TV set, HD media player, streaming server, Hard drive, Game console, etc.
3) Convert Canon/Sony/Panasonic/Nikon/JVC/Blackmagic/Red One shooted H.265, XAVC, XAVC S/L, MXF, MOV, AVCHD, AVI, MP4, VOB footage into common video formats, so you can watch or edit them on PC/Mac.
4) Compress 4K to 1080P, 720P and allows you to adjust video/audio bitrate, frame rate, codec, sample rate to get more compatible video for Apple TV 4, Amazon Fire TV (2015), VLC, PC.
5). Pavtube Video Converter Ultimate is fully compatible with Windows 2003/XP/Vista/Windows 7/Windows 8/Windows 8.1/Windows 10 while the Mac version supports Mac OS X 10.11 El Capitan, Mac OS X 10.10 Yosemite, 10.9 Mavericks, 10.8 Mountain Lion, 10.7 Lion, 10.6 Snow Leopard, 10.5 Leopard.
If you want to know more the function of Pavtube Video Converter Ultimate, just read its review
Now get Pavtube Video Converter Ultimate for Windows/Mac below: 
Once you have a Pavtube product in hand, you will enjoy the service of life-long technical support and update in time to compatible with any Win/Mac system upgrade. Catch this opportunity and enjoy the best video production experience with the least money in Pavtube.
This Pavtube Father’s Day promotion coupon will expire on June 26th 2016. Once the campaign ends, the price will go back to the original $65. But you still can get some discount on Pavtube Software Bundles in daily life. The software bundles with the discount on Pavtube Video Converter Ultimate includes:
ByteCopy($42) + Video Converter Ultimate($65) = Only $79.9, Save $27.1
Video Converter Ultimate($65) + DVD Creater($35) = Only $64.9, Save $35.1
Video Converter Ultimate($65) + ChewTune($29) = Only $74.9, Save $19.1
User Guides:
- Covert H.265 Music Videos to Full ms 2008 server for Home Theater
- Two Ways to Watch H.265 Video on Android Phones
- 3 Apps from Pavtube to Help You Backup X-Men Collection Blu-ray Discs
- Convert 2D Video/Blu-ray/DVD to 3D MP4/MKV/MOV/AVI/WMV
How to Compress and Convert 1080P to 720P with Original Quality?
Jun
Did you get the expression in your father’s eyes when you present the gift for you mom on Mother’s Day? Have you prepared the best Father’s Day gift for your dear daddy? If you still didn’t have any idea about the Father’s Day gift, here has a suggestion. If your daddy loves movies and collecting Blu-ray/DVD discs, just get him a professional Blu-ray/DVD Ripper to help him backup all his discs. Pavtube Studio offers customers the top Blu-ray/DVD Ripper and give Facebook fans 50% OFF on the best Blu-ray/DVD Backup Tool on Father’s Day Promotion. The special activity starts on today, and ends on June 26th. Move on to dive into the details. 
Watch 2D/3D Blu-ray, DVD Films with Father at home on Father’s Day
Spending some relaxing movie time with mom is a heart-warming gift for here. Among other things, watching 2D/3D Blu-ray and DVD films your mom likes such big names as Jennifer Aniston, Julia Roberts and Jason Sudeiki, etc with her may be the best way to show your love to your Father.
Tip: If you want to play Father-themed 2D/3D Blu-ray and DVD movies through home theater on big screen TV or VR headsets at home with your mom and other family members, you can try Pavtube ByteCopy and Pavtube ByteCopy for Mac– A top Blu-ray/DVD Ripper/Backup for Home Theatre/TV/VR Headsets.
Take a Tip to play Blu-ray/DVD with your Daddy on Father’s Day
Furthermore, maybe your Fathers had seldom traveled to any place, then Father’s Day gives you the valuable opportunity to have a trip with here.
Tip: You may want to play your precious Blu-ray/DVD movies or backed up ISO files in iPhone, iPad and other Android/Windows tablets and phones with Mom when traveling, getting her Pavtube ByteCopy or ByteCopy for Mac to make Blu-ray/DVD backup on mobile devices like iPhone, iPad, Android will make your trip less dull.
Get Pavtube ByteCopy for Win/Mac 50% OFF at Father’s Day Deal 2016!
Now, Pavtube ByteCopy or ByteCopy for Mac offering 50% OFF deep discount. It’s time to get our powerful tool and rip/copy your Blu-ray/DVD/ISO to watch with your daddy! Just grab one for her. Only $21! Save you $21! (Read Review)
Enjoy lifetime FREE update and tech support services. 30-Day Money Back guarantee.
What can Pavtube ByteCopy for Win/Mac give you?
* Constantly update to decrypt the latest Blu-rays, DVDs
* Rip any Blu-rays/DVDs/ISO to MP4, FLV, AVI, MOV, H.264, H.265, M3U8, WMV, AAC, etc.
* Convert Blu-rays/DVDs/ISO to iPhone 6S/SE, iPad, Android, Samsung, Xperia, etc.
* Backup Blu-rays/DVDs to multi-track MKV with lossless quality andl preservation of all audio tracks, subtitles and chapter markers, etc.
* Perfectly backup Blu-ray/DVD with 1:1 Quality and protection removed
* Save 100% intact M2TS/VOB main movie from your Blu-ray/DVD Disc
* Rip Blu-ray/DVD with forced subtitle, desire subtitle/audio tracks
* Edit Blu-rays/DVDs/ISO: Trim, crop, merge videos, add watermark and subtitle etc.
Other user-friendly and effective products for Father’s Day 2016
Pavtube Video Converter Ultimate/ iMedia Converter Ultimate– 50% OFF (Original: $65 Now: $32.5)
Pavtube BDMagic/ BDMagic for Mac – 50% OFF (Original: $49 Now: $24.5)
Pavtube DVDAid/ DVDAid for Mac – 50% OFF (Original: $35 Now: $17.5 )
Pavtube HD Video Converter/HD Video Converter for Mac – – 50% OFF (Original: $35 Now: $14.5 )
Conclusion
In a word, the best Father’s day gifts are not about money, they are about your affections and love embodied in them. To pick up a terrific Father’s Day gift for your daddy, you have to know what he is into. Catch your time to get the best 2016 Father’s Day Swett Discount from Pavtube. Enjoy and have a nice day!
Related Guides:
- Top DVD to Lossless MKV Converter 2016
- Rip Blu-ray/DVD to unRAID server
- Watch 3D Blu-ray Movies on Oculus Rift
- Store Blu-ray onto USB 3.0 Flash Drive for Playback
- Copy Blu-ray to MKV for using Kodi on Open Hour
Src: http://bluraydtstruehd.com/2016/06/2016-fathers-day-promotion/
Jun
For a cinephile, people has many ways to enjoy movies: watch movies in the theater/on the TV, stream Blu-ray/DVD and download movies from torrent site. Many people like to stream the downloaded torrent movies on Apple TV 4/3/2/1 via iTunes then they don’t need to add the movie to the playlist one by one. However, not all torrent movies can be put into iTunes for Apple TV freely;
“I download torrents via Kickass Torrents and / or Lime Torrents and download the files with uTorrent. I want to watch via my AppleTV from iTunes to my living room television set but some movies can’t be put in, why?” 
I think even though you don’t have an Apple product, you also know Apple product has its own ecosystem, which prevents iTunes store source from outflowing into other OS system devices and also keep strict requirement on the inpouring source. For videos, if you want to add external content to iTunes for Apple TV, iPhone, iPad, you should make sure your video is in the right format for iTunes: .m4v .mp4 .mov.
So if you can’t add torrent movies to iTunes, the main causes of failure probably is the format incompatibility. In the case, you need a video coverter to transcode the format to iTunes and Apple TV friendly ones.
Pavtube Video Converter Ultimate <Mac version> is strongly recommended here for its stability on Windows 10 and versatility. It can re-encode H.265, MKV, AVI, MP4, AVI,WMV, FLV, TS, VOB, AVCHD, M2TS, even Blu-ray, DVD to iTunes, iPhone, iPad, Apple TV compatible format. Apart from transcoding unsupported torrent movies to iTunes supported MP4, MOV, M4V video, this video converter also can output iPhone, iPad and Apple TV preset equipping with optimized A/V parameters. Of course, you also can adjust the video and audio codec, size, bitrate, channel, etc on your own.
It has many functions including video transcoding and video editing function, if you want to learn more about it, you can read its review. There are several features that deserve you to notice: batch conversion, adjust aspect ratio, choose desired subtitle, remove/replace audio, add external subtitle.
You May Also Interested: Top 5 DVD to iTunes Converter for Mac and Windows
Free download and install 
Other Download:
– Pavtube old official address: http://www.pavtube.cn/blu-ray-video-converter-ultimate/
– Cnet Download: http://download.cnet.com/Pavtube-Video-Converter-Ultimate/3000-2194_4-75938564.html
How to Convert Torrent movies to iTunes for Apple TV
Step 1: Add torrent movies
Make sure your torrent movies on your PC. Then download and have a quick video converter installation. The trial version will have a watermark on your converted files. Except for that, there are no time limitation, no virus, and no unnecessary bundle apps while downloading. After that, click “Add Video” button to load your torrent movies files. You can load several files at once thanks to “Add from folder” button.
To choose desired subtitle and audio track, you can click and open the drop down list of “Subtitle” and “Audio” at the bottom of the chapter list. 
Step 2. Choose format for iTunes
You should select a friendly iTunes format for the output files. M4V is one of the supported iTunes format with the H.264 codec, which means that you can use this as an example. Click on the format image to get the pop-up window with the output formats then choose freely. 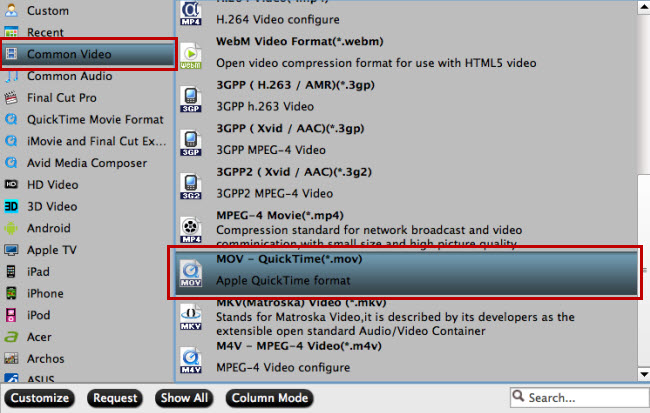
Tip:
a.If the preset video/audio parameters can’t meet your needs, just click Settings icon to adjust the video bitrate, codec, frame rate, audio sample rate, audio channel, etc.
b. If you wanna keep your original subtitle or add new, you can click on “Edit” button, the video editor will pop up. Tap “Subtitle” option and check the “Enable” icon. Then, by clicking on “Browse” to add *.srt, *.ass, *.ssa subtitle file you’ve downloaded.
Step 3: Convert torrent movies to iTunes for ATV
Hit the big Convert bar to start the torrent movies to iTunes (12 included) conversion. The conversion time mainly depends on your source video file size. When the conversion is finished, you can click “Open” to get the generated M4V files, which also can be played on Apple TV /4/3/2/1.
Now, it is the time to sync converted torrent movies to iTunes, open iTunes and go to File > Add to Library or directly drag and drop the converted video to iTunes. And then find the video in the Movies category. Then sync iTunes library to Apple TV to stream torrent movies as below steps.
Sync your Apple TV with iTunes
1.Make sure the computer you want to sync with is on, and iTunes is open.
2.On your Apple TV, choose Settings > Computers > Add Shared iTunes Library, and note the passcode displayed.
3. Click the Devices button near the top of the iTunes window to access your Apple TV, and enter the passcode.
You also can directly add the converted torrent movies to Apple TV to enjoy your movies in your bedroom via television set.
For more Apple TV media streaming issues, please visit the page.
Related Articles:
Jun
If you have high demand on subtitle while ripping Blu-ray to Open Hour Chameleon, just choose to copy Blu-ray to MKV. For 3D Blu-ray, if you need to add external .srt subtitle, ripping Blu-ray to 3D MKV SBS cause Kodi support that on Open Hour. Kodi 3D SBS works with readable subtitle provided the MKV being tag with correct SBS or TAB info but Auto switching TV to 3D not yet supported in Kodi. User will need to change their TV to 3D mode themselves at this moment. As for forced subtitle, tested MKV can support on Open Hour. 
To put it simple, ripping Blu-ray to MKV for using Kodi on Open Hour, you won’t meet subtitle trouble. So the question is how to decrypt Blu-ray to MKV for Open Hour playing using Kodi? Now it is the job of Blu-ray Ripper. A Blu-ray Ripper the difference from Blu-ray Copier> can make backup copies of your Blu-ray discs. Once the disc has been copied over to your hard drive, Blu-ray ripper software has the ability to convert the data to another file format like MKV.
Pavtube ByteCopy for Windows/Mac is exactly top Blu-ray Ripper to help you convert Blu-ray to MKV for Open Hour playing via Kodi. It is easy to use and can keep the original video quality in the Blu-ray ripping process. It can transcode Blu-ray to 720P MKV, 1080P MKV, 2160P MKV (Open Hour supports H.265 HEVC and H.264 3840X2160) and lossless MKV with multi-track subtitle and audio tracks (Note: Multi-Channels Decoding not supported in Open Hour).
You can choose SD MKV from “Common Video” and “HD MKV” in “HD Video”, “Lossless MKV” in “Lossless Video” is not suggested. Once you defined output MKV format, you can open “Settings” window to custom video size, bitrate, codec, frame rate and audio codec, channel, bitrate, sample rate. Then you don’t need to worry your MKV files can’t supported by Open Hour if you reset the MKV video parameters according to the requirement of Kodi and OHC. Read Pavtube ByteCopy review.
Free download and install:
Other Download:
– Pavtube old official address: http://www.pavtube.cn/bytecopy/
– Cnet Download: http://download.cnet.com/Pavtube-ByteCopy/3000-7970_4-76158512.html
How to Rip Blu-ray to MKV for Using on Kodi via Open Hour
Step 1: Import Blu-ray movies
Run the app and insert Blu-ray to Blu-ray drive. Click “File” to load the Blu-ray movies to the Blu-ray ripper. Blu-ray folder, Blu-ray ISO and DVD disc, DVD folder and DVD IFO/ISO are all supported.
Tips:
1. You can add more than one Blu-ray movies at a time for its batch conversion function.
2. If you need to play movies on Open Hour with forced subtitle, you can tick forced subtitle box below the chapter list.

Step 2: Choose MKV to output
Click “Format”, you can choose the desired format in “Common Video” or “HD Video” profiles. Here we selected HD MKV for Open Hour using.
Tips:
1.To reset video parameters, click “Settings”. A new window will pop up where you can adjust the video/audio parameters.
2.To add external subtitle to Blu-ray movie, open “Video Editor” window, click the “Subtitle” bar and check “Enable”, then you will be able to browse and add subtitles that you have saved on local computer to the Blu-ray movies.

Step 3: Convert Blu-ray to MKV for OHC
Click the convert button and start converting Blu-ray to MKV for Kodi and Open Hour. Once the conversion finished, you can get the ripped MKV video in output folder as you wanted.
You can store your MKV files from Blu-ray discs to external hard drive or USB 3.0 Flash Drive. When you need to play them, just insert it to the USB port. Or you can choose to put the Blu-ray movies to NAS then view the movie off of a NAS using Kodi on OpenHour.
Surprise:
Pavtube Studio offers you software bundles to help you save money while get software to rip Blu-ray, make copies of DVD and transcode videos.
ByteCopy($42) + Video Converter Ultimate($65) = Only $79.9, Save $27.1
Learn >> Pavtube Video Converter Ultimate
ByteCopy($42) + DVD Creater($35) = Only $44.9, Save $32.1
Learn >> Pavtube DVD Creater
ByteCopy($42) + MXF MultiMixer($45) = Only $69.9, Save $16.1
Learn >> Pavtube MXF MultiMixer
Related Articles:
Jun
Even you have a DVD Player or powerful Blu-ray Player that can play both Blu-ray and DVD like LG BD670, it doesn’t mean you can play DVD freely without any hassle. For example, in the question from videohelp“My BD670 is region 1, I have dvds both region 1 and 4”, the region 4 DVD won’t be played on region 1 LG BD670.
Learn >> DVD Region Codes
To play different region codes DVD on LG BD670, you can try to set the Blu-ray Player as below:
1- Open Setup menu
2- Go to Lock subMenu
3- Select Area Code(if you didn’t set the password before, set it now)
4- Choose the abbreviation of a country that is in the desired region
However, there are some people don’t think the above changes the region of the player in that some movie segments are banned in certain areas of the world. Depending on the country selected via the method above, those segments would be skipped if applicable. So hack DVD to region free for LG BD670 will be a better way. In this way, you can play any DVDs with various region codes on LG BD670 without changing the player region.
To hack a region-locked DVD, you can use a DVD Ripper. A DVD Ripper can decrypt the protection schedules on DVD discs. Pavtube ByteCopy for Windows/Mac is a ideal choice to accomplish the task.
This DVD both Blu-ray Ripper can bypass all the protections on DVD and Blu-ray discs, Blu-ray/DVD folders, Blu-ray/DVD ISO images and extract MPEG 2, WMV, MP4, AVI files. So you can use it to remove DVD copy protection and make DVD region free for LG BD670. With it, you can backup DVD to Video-TS folder, VOB files or MPEG-2 files then play on any Blu-ray Player when camping so that you can enjoy HD DVD video on wide screen via Blu-ray player. It can keep original video quality. If needed, it can give you multi-track MKV, AVI, MP4, MOV selections.
This Blu-ray Ripper also can convert Blu-rays to Samsung BD-JM57C Blu-ray Player for Vizio TV and rip Blu-ray disc to play on DVD Player.
Free download and install:
Other Download:
– Pavtube old official address: http://www.pavtube.cn/bytecopy/
– Cnet Download: http://download.cnet.com/Pavtube-ByteCopy/3000-7970_4-76158512.html
Hack DVDs to Region Free for LG BD670
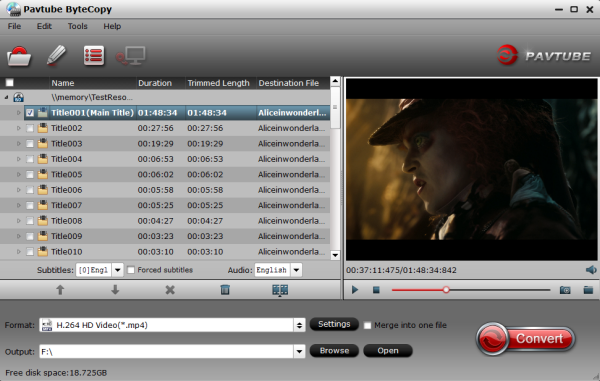
Step 1: Add DVD movies
Install ByteCopy <review>on your computer and launch it. Click “Files” to choose the right choice to load DVD movies. DVD, Video-TS folder, DVD ISO/IFO, Blu-ray, BDMV folder, M2TS files and Blu-ray ISO are all supported to inpput.
Tips:
Batch conversion is supported.
2. You can select desired subtitle and audio track and forced subtitle at the bottom of chapter lists. 
Step 2: Choose output format
Here has so many choices you can choose. For lossless quality, you can select lossless MKV. To get multi-track files, multi-track MP4, MOV, AVI are your choices. To keep the main title of DVD movie, you choose to convert DVD to MPEG-2 files. If you plan to stream these DVD on LG BD670 on TV, you can choose TV preset from profile. This preset is generally MP4 format with TV optimized A/V parameters. You can select it in accordance with your TV brand. 
Step 3: Reset video parameters (Optional)
Commonly, if you don’t have special need, Pavtube ByteCopy gives you excellent default parameters. But if needed, you can click “Settings” on the main interface to adjust video and audio codec, size, bitrate, frame rate and channel.
Step 3: Start digitizing DVD movies
Finally, you can go back to the UI, hit on “Convert” button to start digitizing DVD to MP4 and MKV. The GPU acceleration can save you lots of time. When the conversion is done, open output folder to locate the generated digital files.
Save your DVD rips to external hard drives. Plug it into a Blu-ray player to feed the HDMI cable to the TV. Then, you can enjoy movies when camping.
Surprise
ByteCopy($42) + Video Converter Ultimate($65) = Only $79.9, Save $27.1
Learn >> Pavtube Video Converter Ultimate
ByteCopy($42) + DVD Creater($35) = Only $44.9, Save $32.1
ByteCopy($42) + MXF MultiMixer($45) = Only $69.9, Save $16.1
Related Articles:
- Play DVD Disc on DVD Players without Region Code in 3 Different Ways
- Can’t Play MKV Files on Sony XD93 via USB Flash Drive – Solved!
- Can OHC play 3D Blu-ray ISO with no audio mess up
- Solution on H.264 Won’t Play on Sony DVD Player
- How to Backup Blu-ray movies on Windows 7 with Original Resolution and Quality?
May
Do you want to get something special for your children?Maybe a happy travel,children always learn much on their travel.But your child may be less patient on the way to your destination.He/She need someting interesting,for instance,how about a movie?It’s easy for you and just need a Bluray/DVD converter.
Now up to 50%off to purchase Bluray/DVD ripper and converter,prepare funny movie on tablet or your phone,don’t worry about the boredom of the journey.
Free choosing wanted audio/languages, extracting subtitles out of discs, making 1:1 lossless Blu-ray/DVD copies, transcoding AVCHD/MXF/XDCAM/HEVC footage to wanted formats, adding your own watermarks/subtitle to make a funny video, etc. More interesting features to be found! Don’t miss it!
Pavtube Software, the industry leader in the field of Blu-ray & DVD backup and HD/4K/3D Video solutions, rolls out its Children’d Day Promotion of 2016 on Facebook, offering up to a 40% deep discount on many of its hot selling Video products and up to 50% deep discount on many of its hot selling Blu-ray/DVD products, including No.1 bestseller ByteCopy, No.2 bestseller Video Converter Ultimate… as a gift. Pavtube Software could be everything a movie lover may need to back up their physical DVD and Blu-ray discs, convert them into on-demand formats for enjoying on the move. This Activity expire on June,5th,2016.Don’t miss this chance! 
Note: The main products of Pavtube that improved Blu-ray/DVD ripping & video converting speed with GPU acceleration are BDMagic, ByteCopy, Video Converter Ultimate, DVDAid, Video Converter and so on.
No.1 Bestseller Pavtube ByteCopy for Windows/Mac with 30% OFF – Only $29.4
Key Features
– Support All Blu-ray Related Copy Protections
– Lossless Backup Blu-ray and DVD movies to MKV container with multiple audio/subtitle tracks
– Allow full preservation of all audio/subtitles tracks and chapter markers
– Preserve a 100% BD M2TS/DVD VOB movie without extras
– Convert Blu-ray/DVD/ISO to Multi-track MP4, MOV, AVI, Apple ProRes
– Create 2D/3D Blu-ray/DVD to 3D MKV, MP4, MOV, WMV, AVI in Side by Side, Anaglyph and Top/Bottom 3 different modes
– Best solution to watch BD/DVD/ISO movies on portable devices, game consoles, media players/servers, TVs, projector, VR headsets, Non-linear editing system, etc.
– Support exporting forced subtitles and .srt external subtitles
– Support insert srt/ass/ssa subtitles to any movie file
– Remove unwanted audio tracks and subtitles streams at will
– Encode Blu-ray/DVD/ISO to H.265/HEVC MKV/MP4
– Fast conversion with NVIDIA CUDA/ AMD GPU acceleration technology
– Well compatible with Windows 10
– Customize Blu-ray/DVD with built-in video editor
ByteCopy Review
ByteCopy for Mac Review
MakeMKV vs ByteCopy vs DVDFab
Top 5 reasons to pick Pavtube ByteCopy on PC/Mac 

No.2 Bestseller Pavtube Video Converter Ultimate for Windows/Mac with 30% OFF – Only $45.5
Key Features
– 2D/3D Blu-ray Ripper + DVD Ripper + ISO Converter + 4K Converter + 3D Converter + SD/HD Video Converter
– Save a 100% intact BD M2TS/ DVD VOB movie without extras
– Convert/Rip Blu-ray/DVD to virtually any video/audio format
– Decode and Encode H.265/HEVC, XAVC, etc. 4K Video to 4K/HD Videos
– Full disc copy with original BD/DVD structure
– Rip 2D/3D Blu-ray/Video and (HD)DVD to 3D MKV, MP4, MOV, WMV, AVI in Side by Side, Anaglyph and Top/Bottom 3 different modes
– Create playable video files for portable devices, game consoles, media players/servers, TVs, projector, VR headsets and more
– Create editable files for Non-linear editing systems like FCP, iMovie, EDIUS Pro 8/7/6, Adobe Premiere Pro CC/CS6/5/4/3, After Effects CC/CS6, Avid Media Composer, GoPro Studio, Sony Vegas Pro, Sony Movie Studio, Pinnacle Studio, Windows Movie Maker, MAGIX Movie Edit Pro HD, Corel VideoStudio Pro, Cyberlink PowerDirector and more
– A professional video editing tool with trim, crop, split, merge and other options
– Improve Blu-Ray Ripping & Copying Speed With GPU Acceleration
5 Reasons Why Choose Pavtube Video Converter Ultimate
Pavtube Video Converter Ultimate Review
Wondershare vs Pavtube Video Converter Ultimate
No.3 Bestseller Pavtube BDMagic for Windows/Mac with 40% OFF – Only $29.4
Key Features
– 2D/3D Blu-ray Ripper + 2D/3D Blu-ray Copy + 2D/3D ISO Converter + DVD Ripper
– Bypass all copy & region protections
– Preserve the BD/DVD’s original file structure by using “Copy the entire disc” function.
– Blu-ray and DVD Main title content copy
– Rip/Convert 2D/3D Blu-ray and DVD discs & ISO to various videos like MP4, AVI, MKV, MOV, WMV, MPG, FLV, SWF, etc.
– Rip and Encode Blu-ray and DVD to H.265/HEVC MP4/MKV
– Create 2D Blu-ray/DVD/ISO to 3D movies in Side by Side, Anaglyph and Top/Bottom 3 different modes
– Create playable video files for portable devices, game consoles, media players/servers, TVs, projector, VR headsets and more
— Customizable video parameters and effect
– Customize Blu-ray/DVD with built-in video editor
– Fast conversion with NVIDIA CUDA/AMD GPU acceleration technology
Top 5 Reasons to choose Pavtube BDMagic
Pavtube BDMagic Review
Pavtube ByteCopy vs Pavtube BDMagic
Pavtube BDMagic vs Handbrake
No.4 Bestseller Pavtube HD Video Converter for Windows/Mac – 30% discount $24.5
Key Features
– HD Video Converter + 4K Video Converter + 3D Video Converter + Audio Converter
– Convert All Popular HD Video and Audio Formats
– Support H.265/HEVC Encoding and Decoding
– Support Transcoding HD/4K Videos from all Camcorders & Cameras: Sony, Canon, Panasonic, Samsung, GoPro, Blackmagic, JVC, Nikon, DJI and more
– Export Apple ProRes/DVCPRO/HDV/Avid DNxHD/AIC/MPEG-2 for NLEs
– Support Presets for Almost All Popular Devices, game consoles, media players/servers, TVs, projector, VR headsets and more
– Support Batch Conversion with Fast Speed and Excellent Quality
– Edit Videos through Trimming, Cropping, Adding Watermarks, Insert Subtitles, etc.
– Support adding .srt/.ass/.ssa subtitles into any videos
Pavtube HD Video Converter for Mac Review
Best HD Video Converter Review
Top 5 Best HD Video Converter for Mac Review
No.5 Bestseller Pavtube Video Converter for Windows/Mac – 40% discount $21
Key Features
– Convert from and to any common SD/HD/3D/4K video and audio format.
– Support Decoding and Encoding H.265/HEVC and XAVC 4K video
– Support Encode any videos to M3U8 for Apple devices
– 150+ ready presets for iPhone, iPad, Apple TV, Samsung, Google, TV, Surface, PS4, PS3, Xbox, WDTV and other mobile devices
– Support Apple ProRes/DVCPRO/HDV/Avid DNxHD/AIC encoding.
– Output Formats for Windows or Mac editing software, e.g. FCP X, iMovie, FCE, Avid, Adobe Premiere, Eduis Pro, GoPro Studio, WIndows Movie Maker, Sony Vegas Pro…
– 6X faster conversion speed and high output quality
– Support batch conversion – convert multiple files at the same time
– Edit and touch up your video in clicks (e.g. trimming, cropping, inserting SRT/ASS/SSA subtitle, etc)
Top 10 Video Converter Review
Top 4 Video Converter for Mac Review
No.6 Bestseller Pavtube DVDAid for Windows/Mac with 35% OFF – Only $22.75
Key Features
– Unlock Region Code & Copy Protections
– Superior support any kinds of DVD and ISO/IFO image files
– Back up DVD with 1:1 original quality
– Support HEVC/H.265 and M3U8 Output
– Convert DVD to common, HD, 3D and 4K video & audio in 250+ formats.
– Edit and personalize DVD instantly
– Convert 6X faster and keep excellent video quality
– Provide optimized preset formats for Mobile Devices/Game Consoles/TV/NLE/Web, etc.
Reviews: Pavtube DVDAid vs Slysoft AnyDVD
Top 5 Apple/Android DVD Ripper Review
Top 5 DVD Copy Review
Best DVD to MP4 Converter Review
No.7 Bestseller Pavtube multi-track MXF Converter for Windows/Mac – 50% discount $22.5
Key Features
– Export MXF into MKV, MOV, and MP4 container with multiple audio tracks preserved
– Output multi-track Apple Prores MOV for further editing in Final Cut Pro (X)
– Mix multiple audio tracks/channels in MXF footage into one
– Make MXF files editable in mainstream video editing applications
– Convert MXF to any other formats for editing, playing, or broadcasting
– Convert 2D videos to 3D in MKV, MOV, AVI, MP4, WMV formats
– Support DVCPRO/HDV/Avid DNxHD/AIC output
– Import/preserve/mix multi-track MXF in MKV/MP4/MOV formats
– Merge/split/trim/crop MXF footages.
Best Multi-track MXF Converter Review
Pavtube iMixMXF vs Tipard MXF Converter for Mac
Top 5 Best MXF Converters for Mac
For more products of Pavtube Children’d Day Promotion 2016, don’t hesitate to visit: hhttps://www.facebook.com/pavtubefans/app/203351739677351/
Src: http://i-loveshare.com/pavtube-childrens-day-special-offer/
May
When your videos are a mish-mash of video types and formats, you will get troubles in playing them on any device, anywhere you go. Possibly, you need a video transcoder to help you re-encode the video to right format. Handbrake is arguably the world’s best open-source video transcoder while Pavtube Video Converter Ultimate can get the crown as the best commercial video converter that help you convert video and rip your DVDs to your computer, your Android device or whatever you happen to own.
The Introduce of Handbrake 1.0.0 and Pavtube Video Converter Ultimate
Handbrake: This application is the cross-platform, easy-to-use video ripping and encoding tool, took the top spot by a wide margin, with close to 70% of the overall vote. The highlight is that this video transcoding and DVD ripping tool is availability on multiple platforms, its ease of use and presets for quick conversions (as well as its more detailed options for advanced users), and its speed.
Pavtube Video Converter Ultimate: First of all, you need to know, as the closed-source, it covers all the functions of Handbrake. After all, it is a paid one Video Converter + DVD Ripper + Blu-ray Ripper + Audio Converter. To some degree, although it is a commercial video encoding tool, it deserves the price. It can convert video to another format, copy DVD and backup Blu-ray. You can get H.265, M3U8, MP4, MKV, M4V, AVI, etc video and MP3, FLAC, AAC, etc audio with this integrated powerful software.
Handbrake 1.0.0 vs Pavtube Video Converter Ultimate: Input, Output, Features
Similar Search: Leawo Blu-ray Ripper vs Pavtube Video Converter Ultimate, AnyDVD vs Pavtube Video Converter Ultimate
For some simple video conversion work, Handbrake can do it well. Regrettably is, as a open-source video encoding tool, it has some unavoidable disadvantages. I think there is no way better than comparing Handbrake with Pavtube Video Converter Ultimate to tell you the shortness of Handbrake.
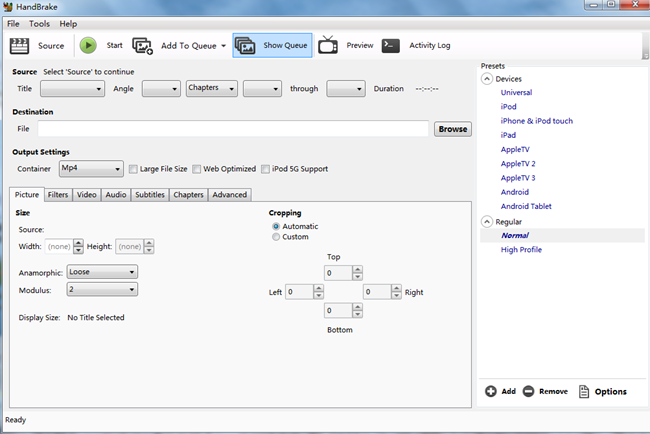
Snapshot
Handbrake:
Pavtube Video Converter Ultimate
Seeing the interface of the two Video Converter software, do you feel that Handbrake’s GUI is a little be complex like me Not like Handbrake, Pavtube Video Converter Ultimate has a intuitive interface that make people know easily where to import source video, choose output format, start conversion. You even can find te edit and setting icon easily in the UI.
Input
|
Supported Files |
Blu-ray |
DVD |
MP4 |
MKV |
H.265 |
FLV |
TS |
M2TS |
VOB |
|
Handbrake |
NO |
Only Unprotected DVD |
YES |
YES |
YES |
YES |
YES |
YES |
YES |
|
Pavtube Video Converter Ultimate |
YES |
YES |
YES |
YES |
YES |
YES |
YES |
YES |
YES |
As the most popular video transcoder, Handbrake can’t rip Blu-ray and copyright DVD. It only can handle .mkv, .flv, .m2ts, .mp4, .wmv, avi, .mod, etc and unprotected DVD .vob files. On the other hand, Pavtube Video Converter Ultimate can work in H.264/H.264, MP4, MOV, MKV, VOB, WMV, MPG, AVI, Divx, M4V, QT, FLV, F4V, ASF, 3GP, TS, MTS, M2TS, TP, TRP, MOV, MOD, TOD, MXF(partial), DV, M2V, 3G2, RM, RMVB, DAT, NUT, NSV and 3D Blu-ray movies, 2D Blu-ray movies, Blu-ray Folder, Blu-ray ISO Image File, DVD movies, DVD Folder, DVD IFO File, DVD ISO Image File.
Output
|
Supported Files |
FLAC |
M3U8 |
MP4 |
MKV |
H.265 |
FLV |
3GP |
WMV |
AVI |
|
Handbrake |
NO |
NO |
YES |
YES |
NO |
NO |
NO |
NO |
NO |
|
Pavtube Video Converter Ultimate |
YES |
YES |
YES |
YES |
YES |
YES |
YES |
YES |
YES |
For some bizarre reason, you’ve probably used Handbrake. The biggest weakness of Handbrake is that it only can output H.264 and MPEG-4 MP4 and MKV. Generally, for normal people, these two formats should be able to meet their video playback need in that nearly all multimedia players and video editing tools support H.264 MP4.
However, although H.264 MP4 format almost can fulfill any device’s parameter demand, sometimes, H.264 MP4 isn’t the most compatible format for them. If you choose to use Pavtube Video Converter Ultimate to convert your video, you can get:
Common Video Formats:
MP4, AVI, WMV, MKV, MOV, M4V, VOB, DV, ASF, MPG, 3GP, 3G2, etc.
HD Video Formats:
MP4, MOV, MPG, MKV, WMV, TS, AVI, etc.
3D Video Formats:
3D SBS/TB/Anaglyph MP4, 3D SBS/TB/Anaglyph MOV, 3D SBS/TB/Anaglyph MKV, 3D SBS/TB/Anaglyph AVI, 3D SBS/TB/Anaglyph WMV
4K Video:
4K MP4, 4K MKV.
Customization
|
Supported Function |
Trim |
Merge |
Crop |
Add Subtitle |
Rotate |
Deinterlacing Video |
Adjust Effect |
Add Watermark |
|
Handbrake |
NO |
NO |
YES |
YES |
NO |
NO |
NO |
NO |
|
Pavtube Video Converter Ultimate |
YES |
YES |
YES |
YES |
YES |
YES |
YES |
YES |
Normal video converter applications in the market including Handbrake and Pavtube have some simple video editing functions like video trimming, cropping, watermark addition, adding subtitle, deinterlacing video, rotate video, adjust video contrast, vignette video, denoise video, etc. In the aspect of video edition function, Handbrake is no doubt weaker than Pavtube Video Converter Ultimate.
Advanced settings
|
Supported Settings |
Video Codect |
Video Size |
Video Frame Rate |
Video Bitrate |
Audio Channel |
Audio Size |
Audio Sample Rate |
Audio Bitrate |
|
Handbrake |
YES |
NO |
YES |
NO |
NO |
NO |
NO |
NO |
|
Pavtube Video Converter Ultimate |
YES |
YES |
YES |
YES |
YES |
YES |
YES |
YES |
It is obviously that in avcanced settings aspect, Pavtube Video Converter Ultimate would perform better cause it can enable users to adjust audio and video parameters like codec, bit rate, frame rate, sample rate, audio channel while Handbrake allows peopel to reset video codec and frame rate only
Conversion speed
Source file for testing:
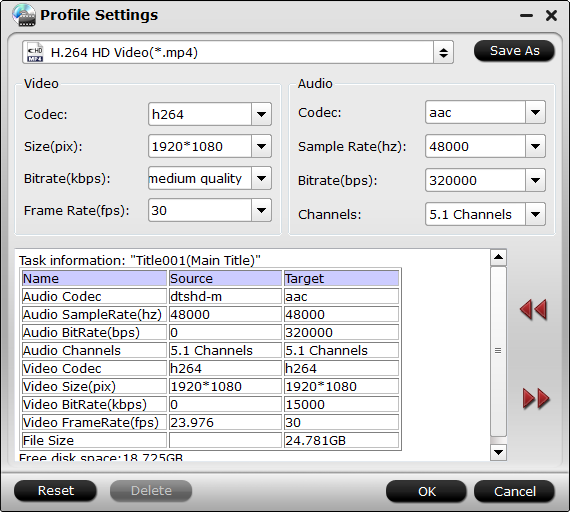
MP4 file, video codec: H.264;Resolution: 1280*720; Frame Rate: 24; Duration: 01:45:55; Audio Codec: AAC; Sample Rate: 48000Hz; Channels: 2
Pavtube Video Converter Ultimate:
Convert to MKV format, Video codec: h264, Size: original, Bit rate: High Quality; Audio Codec: aac; Sample rate (hz):44100; Bit rate (bps):128000; Channels: Stereo
Time expenditure: 1 hour and 02 minutes.
Handbrake:
Convert to MKV format, Video codec: h264, Frame Rate: Same as source
Time expenditure: 4.5 hours
Price & Availability
Handbrake: Free, Get it
Pavtube Video Converter Ultimate: Get it
Use Handbrake and Pavtube Video Converter Ultimate to Convert Video and Rip DVD
Handbrake User Guide:
Step 1: Open Handbrake and click on the “Source” button at the top left. Select DVD / VIDEO_TS folder from the drop down list. Then browse for the location where MakeMKV copied your movie. Select the folder, and click “OK.”

Step 2: You may be prompted to set a default path in Handbrake. This is an optional step. Click “OK.”

If you’d like to set a default destination folder, Go to Tools on the top menu, select Options. On the General tab, click “Browse” to select a destination output folder. Click “Close” when Finished.

Step 3: Next, click the dropdown list next to “Title.” Select the title that matches the length of the movie. It’s possible you may have see more than one title with a similar length. If so, consult the DVD information, or a site like IMDB.com, to find the proper movie title length. Select your container under Output Settings. This will be your final output file extension. We will be using MP4 for this example. You also have the option of MKV.

Step 4: If you didn’t set up a default destination folder, you’ll need to select one by clicking the “Browse” button. You can manually customize the output file name and change the output file extension to .mp4 (Unless you prefer the iPod friendly .m4v extension).
Settings
There are a variety of custom settings that can be changed either through the tabs listed under Output Settings, or by selecting one of the Presets to the right.
If converting exclusively for any of the devices listed in the preset list, simply click on that device and the settings will be automatically applied in the Output Settings tabs. For more Universal (non-Apple) devices or output, select the Normal profile.

The Video tab allows you to choose your codec. H.264 is the default. You also have the option to choose a target (output) size. The Constant Quality is recommended to be set between 59% – 63%. Anything over 70% will likely result in an output file larger than the input without any improved quality.

Step 5: When you’ve finished any customizations you are ready to begin the conversion process. Click “Start.”A Command window will open and you can follow the process. You’ll probably want to find something to do in the meantime as the process could take a couple of hours. When the process completes, you’re ready to watch your video.

Pavtube Video Converter Ultimate User Guide:
Step 1: First install and launch Pavtube Video Converter Ultimate <review>on your computer. You can load files to the program with two methods: directly drag the files into the interface or click on the “Files” button located on the top, it will open a file explorer from where you can choose the video file for conversion.
Step 2: When the video is loaded into the program, click the “Edit” icon on the top of the menu, you can do some simple and basic video editing work such as trimming, cropping, adding watermark, inserting subtitles, etc according to your own needs. This step is optional and can be skipped if you do not need this step.
Step 3: Once you have completed the video editing process, choose the output format in the "Format" drop-down list for your video, there are multiple different video and audio formats for you to choose from.
Step 4: If you could not find your desired output format from the output formats list, you can create your own custom format by clicking on “Settings” button as highlighted below. In the “Settings” window, choose the video/audio settings according to your requirement.
Step 5: After all the settings is completed, click “Browse”, from its drop-down list, define an output folder on your computer to save the generated files.
Step 6: Click on the “Convert” button to start the video conversion process, it will take a few minutes (depending on file size) for the conversion to complete.
When the conversion is completed, you will get a notification that the conversion is done. Click on “Open Output Folder” button in the notification box to view the generated video file.
Verdict
If it is occasionally for you to convert video and rip DVD, you can select Handbrake. However, when you want to convert Blu-ray to digital files, copy commercial DVD to hard drive, convert video to H.265, create 3D SBS video for Gear VR/Oculus Rift, Pavtube Video Converter Ultimate is no doubt the best choice.
Related Articles:
May
Windows 10 has released for a long time and more and more people have updated their computer to Windows 10. When enjoying the new features, you may find a hole that is the Windows Media Center will no longer be supported on Windows 10 and Window Media Player still has strict format limit. This means that if you have WMC installed, WMC will stop working to play your DVD and your WMP can’t solve the problem at all. In this case, we need a powerful video player for Windows 10.
So here, we gathered top 10 and an all-in-one video player for Windows 10 for your picking. Hope that you can find your ideal one video player for Windows 10.
5KPlayer
5KPlayer is a powerful free video player for Windows 10 with elegant user interface and straightforward layout. Itcan play all video files including popular video file formats like MP4, H.264, AVI, WMV, ASF, FLV, M4V, WEBM, MPEG1/2, RM/RMVB and also 1080p HD videos like MKV, HEVC, AVC, MOD, M2TS, AVCHD, MPEG-TS, TP, EVO, etc. 5KPlayer also enables users to play videos on Windows 10 with perfect audio effect thanks to its high quality audio system.
KMPlayer
KMPlayer is another lightweight free video player for Windows 10. KMPlayer allows users to play video files such as AVI, WMV, FLV, MKV, etc without any separate codec. Apart from various video formats, KMPlayer also supports a host of languages, including English, German, French, Spanish, etc. It is 100% free and clean.
Learn >> Rip Blu-ray to Watch in KMPlayer on computer
GOM Player
GOM Player is an all-purpose video player for Windows 10, Window 8.1, Windows 8, Windows 7 that plays almost any video?including SD/HD MP4, MKV, AVI, WMV, 3GP, etc with ease.?With its user-friendly interface, advanced functionality, and free price tag, it’s the only media player you need.
VLC Player
Hot Search: 4K to VLC, Blu-ray to VLC, H.265 to VLC
As an open source media player for Windows 10, VLC is a highly portable multimedia player for Windows 10 that plays various audio and video formats such as MPEG-2, MPEG-4, H.264, MKV, WebM, WMV, MP3…. with no codec packs needed. It even can play DVDs, Audio CDs, VCDs, and various streaming protocols.
RealPlayer
RealPlayer media player for Windows 10 can play your videos offline and organize your collectionis. It is compatible with numerous container file formats inclusing MP3, MP4, MOV, WMV, RMVB, RA formats.
MPC-HC
MPC-HC is an extremely light-weight, open source media player for Windows?10. It supports nearly all common video and audio file formats available for playback. It is?100%?spyware free, there are no advertisements or toolbars.
Potplayer
Potplayer is another fine video player for Windows 10. It can get the best out of what you have with the minumum resource using DXVA, CUDA, QuickSync. It even can output 3D effect and supports 3D glasses. So you can use it to play your 3D SBS, TB and Anaglyph video.
DivX Player
Read Also: How to Stream Blu-ray in DivX Player?
If you are searching for a decent video player for Windows 10, DivX Player is the first of its kind. This award-winning software supports a wide range of video codec and format, even offering free HEVC playback, including Ultra HD (4K). It?is also optimized for movies, TV shows and web video clips in the Internet’s most popular formats.
UMPlayer
UMPlayer is also an ideal video player for Windows 10. With over 270 built-in Audio and Video codecs UMPlayer can handle nearly all media formats, including AAC, AC3, ASF, AVI, DIVX, FLV, H.263, Matroska, MOV, MP3, MP4, MPEG, OGG, QT, RealMedia, VOB, Vorbis, WAV, WMA, WMV, XVID and many more.comp
SMPlayer
SMPlayer is a free media player for Windows 10 with built-in codecs that can play virtually all video and audio formats. It doesn’t need any external codecs. One of the most interesting features of SMPlayer: it remembers the settings of all files you play. So you start to watch a movie but you have to leave… don’t worry, when you open that movie again it will be resumed at the same point you left it, and with the same settings: audio track, subtitles, volume…
Powerful Video Player Assistant for Windows 10 – Pavtube Video Converter Ultimate
Snapshot
No matter what video player for Windows 10 you have chosen, you may meet some unexpected problem in that no video player can play all the formats and codec without any hassle, especially HEVC, 4K, Blu-ray, DVD, ISO images. Pavtube Video Converter Ultimate <review> will be a decent video player assistant for Windows 10 that has the ability of Video Converter + Audio Converter + Blu-ray Ripper + DVD Ripper for Windows 10, Windows 8.1, Windows 8 and Windows 7.It can transcode H.265 MKV/MP4, HEVC, 4K Video, H.264, MPEG, TS, MTS, AVI, WMV, even Blu-ray and DVD without considering about the region codes to normal SD/HD MP4, MKV,WMV, etc. In this case, your whatever video player can play virtually any video on Windows 10.
Related Articles:
May
Every time when you load H.264 to Sony DVD Players for playing, it stops working? Your Sony DVD Players even can’t recognize your H.264 video files? This article offers you the best solution to playing H.264 video on Sony DVD player. Learn how to.
Q 1 : Viewing H.264 Files on Sony DVD Players. “ I have a dumb Q … I have read thru few excerpt and I seem can’t get a straight answer … so … Can a H.264 encoded file (AVI) be viewed directly thru a XviD/DivX capable DVD Player? Btw … my Philips DVD Player it only plays back the sound and it says “No Codecs” for the Video Part … Thanks. “
Q 2: I have some H.264 videos that I want to convert in order to play them on my DVD player, which supports MPEG-1, 2 & DVD format. What is the best format and which codec is best? I have some H.264 videos in 480p res. and I want to make a DVD of all of these videos so that I can play them on my DVD player. I Want My Video In Same Quality But Want 2 Decrease File Size 2 Save Space?
Reason: Regular standalone DVD players can only read movie DVD’s (those are in MPEG-2, and if you view them in Windows Explorer, you see a folder structure with VIDEO_TS, and files like .VOB .IFO and .BUP). Newer DVD players that are DivX-certified can (in addition to the above) read data DVD’s with an AVI file encoded in the DivX codec. However, MP4/MPEG-4/H.264 MP4 is not coded in many DVD players and some of its successors like HD DVD players, Blu-ray disc players and 3D DVD players. 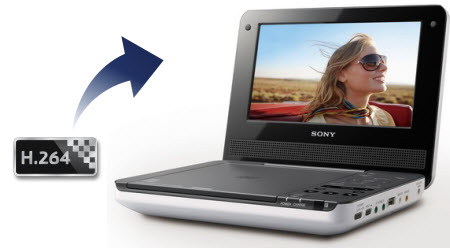
Best Method: In order to solve can’t play H.264 on Sony DVD player, you first need to know which video format does your DVD player can play and then convert your H.264 to DVD player supported format so as to successfully convert H.264 to MP4/AVI for easy playback on Sony DVD player. With the help of Pavtube Video Converter Ultimate. This video converter allows you to convert videos from and to MP4, VOB, FLV, MPEG-1, MPEG-2, and 70 more formats. And it offers 6X faster conversion speed without any quality loss. You can just take a trial to directly convert MP4 to DVD player supported format for playing MP4 videos on your DVD players.
This is a must-have video converter to convert various HD and SD videos like wmv video for playing on any iOS, Android and Windows devices, including the DVD players (Sony, Philips, Toshiba, Panasonic, Samsung and LG etc.). Here is review.
Convert and Transfer H.264 files to Sony DVD Player on Windows/Mac
Note: The equivalent Mac version is iMedia Converter for Mac. Now you can use it to convert videos like A-B-C for plaing on Sony DVD Player.
Below will introduce the detailed guide on how to use this wonderful tool to successfully convert H.264 to Sony DVD players supported videos for playing H.264 on DVD player nicely. Free download the right version of this H.264 to AVI Converter (Windows version, Mac version) according to your computer type.
Free Download H.264 to Sony DVD Player Converter:
Other Download:
– Pavtube old official address: http://www.pavtube.cn/blu-ray-video-converter-ultimate/
– Cnet Download: http://download.cnet.com/Pavtube-Video-Converter-Ultimate/3000-2194_4-75938564.html
Step 1: Add source H.264 file
Launch the excellent H.264 to DVD Player Converter. And then click “Add Video” import your source materials in .wmv format. Besides H.264, you can also load FLV, MKV, AVI, VOB, TiVo, MPG, MOV, etc. files to the program. Batch conversion is supported so that you can add multiple files. 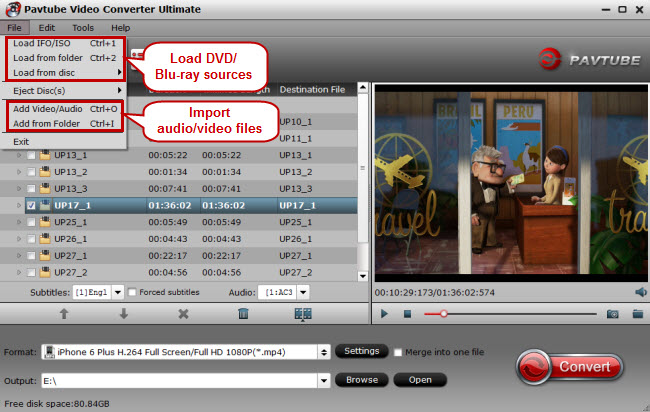
Step 2: Choose a DVD Player Supported profile
In order to transcode H.264 MP4, MKV to AVI, you are suggested to choose “Xvid AVI – Audio Video Interleaved(Xvid)(*.avi)” as output format. If you require for high quality, “DivX HD(*.avi)” would be a great choice. 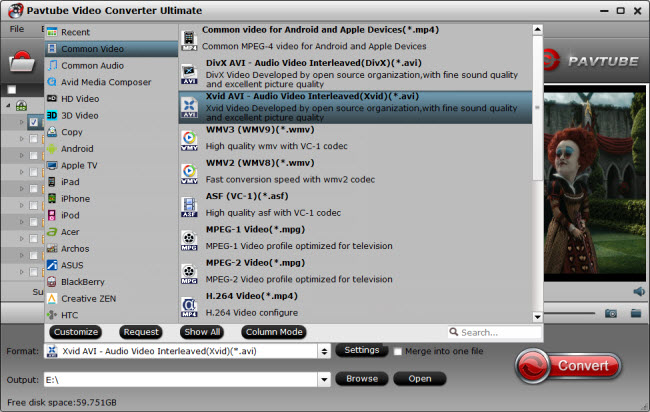
Step 3: Make personal settings optionally and additionally
If you like, you can click “Settings” to change the video encoder, resolution, frame rate, etc. as you wish.
Step 4: Start converting H.264 video to DVD Player
After above settings, you can start the H.264 to MP4 Conversion to fit the Sony DVD Player so as to play back videos in portable and wireless way. You can view the duration and remaining time of the conversion process, and choose whether to shut down computer and open output folder when conversion completed.
Once the process completes, download and transfer the converted H.264 videos to your devices and DVD Player using the USB cable and enjoy it in travel.
P.S. Pavtube Video Converter Ultimate also enables or add external subtitle, crop and trim videos, merge multiple videos, adjust parameters by clicking the “Edit” button and take snapshot.
Much wonderful software bundled with Video Converter Ultimate will provide you more amazing experience in converting videos. Go to Money Saving Software Bundles to get special offer for more software, such as ByteCopy + Video Converter Ultimate = Only $79.9, Save $27.1, Video Converter Ultimate($65) + ChewTune($29) = Only $74.9, Save $19.1 and so on.
Read More:
May
The craze for 3D movies can be traced to Cameron’s 2009 hit, Avatar. With several years of 3D movies development, it is quite easy for us to watch 3D movies in cinema. However, do you know that you can play 3D videos on computer with PowerDVD? Isn’t it a good idea to convert 2D/3D movies to 3D for watching on PowerDVD (16 Standard/Pro version included)?
Part I: PowerDVD 16 Standard/Pro 2D/3D support
PowerDVD is the World’s No. 1 media player software for Windows 10. The latest PowerDVD 16 now brings this award-winning experience to your big-screen TV, with a stunning new TV Mode that lets you recreate the atmosphere of cinema in your own home.
As is known, in order to successfully play 3D videos, most of people prefer to make use of professional 3D players. So, does PowerDVD play 3D movies? Can you watch all 2D movies with PowerDVD? Actually, not all versions of PowerDVD can easily open 2D/3D video files. Check out all the supported format for different version of PowerDVD 16 below.
| PowerDVD Live
|
PowerDVD 16
Ultra
|
PowerDVD 16
Pro
|
PowerDVD 16
Standard
|
|
|
Blu-ray Disc/Format Support
|
||||
| Blu-ray disc (BDMovie/BD-R/BD-RE 2.1/BD Profile 1.1) | √ | √ | √ | – |
| BD Live (BD Profile 2.0) | √ | √ | √ | – |
| AVCHD | √ | √ | √ | – |
| AVCREC | √ | √ | √ | – |
| Blu-ray 3D Disc | √ | √ | – | – |
| Blu-ray movie ISO file playback | √ | √ | – | – |
| TrueTheater 3D on Blu-ray (2D to 3D Conversion) | √ | √ | – | – |
|
DVD Support
|
||||
| DVD Movie (DVD, DVD-VR, DVD+VR) | √ | √ | √ | √ |
| 3D DVD (Side-by-Side, Over/Under) movie | √ | √ | – | – |
| CPRM Protected Disc | √ | √ | √ | √ |
| DVD Movie ISO file playback | √ | √ | – | – |
| TrueTheater 3D on DVD (2D to 3D Conversion) | √ | √ | – | – |
|
Video Format Support
|
||||
| MPEG HEVC (H.265) | √ | √ | – | – |
| MPEG-4 AVC (H.264) | √ | √ | √ | √ |
| 3D videos (MK3D/Side-by-side/Up-and-under/2D to 3D, MVC) | √ | √ | – | – |
| XAVC-S support for 4K/HD movies | √ | √ | √ | √ |
| MKV, FLV, MOV, 3GPP support and more | √ | √ | √ | √ |
| Customized subtitles / multiple subtitles | √ | √ | √ | √ |
|
Audio Format Support
|
||||
| Dolby Digital (5.1 ch) | √ | √ | √ | √ |
| Dolby Digital Plus (7.1 ch) | √ | √ | 5.1 ch | 5.1 ch |
| Dolby TrueHD (7.1 ch) | √ | √ | 5.1 ch | – |
| DTS 96/24 | √ | √ | √ | √ |
| DTS-HD (7.1 ch) | √ | √ | 5.1 ch | – |
| DSD Audio | √ | √ | √ | – |
| AAC Decoding (5.1 ch) | √ | √ | √ | √ |
| Lossless HD Audio – APE/FLAC/ALAC | √ | √ | √ | √ |
|
Media Library, User Interface Enhancement and Player Features
|
||||
| Import Music, Photos, and Videos | √ | √ | √ | √ |
| Import 3D photos & videos | √ | √ | – | – |
| Photo slideshow (JPG, BMP, PNG, TIFF, RAW) | √ | √ | √ | √ |
| 3D Photo slideshow (*.MPO, *. JPS) | √ | √ | – | – |
| Instant Thumbnail for Photo viewing | √ | √ | √ | √ |
| Media library for Movies | √ | √ | √ | √ |
| Media Library for TV Shows | √ | √ | √ | √ |


Now you understand all the different types of media PowerDVD Live, PowerDVD 16Ultra, PowerDVD 16Pro, PowerDVD 16Standard can handle.
On the movie front, you can watch DVDs and Blu-ray discs (assuming your PC has a Blu-ray drive) on PowerDVD Live and PowerDVD 16Ultra. Beyond movie discs, PowerDVD Live/16Ultra lets you watch videos downloaded from the Internet including H.264/H.265, 4K XAVC-S, 3D, MKV, FLV, MOV 3GP, etc. and smart devices such as Android phones and tablets and Apple iPhones and iPads. However, you can’t play 3D Blu-ray or other 3D videos on PowerDVD 16 Standard/Pro version. Only 2D movies like H.264, 4K XAVC-S, 3D, MKV, FLV, MOV, 3GP, etc. can be imported into PowerDVD 16 Standard/Pro.
“PowerDVD Won’t Play 2D/3D movies” Symptoms
Symptoms 1: When trying to play H.265 videos, PowerDVD 16 Standard requires update to continue to use it. After updating, PowerDVD won’t run at all but crashes.
Symptoms 2: PowerDVD cannot play movies with 7.1 audio channels. Message just comes up saying “There is a disc with an unsupported format in drive”.
Symptoms 3: PowerDVD preinstalled oncomputer came up with error message when launching and was forced to close. After updating, the progress bar of the 3D movies goes 99% and hangs there.
Symptoms 4: PowerDVD can only play DVDs but cannot play 3D Blu-Rays discs after system update.
How to Solve “PowerDVD Won’t Play 2D/3D movies” Problem
Solution 1: Play 2D/3D movies Smoothly with Best PowerDVD Alternative
When you’ve encounter either one of the symptoms, you’ll be advised by Cyberlink support to upgrade to the latest version of PowerDVD. However upgrading may not solve the tough problems. To solve “PowerDVD won’t Play 2D/3D movies” problem, you can download and try another alternative outstanding 2D/3D Video Player – VLC Player/Kodi.
* Plays 2D/3D video file smoothly and correctly without sound, subtitle errors and other interruptions.
* Outputs high quality audio system and HD videos.
* 100% clean and safe without any bundled adware, malware, spyware.
Solution 2: Convert 2D/3D movies to PowerDVD Better Compatible Formats
Compared with 2D/3D movies, the Blu-ray/DVD can’t be played by PowerDVD all the time. Therefore, it’s better to convert 2D/3D movie to those more common video formats to play with different versions of PowerDVD (16 Standard/Pro included).
Pavtube Video Converter Ultimate is top-notch 2D/3D video conversion software, which concentrates on offering simplest and fastest solution to convert any HD/SD/4K videos. It is capable of converting 2D/3D MKV, AVI, MP4, WMV, MOV, H.265, etc to PowerDVD for playback delivering high video & audio quality.
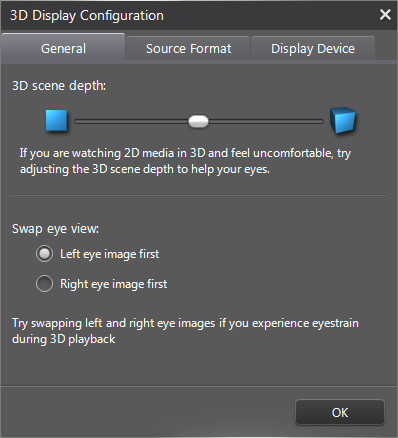
As the name suggests, it is completely ultimate video tools which not only support outputting Red/Blue, Red/Green Anaglyph 3D, Side-by-Side 3D and Top and Bottom 3D video format so you can enjoy 3D effect on PowerDVD, but also it supports Side-by-Side 3D and Top-Bottom 3D, but also able to convert videos in many format 3D including 3D MP4, 3D MKV, 3D WMV, 3D AVI, and more to 2D video for using with PowerDVD. Also, you are allowed to adjust the depth from 0 to 60 to find a comfortable view and preview 3D effects in real-time to ensure whether the 3D effects are suitable. For Mac users, here is the mac version. Now download the right version and check out the guide below.
Free download and install
Other Download:
– Pavtube old official address: http://www.pavtube.cn/blu-ray-video-converter-ultimate/
– Cnet Download: http://download.cnet.com/Pavtube-Video-Converter-Ultimate/3000-2194_4-75938564.html
Steps to convert unsupported 2D/3D movies for PowerDVD
Step 1: Install and launch the program, load your 3D files with “File > ‘Add Video/Audio’ or ‘Add from Folder'”. It supports batch conversion so you can add multiple 2D/3D videos to the program.
Step 2: Make the suitable choice for your original 2D/3D movies to PowerDVD compatible video format. If you want to output 2D video for PowerDVD 16 Standard/Pro, you can choose idea one like MP4, MKV, FLV, MOV, 3GP from “Common Video” and “HD Video”. For watching 2D/3D movies on PowerDVD Live/16Ultra, YOU can select “MP4 Side-by-Side 3D Video (*.mp4)” or “MKV Top-Bottom 3D Video (*.mkv)” from “3D Video”.
Tip: This 2D/3D to PowerDVD video converter also is a editor for movies. Click the pencil icon and find more editing items for videos, ‘Trim’ to when to start and when to finish, ‘Crop’ to get rid of the unwanted edges, etc. More you can get into the interface here. Additionally, if you get into the ‘Options’ menu, ‘Acceleration’ function is waiting for you too which means you can get 6X 2D/3D video conversion speed with NVIDIA CUDA technology!
Step 3: Go back to the UI then click “Convert” icon to start to re-encode 2D/3D video to compatible format for PowerDVD. After the conversion, you can successfully add and watch 2D/3D videos using PowerDVD (16 Standard/Pro included) with outstanding and perfect quality in regular 2D/3D effect.
Note: What is available for Blu-ray is TrueTheater 3D, previously restricted to video files and DVDs. This feature automatically converts 2D Blu-ray movies to 3D, adding depth based 3D, if not exactly pop. Performance wise, enabling TrueTheater 3D increased CPU usage on the review rig from around under 20% to over 40%. A restart of the player is also needed to enable TrueTheater 3D for Blu-rays if it hasn’t already been enabled in the current session. For file playback supports, the MK3D format is added – this is basically a MKV file containing a 3D video stream, and the support for it is a welcomed addition to PowerDVD.
Good News, the latest PowerDVD 16 now brings this award-winning experience to your big-screen TV, with a stunning new TV Mode that lets you recreate the atmosphere of cinema in your own home. Enjoy!
Related Article:
May
Many people choose to created ISO image files from 3D Blu-ray discs to preserve their Blu-ray collection. However, you can’t simply copy 3D Blu-ray ISO files to your OHC and play the contents on TV. Some users are stuck on “3D Blu-ray ISO Playing No Audio on OHC Issue”. Fortunately, there are always solutions there. This article will guide you through how to rip 3D BD ISO to MKV/MP4 files so that you can enjoy them via OHC on TV more conveniently.
It is a great way to use the Open Hour Chameleon Player for streaming the hottest movies, TV shows, music and more on smart TV through connecting to your high-speed Internet service. RK3288 players, like Cloud Media’s Open Hour Chameleon, are in Alpha for 3D support. After testing, we found most of the AVI, MKV, FLV, VOB/IFO, BDMV/BD ISO, FLV and MP4 videos in my library could play fine, except for 3D Blu-ray ISO. If you’re looking for 3D Blu-ray ISO entertainment on TV via Open Hour Chameleon with no audio mess up, you can rip the movies and TV episodes from ISO to a Open Hour Chameleon readable file like H.264 video in an mp4 or mkv container.
To accomplish the task, what you need is an intuitive tool that can rip 3D Blu-ray ISO files for OHC. There’s kinds of different ISO ripping software with a variety of different options out there that can extract digital contents from 3D Blu-ray ISO and convert to a format recognized by OHC with 3D effect preserving. The software today we’ll use called Pavtube ByteCopy – a great tool that features a modern and highly intuitive interface and is available for Windows and Mac OS X (ByteCopy for Mac Version).
The process also involves getting around the protection and converting the Blu-ray/DVD content to a video file that Open Hour Chameleon supports well. The program also gives you options to compress the video to reduce its file size, change the resolution to fit any screen and more! (Read review)
Free download and install Pavtube ByteCopy:
Other Download:
– Pavtube old official address: http://www.pavtube.cn/bytecopy/
– Cnet Download: http://download.cnet.com/Pavtube-ByteCopy/3000-7970_4-76158512.html
How to Convert ISO to Open Hour Chameleon Compatible Formats
Step 1: Run the ISO to Open Hour Chameleon Converter and click “Load file(s) > Load IFO/ISO” to select and load the ISO image files to the program.
Step 2: Click Format bar to select a proper format like MP4 from “Common Video” or “HD Video” profile, which can be viewed on Open Hour Chameleon perfectly. Or you can directly choose a format from “TVS” for playing on your corresponding TV via OHC.
Tip: Before start the ISO conversion for Open Hour Chameleon, you can click the Settings icon and adjust the video size, video bitrate, codec, frame rate, audio sample rate, etc parameters, so that you can get a decent video on your OHC. However, I recommend you leave the default selections since most of the work is done for you.
Step 3: When everything is OK, hit the big “Convert” button to start the ISO to Open Hour Chameleon conversion. That’s it! Time to have a coffee. After the conversion, you can stream the converted files onto your Open Hour Chameleon via the HDMI or SD card and then play it back on TV through OHC. Now the “3D Blu-ray ISO Playing No Audio on OHC” issue at Open Hour Forum can be fixed:
hi guys,
today I purchased OHC very good device, just playing 3d bluray iso ” boxtroll ” movie,with no audio, can some one help how to fix it?
thanks in advance..
Related Articles:
May
As we all know, AAC is a common audio codec which is mainly used in MKV or MP4 format container. However, sometimes MKV with AAC may not work very well on WDTV in the following situations.
Why my MKV in AAC cannot be played with media players like WDTV? I’m only getting 2 channel sound from 5.1 MKV files. I have a WDTV live, Pioneer VSX-1021, and Epson projector. I have tried optical pass thru and digital pass thru, but I’m only getting 2 channel sound. Any ideas?
I’m not sure what the best way would be to change MKV audio track from AAC to AC3 files for playback with 6-channel on WDTV. Does anyone know the solution?
I have a problem with AAC 5.1 to AC3 5.1 conversion for WDTV. Do any of you have any idea on how to get around this problem?
My WDTV device does not support AAC audio format. It does support MP3 and AC3. What would be the best option to transcode it to AC3 with Dobly AC3 Audio?
The audio of MKV in AAC is lag behind of video in WDTV. Any solution?
It seems that the audio quality of MKV video in AAC is unbearable by WD TV. Why?
So does WDTV play MKV with AAC 5.1 audio track? Actually, WDTV can easily open MKV files unless your AV Receiver supports decoding 5.1 AAC. If it doesent … then you will either get No Sound or only 2 Channel Sound at the very least. This article will introduce a powerful AAC Converter and a full tutorial on how to convert 5.1 channels AAC or 6 channels AC3 on Mac and Windows while keeping the video format or changing the video format.
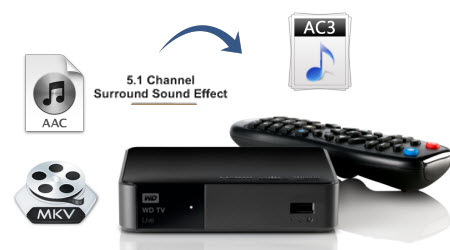
Solution: Convert AAC 5.1 to AC3 5.1 in MKV to WDTV for playback
In order to successfully play MKV with AAC 5.1 audio on WDTV anywhere, a recommended solution is transcoding audio in MKV from AAC to AC3 5.1 to play on WDTV.
Preparation:
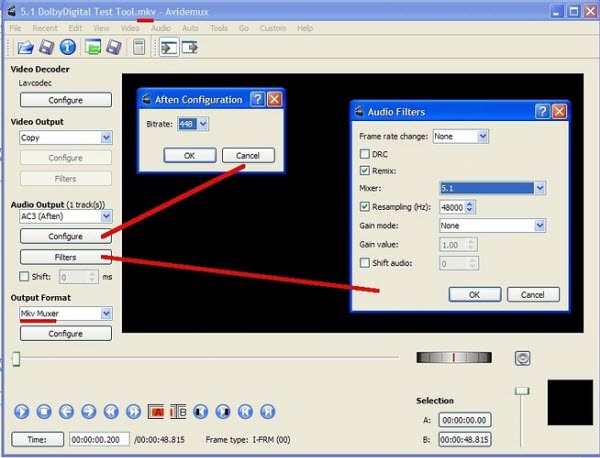
You can finish the task by using software. eg. PopCorn MKV AudioConverter– a top Matroska MKV DTS/AAC to MKV AC3 converter or Avidemux: Open your video file (Video OutputCopy) Audio Output AC3 (Aften)select configure and filters (see picture for settings) * Output Format If your video is MKV then select MKV Muxer File > Save …. wait about 10-15 Minutes (depends on the size of your video) * usually i dont change the audio filters…
But to perform AAC to AC3 with Dobly Digital 5.1 Audio conversion in simple steps while still keeping the original quality, Pavtube iMedia Converter for Mac is what you need. It is simple to use and features fast conversion speed. With this excellent AAC to AC3 audio converter, you can convert not only convert AAC to the audio format you need incllucing AC3, MP3, AIFF, M4A, etc., but also transcode MKV, MP4 videos with AAC audio to play on WDTV, Chromecast, iTunes, iPhone, iPad, iPod, Xbox 360, PlayStation 3, Nintendo Wii, PowerPoint, or edit in iMovie.
What’s more, it offers solutions to merge AC3 files, split AC3 files, adjust the bitrate/sample rate of AC3 files, change the channels of AC3 files 5.1 channels, stereo or mono depending your source audio and more wait to experience, and you are provided some useful edit functions cropping, trimming, adding watermark, attaching subtitles for watching with best results. If you’re using a Windows, you can get the equivalent Windows version entitled Pavtube Video Converter Ultimate which can help you transcode MKV AAC to AC3 5.1 audio on Windows (Windows 10 included). (Read review) Just get it and follow the step-by-step guide to achieve your goal smoothly.
Free download and install Pavtube iMedia Converter for Mac:
Other Download:
– Pavtube old official address: http://www.pavtube.cn/imedia-converter-mac/
– Cnet Download: http://download.cnet.com/Pavtube-iMedia-Converter/3000-2194_4-76177788.html
Transcoding audio in MKV from AAC to AC3 5.1 for WDTV
Step 1: Add source MKV video files with AAC
Install the launch the AAC converter. Click the “Add video: button to import MKV AAC files into it for converting. The AAC to AC3 Converter is multi-task based and supports batch conversion, this means you can load in multiple video files to convert at one time. (Besides MKV/MP4, H.265 MP4 Blu-ray is supported)
Step 2: Set output profile for WD TV
If you want to keep MKV format as your original one, just choose MKV as output format from “Common Video” or “HD Video” in the drop-down list “Format”. Or you can change source MKV to MP4 files which is suitable for playback on WDTV, navigate to “Common Video” or “HD Video” catalogue and choose H.264 format.
Step 3: Set audio as AC3 5.1
Click “Settings” button, the “Profile Settings” windows pops up, on which you can set the Audio Codec to AC3 and Channels to 5.1 Channels. This ensures your output audios to be encoded with ac3 5.1. Otherwise, you can keep your channels as Stereo.
Step 4: Transcode MKV AAC to AC3 5.1 for WDTV
Hit the Convert button to start converting MKV AAC to AC3 with 5.1 channels. Another good thing about Pavtube iMedia Converter for Mac is, it offers a “Shut down computer after conversion” option, so if you don’t want to wait around in front of your computer for the entire conversion process, you can tick off it and go away to do other things. After the conversion, you can stream the converted files to TV via WDTV.
Need to convert copy-protected Blu-ray/DVD and ISO files to WDTV for watching? Pay extra $14.9 to get ByteCopy for Mac + iMedia Converter for Mac software bundle. Save you $27.1! What are you waiting for?
What Is AC-3 Audio Format
AC-3 is an audio codec for surround sound audio files used on DVDs format. The AC-3 compression method was created by Dolby Labs for use in a Dolby Digital audio on DVD, Blu-ray and other digital video formats. AC-3 stands for Audio Coding 3.
AC-3 increases fidelity over its previous surround sound standard, Pro-logic, with independent tracks for each of the 6 speakers, a 16bit sampling at 48kHz rate compressed by 10-12 times, making for a total bit rate of 384kbps.
Related Articles:
May
Some video fans might want to play VC1 files on Open Hour Chameleon. However, they need to convert VC1 to H.264 first. Before discussing how to convert VC1 files to play on Open Hour Chameleon, we’d like to introduce what VC1 and Open Hour Chameleon are since some users might not know it well.
About VC1
VC-1, which was initially developed as a proprietary video format by Microsoft. It is today a supported standard found in Blu-ray Discs, Windows Media, Microsoft’s Silverlight framework, Slingbox, and the now-discontinued HD DVD.
About Open Hour Chameleon
A positive first step for this premium Android-based TV streamer, with a polished hardware specification inside and out, and vast app support courtesy of the Google Play Store. It’s not yet the finished article though, with DTS & Dolby audio support in particular an issue. But the Chameleon has an abundance of potential and with the right focus, could be a fantastic media and gaming partner for your big screen.
Symptoms in Playing VC1 on Open Hour Chameleon
I’m just trying to get my head around the 23 976 issue: So far I have found that all of my 23 976 files play fine when the codec is H 264. However when playing remuxed VC1 files at 23 976 is when I experience slow play and tons of dropped frames. Is this the issue that others are experiencing with 23 976 or is my situation unique? Why VC1 files will not play on Open Hour Chameleon smoothly?
Source: forum.openhourlab.com
Why Can’t Play VC1 on Open Hour Chameleon?
Open Hour Chameleon supports
Video Format:
3D BD ISO, BD ISO, BDMV, MKV, MPEG-TS, MPEG-PS, M2TS, VOB, AVI, MOV, MP4, QT, WMV, DVD-ISO, VIDEO_TS, AVCHD 2.0 (AVCHD 3D, AVHD Progressive, AVCHD 3D). XVID SD/HD, MPEG-1, MPEG-2, MPEG-4, MP4 4K HEVC
Video Codec
HEVC, HEVC 4K 10 Bit, H.264, H.265, MVC, AVC, MPEG-2, MPEG-4, XVID, DIVX, WMV9, VC-1, H.264/x.264, CVD 1.0/2.0, SVCD, AVS, MPEG1/2/4 Elementary (M1V, M2V, M4V), MPEG1 / 2 PS (M2P, MPG, DAT, VOB), MPEG2 Transport Stream (TS, TP, TRP, M2T, M2TS, MTS), AVI, ASF, WMV , Matroska (MKV), MOV (H.264), MP4, RMP4.
Audio Format/Codec
AC3, DTS MPEG, AAC, LPCM, ALAC, AIFF, WAV, VSELP, FLAC, Ogg/Vorbis
Reason:
Though VC1 is listed as Open Hour Chameleon supported video code, it is particular about what audio and video codec inside in the video container. Open Hour Chameleon only supports playing WMV/MKV with VC1 video codec and AC3/DTS/AAC audio codec. Open Hour Chameleon VC1 issues are also affected by video resolution, frame rate, bitrates and etc. When you play VC1-encoded Blu-ray on Open Hour Chameleon over a network connection, the video may not be played smoothly.
How to Fix Open Hour Chameleon Won’t Play VC1 problem?
To successfully play all kinds of videos with VC1 codec on Open Hour Chameleon whatever via micro SD card, USB flash drive or DLNA, a recommended solution is to convert Open Hour Chameleon unsupported VC1 to Open Hour Chameleon more supported H.264 codec.
During the experiment, we tried several different Blu-ray ripping tools and found that tools like MeGUI, Handbrake, and BD Rebuilder struggle with the VC-1 video files, reporting that conversion will take over three days for a 2 hour movie. So, is there something to do with the VC-1 codec smoothly with the best resulted video? Fortunately, when we tired Pavtube ByteCopy, it works with the VC-1 encoded Blu-ray perfectly.
Overall, it facilitates removing region code and ripping the content of any VC-1 encoded Blu-rays (encrypted or not encrypted) to Open Hour playable H.264 MP4, MKV, AVI, etc. in several clicks with original wonderful quality and keep 5.1 channels.
Moreover, it supports Blu-ray disc decryption (crack AACS, BD+, region code, copyright protection) and lists the titles/chapters when loading Blu-ray disc. And it is easy enough to backup Blu-ray without protection and copy Blu-ray to MKV with lossless video output and multiple audio & subtitle & chapter markers with 7.1 sound preserving. This following text will take this program for example to introduce the steps to convert and rip VC1 Blu-ray to H.264 for Open Hour Chameleon. If you wanna process VC1 Blu-ray on Mac OS X (El Capitan inlcuded), please turn to ByteCopy for Mac.
Please download the VC1 Blu-ray to Open Hour Chameleon on PC or Mac (100% free and clean).
Free download and install Pavtube ByteCopy:
Other Download:
– Pavtube old official address: http://www.pavtube.cn/bytecopy/
– Cnet Download: http://download.cnet.com/Pavtube-ByteCopy/3000-7970_4-76158512.html
Tutorial to rip Blu-ray VC1 to H.264 for Open Hour Chameleon
1. Run the VC-1 Blu-ray Ripper and import VC-1 encoded Blu-ray content. Soon after loading, you will find all titles and chapters for the Blu-ray disc. You can select preferred subtitles and audio track.
2. Click Format bar and select output format. To convert BD VC-1 to H.264 MP4, MKV, AVI, you can select from “HD Video” profile.
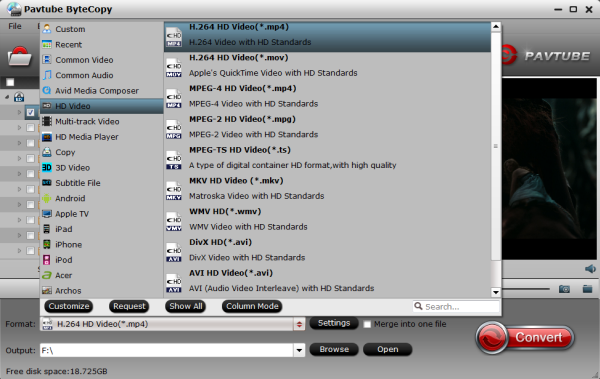
Tip: If you wanna play the output videos on certain devices, a better choice is selecting the preset for device like TV as the output format in the output box.
3. This VC-1 Converter for VC-1 encodedalso allows you to customize video and audio parameters via clicking Settings button. The adjustable settings include codec, bit rate, frame rate, sample rate, audio channel.
4. When all the settings are ready, hit the Convert button to start ripping Blu-ray VC1 to H.264 for VC-1 encoded. Once the conversion is finished, you can click “Open” button to find the final output video for streaming to TV effortlessly. If you want to take advantage of the latest and greatest features delivered by HDMI 2.0, you’ll need to pick up an additional cable. Enjoy your VC1 files via Open Hour Chameleon on big screen at ease!
Note: Before streaming, you can backup your 3D Blu-ray in FreeNAS or hard drive first.
Need to convert all kinds of videos with VC1 codec? Pay extra $37.9 to get ByteCopy + Video Converter Ultimate software bundle for VC1 Blu-ray ripping and VC1 video conversion on Windows 10/8.1/8/7/Vista/XP. Save you $27.1! What are you waiting for?
Additional Tip: Comparison of H.264 and VC-1
H.264 and VC-1 are popular video compression standards
Overview
| VC-1 | H.264 | |
| Goals | Designed to offer very high image quality with excellent compression efficiency | Designed to meet a variety of industry needs with many profiles and levels, allowing for varying compression, quality and CPU usage levels, where the lowest level is for portable devices, designed with low CPU usage in mind, while the high levels are designed with very high quality and compression efficiency in mind |
| Example industry use | Supports 4:2:0 compression / color space | Supports studio archiving requirements with 4:4:4 color space;separate black and white (BW) video mode |
| Licensing costs | Similar | |
| Documentation | Not free. Reference decoder, comes with external documentation. | AVC/H264 Licensing costs and terms from MPEG LA. Reference encoder and decoder free as well. Additionally, JVT & M4IF mailing lists are available where one may receive answers on AVC related questions. |
Terminology
All sources for the below information are from the respective specifications listed in the overview section.
| Feature | VC-1 | H.264 |
|---|---|---|
| Partition sizes | 16×16 and 8×8 | 16×16, 16×8, 8×16, 8×8, 8×4, 4×8, and 4×4 |
| Integer transform | 8×8, 4×8, 8×4, and 4×4 | 4×4; 8×8 available in High Profile only |
| Frame | Used for progressive or interlaced content | |
| Macroblock sizes | 16×16 only | |
| Motion vector | Two dimensional vector offset from current position to reference frame | |
| Picture | A field or frame | |
| Skipped macroblock | No data is encoded for macroblock | |
Features
| VC-1 | H.264 | |
| Bitstream formats | single bit stream | NAL and byte stream |
| Bitstream format | In advanced profile, each Bitstream Data Unit has its own header.Simple and Main profile provide neither sequence nor entry point headers. | SPS (sequence parameter set),PPS (picture parameters set),slice header, macroblock |
| Deblocking filter | In-loop filter and overlap transform | In-loop only |
| CABAC | No | Only supported in Main and higher profiles |
| Variable transform size | Yes | Only in High profile and above |
| Slice | Contiguous (integer number of macroblock rows only) | Contiguous or non-contiguous |
| Sub-pixel interpolation methods | bicubic, bilinear | 6-tap filter for half pixels; averaging for quarter pixels |
| Variable Length Coding | Yes | |
| B frame used for predicting other pictures | Yes | |
Related Aricles:
May
Mother’s Day is just around the corner, it is the time to prepared cool gifts for your mom and make plans for the coming weekend with your mom! Are you still lack your brain trying to pick up a meaningful gift which can best describe your love for here on Mother’s Day? No worry! Here this article will share with you the 20% OFF Blu-ray/DVD Backup Tool – the top pick Mother’s Gift 2016! The special promotion starts on today, and ends on May 15th. Move on to dive into the details.

Watch 2D/3D Blu-ray, DVD Films with Mom at home on Mother’s Day
Spending some relaxing movie time with mom is a heart-warming gift for here. Among other things, watching 2D/3D Blu-ray and DVD films your mom likes such big names as Jennifer Aniston, Julia Roberts and Jason Sudeiki, etc with her may be the best way to show your love to your mom.
Tip: If you want to play Mother-themed 2D/3D Blu-ray and DVD movies through home theater on big screen TV or VR headsets at home with your mom and other family members, you can try Pavtube ByteCopy and Pavtube ByteCopy for Mac– A top Blu-ray/DVD Ripper/Backup for Home Theatre/TV/VR Headsets.
Take a Tip to play Blu-ray/DVD with your Mom on Mother’s Day
Furthermore, maybe your moms had seldom traveled to any place, then Mother’s Day gives you the valuable opportunity to have a trip with here.
Tip: You may want to play your precious Blu-ray/DVD movies or backed up ISO files in iPhone, iPad and other Android/Windows tablets and phones with Mom when traveling, getting her Pavtube ByteCopy or ByteCopy for Mac to make Blu-ray/DVD/ISO backup on mobile devices like iPhone, iPad, Android will make your trip less dull.
Get Pavtube ByteCopy for Win/Mac 20% OFF at Mother’s Day Deal 2016!
Now, Pavtube ByteCopy or ByteCopy for Mac offering 20% OFF deep discount. It’s time to get our powerful tool and rip/copy your Blu-ray/DVD/ISO to watch with your mom! Just grab one for her. Only $33.6! Save you $8.4! (Read Review)
Enjoy lifetime FREE update and tech support services. 30-Day Money Back guarantee.
What can Pavtube ByteCopy for Win/Mac give you?
* Constantly update to decrypt the latest Blu-rays, DVDs
* Rip any Blu-rays/DVDs/ISO to MP4, FLV, AVI, MOV, H.264, H.265, M3U8, WMV, AAC, etc.
*Convert Blu-rays/DVDs/ISO to iPhone 6S/SE, iPad, Android, Samsung Galaxy, Xperia, Surface, etc.
* Backup Blu-rays/DVDs to multi-track MKV with lossless quality andl preservation of all audio tracks, subtitles and chapter markers, etc.
* Perfectly backup Blu-ray/DVD with 1:1 Quality and protection removed
* Save 100% intact M2TS/VOB main movie from your Blu-ray/DVD Disc
* Rip Blu-ray/DVD with forced subtitle, desire subtitle/audio tracks
* Edit Blu-rays/DVDs/ISO: Trim, crop, merge videos, add watermark and subtitle etc.
* Extract SRT Subtitles from Blu-ray disc, BDMV and ISO file
Other user-friendly and effective products for Mother’s Day 2016
Pavtube Video Converter Ultimate/ iMedia Converter Ultimate– 50% OFF (Original: $65 Now: $32.5)
Pavtube BDMagic/ BDMagic for Mac– 35% OFF (Original: $49 Now: $31.85)
Pavtube DVDAid/ DVDAid for Mac – 35% OFF (Original: $35 Now: $22.75)
Pavtube HD Video Converter/HD Video Converter for Mac – 30% OFF (Original: $35 Now: $24.5 )
Conclusion
In a word, the best Mother’s day gifts are not about money, they are about your affections and love embodied in them. To pick up a terrific Mother’s Day gift for your mom, you have to know what he is into. Catch your time to get the best 2016 Mother’s Day Swett Discount from Pavtube. Enjoy and have a nice day!
Related Guides:
May
Have collected a bunch of DVD movies and hope to insert them to Windows Media Player for direct playing? However, most of the questions that you might encounter are Can Windows Media Player play DVDs? How to play DVD with Windows Media Player? How to solve WMP playing DVD error. However, this is not to say that Windows Media Player is faulty when it comes to playing a DVD. Just like any other media player there are problems that people do encounter and sometimes they lack the knowledge when it comes to using WMP for playing DVD purpose.

Can Windows Media Player play DVDs?
In Windows Media Player, you can play audio CDs, data CDs, and data DVDs that contain music or video files (also known as media CDs). If you have a DVD drive and a compatible DVD decoder installed on your computer, you can use Windows Media Player to play a DVD-Video disc—this is the type of DVD that movies are distributed on. If you are using a version of Windows 7 that supports DVD playback, you should be able to load the DVD in Windows Media Player without issue. The real frustration is that DVD playback has been removed from Windows 8 and Windows 10. That’s to say, the Windows Media Player packed on Windows 8/10 cannot play DVD movies out of the box.
How to play DVD with Windows Media Player
*Click the Start button > Select Control Panel on the start menu. For Windows 8/Windows 10 users you can simply search the Start Menu for “Control Panel” and it will show right up in the list.
*In the search box > type troubleshooter > click Troubleshooting.
*Click view all in the left pane > click Windows Media Player DVD.
It will probably lead to this window (see below) to ask you to install a Windows Media Player DVD decoder.

In case there are a lot of unsolved problems that you are experiencing every now and again when it comes to playing DVD with Windows Media Player, there are better solutions below that you can adopt so that you can continue to enjoy your DVD videos and troubleshoot a DVD that won’t play on WMP.
> Check Correct DVD Titles on Windows Media Player
Solution for DVD not working with Windows Media Player
Solution 1.
If the DVD is from another region, there’s a very good chance that it will not play. This is because regions are hard-coded into DVD drives to help fight piracy. To play DVDs from other regions, you’ll need to flash your DVD player’s firmware, which is not recommended unless absolutely necessary.
> See how to remove DVD region code
Solution 2:
Your drive may be physically failing. If this is the case, you’ll need to install a replacement. See How to Install a DVD Drive for details.
Solution 3:
If you get a message that says that your computer is missing a codec or that you require a DVD decoder, you are probably trying to play, burn, or sync a file that was compressed by using a codec that Windows or the Player doesn’t include by default.
Click “Go Online to learn how to obtain a DVD decoder” and then check the Microsoft recommended Windows Media Player DVD decoder such as CinePlayer DVD Decoder and Advanced Corel DVD Decoders. But those WMP DVD decoder are all costing around $ 15. For more information about codecs, see frequently asked questions about codecs.
Solution 4:
There is lots of Windows Media Player DVD decoder for free downloading on the download sites and all claim to be the best solution to fix Windows Media Player not playing DVD. But the safety cannot be guaranteed. Those free add-ons and Plug-ins are the least you should be trust cuz they may containing virus and create continuous ads. But there is still solution 4 – replace Windows Media Player with another more powerful Windows DVD player freeware.
If you have another DVD player program installed, it may be messing up Windows Media Player. Either use the other DVD player, or uninstall the program so that Windows Media Player works properly again.
Top 4 Windows DVD Player for Windows 7/8/10 Free Download
1. VLC Player
VLC Player is a comprehensive media player and all region free DVD player for windows. This universal Windows DVD player plays all kinds of DVDs easily and smoothly. Blu-rays are another story, as they are supported but many of them won’t play because of DRM encryption. And this DVD player for Windows, Mac, Linux, Unix gives you more controls over DVD playback, you can set a given title and chapter using the Title and Chapter selectors.
Pros:
– Support more operating system including Windows, Mac OS X, Linux, Unix, etc.
-Integrated with feature for MKV, MP4 video and MP3, AAC music playing.
Cons:
– Not working prefectly on Windows 8.
– VLC audio delays problem not solved properly when playing DVD videos.
– User interface out of date.
2. GOM Player
GOM Player is also a standard Windows DVD player that works similarly to other media players, and it compatible well with Windows 8/7/XP and is able to play VCD and SVCD with perfect surround sound. And this Windows DVD player also has an official remote control app for iOS and Android devices.
Pros:
– Codecs are included for playing popular video formats.
– Advaced features: screen capture, audio capture
Cons:
– Its default user interface seems to be undesirable.
– No help documentation built in this player.
3. KMPlayer
The KMPlayer, or K-Multimedia Player, is a Windows DVD player which can play a large number of formats such as DVD, VCD, AVI, MKV, OGG, OGM, 3GP, MPEG-1/2/4, etc. It plays DVDs with movies on them without individually clicking on each .VOB files.
Pros:
– Plays DVD folders.
– The original version of this Windows DVD player is recommended by lots of users.
Cons:
– Not support h.264/h.265 video codec playback.
– No video only sound or videos not showing full screen bugs.
4. PowerDVD
PowerDVD is developed by CyberLink Corp. and can play any video, audio, pictures, DVD, Blu-ray and HD movies. It supports playback any files across PC, tablets, smart phones, TV and more. The supported OS include Windows 8.
Pros: It’s high playback image and audio quality makes it famous in the DVD player market.
Cons: What makes people frustrated is that PowerDVD is expensive and its superabundant version usually makes users refused and hard to decide which to choose.
5. BS Player
BS Player is claimed to be the best multimedia player in the world. It supports DivX, HD, AVC video, movie, audio, DVD and YouTube files.
Pros: There’s a free basic version of BS player to fulfill users’ needs.
Cons: But if you want to navigate the DVD menu, you need to purchase it first. Besides, there’s no “Play DVD” button, which means you need to upgrade to the pro version as per needs.
Solution 5:
Another alternative solution is ripping DVD to Windows Media Player friendly video, then enjoy those converted DVD movies with WMP freely.
Pavtube ByteCopy is one of the powerful DVD converters in the market today. It has the ability to remove DVD protection or extract audio from DVD and save them as Windows Media Player playable format with fast speed and high quality. Besides enabling you to do the DVD to Windows Media Player conversion, such tool also endows you with the ability to choose desired subtitles and audio tracks or keep forced subtitles for far better movie enjoyment.
What’s more, you can finish the DVD ripping process with only three simple steps: Load DVD, choose an output format and start the ripping process. Pavtube ByteCopy has a quite neat and well-designed interface. And the software lets you tweak just about everything after you’ve got the movie from disc. Some of you may be using a Mac computer, please visit Pavtube ByteCopy for Mac. Please select the right link below for your operating system (PC, Mac). The following instructions will show you how to rip and convert DVD to Windows Media Player friendly format – WMV, so that you can then put the movie onto Windows Media Player.
Free Download and Install Pavtube ByteCopy:
Other Download:
– Pavtube old official address: http://www.pavtube.cn/bytecopy/
– Cnet Download: http://download.cnet.com/Pavtube-ByteCopy/3000-7970_4-76158512.html
Steps to convert DVD to Windows Media Player
Step 1. Load DVD movies
Insert a source DVD in optical drive. Install and launch the excellent DVD chapter converter, click disc button to load DVD movies. You can then select the chapters you want by clicking the checkbox. If you want to export the multiple chapters into one single video, please click “Merge into One File” box.
Tip 1: To get the certain desired part, you can also click “Edit selected task” to trim the videos. In addition, you can also crop, add watermarks, etc. to customize your videos.
Tip 2: DVD movies always contain subtitles and audio tracks in different languages. For better than ever DVD movie enjoyment, you are highly suggested to choose desired subtitles and audio tacks for output, via opening the subtitle and audio track selecting box at the bottom of the left processing list.

Step 2. Set output format
Click on “Format” bar to select output format. Here you can choose to rip DVD to .wmv, .asf or .wma from “Common Video”, “HD Video” or “Common Audio” for playing with Windows Media Player. <Refer to Windows 10 Supported Video/Audio Formats>

See File types supported by Windows Media Player:
| File extension | Windows Media Player 12 | Windows Media Player 11 | Windows Media Player 10 | Windows Media Player 9 Series | Windows Media Player for Windows XP | Windows Media Player 7 |
|---|---|---|---|---|---|---|
| Windows Media formats (.asf, .wma, .wmv, .wm) | √ | √ | √ | √ | √ | √ |
| Windows Media Metafiles (.asx, .wax, .wvx, .wmx) | √ | √ | √ | √ | √ | √ |
| Windows Media Metafiles (.wpl) | √ | √ | √ | √ | – | – |
| Microsoft Digital Video Recording (.dvr-ms) | √ | – | – | – | √ | – |
| Windows Media Download Package (.wmd) | √ | √ | √ | √ | √ | √ |
| Audio Visual Interleave (.avi) | √ | √ | √ | √ | √ | √ |
| Moving Pictures Experts Group (.mpg, .mpeg, .m1v, .mp2, .mp3, .mpa, .mpe, .m3u) | √ | √ | √ | √ | √ | √ |
| Musical Instrument Digital Interface (.mid, .midi, .rmi) | √ | √ | √ | √ | √ | √ |
| Audio Interchange File Format (.aif, .aifc, .aiff) | √ | √ | √ | √ | √ | √ |
| Sun Microsystems and NeXT (.au, .snd) | √ | √ | √ | √ | √ | √ |
| Audio for Windows (.wav) | √ | √ | √ | √ | √ | √ |
| CD Audio Track (.cda) | √ | √ | √ | √ | √ | √ |
| Indeo Video Technology (.ivf) | √ | √ | √ | – | √ | √ |
| Windows Media Player Skins (.wmz, .wms) | √ | √ | √ | √ | √ | √ |
| QuickTime Movie file (.mov) | √ | – | – | – | – | – |
| MP4 Audio file (.m4a) | √ | – | – | – | – | – |
| MP4 Video file (.mp4, .m4v, .mp4v, .3g2, .3gp2, .3gp, .3gpp) | √ | – | – | – | – | – |
| Windows audio file (.aac, .adt, .adts) | √ | – | – | – | – | – |
| MPEG-2 TS Video file (.m2ts) | √ | – | – | – | – | – |
Detailed information can be found here.
P.S.
a. Keep in mind, if you rip the DVD to another common format and playback it on WMP, you may hear audio but no video picture displayed, which means the video codec isn’t installed. You need to install extrac codec pack to solve the issue. That’s why we prefer to choose WMV, a format developed by Microsoft.
a. ByteCopy also helps you to convert videos to mobile devices supported formats, such as iPhone, iPad, iPod, Samsung Galaxy, etc.
c. In profile settings, you are allowed to adjust video and audio codec, size, channels, etc for better video quality. You also can set to preserve 5.1 channels when copying DVD to Windows Media Player.

Step 3. Start converting DVD on Windows Media Player
In the end, you just need to click the “Convert” button start the conversion. When the converting process ends, you can open output folder to check and play converted DVD videos in Windows Media Player with the best quality. Enjoy.
How to Add items to the Windows Media Player Library
There are several methods you can use to add files to your Player Library:
Monitoring folders: When you start the Player for the first time, it automatically searches certain default folders included in the Music, Pictures, Videos, and Recorded TV libraries on your computer. If you ever add or remove files from these media libraries, the Player will automatically update its available media files. You can also include new folders in your Windows libraries from other locations on your computer or from removable storage devices.
Add media files that you play: When you play a media file on your computer or from a removable storage device, the file is automatically included in your Player Library so you can access it directly from the Player. And if you have access to remote media files stored on other computers on your network, you can change the Player’s settings to add these remote files to your Player Library when you play them.
Windows 10 Tip: Find Windows Media Player
To find WMP, click Start and type: media player and select it from the results at the top.

Alternately, you can right-click the Start button to bring up the hidden quick access menu and choose Run or use the keyboard shortcut Windows Key+R. Then type: wmplayer.exe and hit Enter.

If you plan on using it a lot, you might want to pin it to the Taskbar while you’re here. To do that, right-click on it and select Pin to taskbar, Pin to Start, or both.

Windows Media Player hasn’t changed at all since its last update to version 12 in Windows 7. So, if you recently upgraded from Windows 7 to 10, and aren’t quite ready to use the new apps, you’ll be happy to see its familiar UI.
Personally, I would have like to see at least a fresh coat of paint on the WMP interface. However, it’s obvious that Microsoft is phasing out some of its legacy software for the new universal apps instead.
When you first dive into Windows 10, you’ll find that your media is already set to open in its new universal apps (Groove, Photos, Movies & TV). But if you want to stick with WMP, you can set it as your default player by adjusting file associations.

It’s also worth noting that while DVD support has been taken away, support for FLAC and MKV files is added to Windows 10, and you can use WMP for that.
Related Software:
BDMagic for Windwos/Mac – The best Blu-ray solution to rip and backup any commercial and region-locked Blu-ray to H.265, M3U8, MP4, MKV, AVI, FLV, etc.
DVDAid for Windows/Mac – Capacity of ripping copy-protected and homemade DVD to iPhone 6S/SE, iPad, Surface Pro, Synology NAS, Seagate Wireless Plus, etc with suitable format.
Pavtube Video Converter Ultimate for Windows/Mac – Function of converting Blu-ray/DVD, 4K/SD/HD videos to play on Windows Media Player video format and nearly all popular devices you have ever seen.
Related Aricles:
Apr
Cannot Play 2K/4K MKV Videos on Surface Book 2/1?
Microsoft is rumored to be releasing the Surface Book 2 in 2016 or 2017, which is likely to sport a 13.5-inch screen with 4K resolution support and its performance is said to be improved with better battery life and graphics support. However, it has been complained for incapability of playing 2K/4K MKV videos on Surface Book (2).
What programs would you guys recommend to play 4k and 2k mkv files on Surface Book? VLC is limping along with a ton of visual artifacts.
– I hope there are 3rd party apps or driver updates for the Surface Book 2/1 to play more than just mp4 and avi format. Can’t believe it won’t play MKV out of the box.
– When I click play now, the program indicates ‘now playing’. However, there is no sound or video playback. Does anyone know what this conflict is with Windows 10 Surface Book and my mkv videos?
– Any Apps for Surface Book 2/1 that can play .mkv files smoothly?
– What is the best MKV file Media Player for Surface Book (2) in the Windows store?
Reason Why MKV can’t be played on Surface Book 2/1
MPEG-4, H.264, H.263, MEPG-2, VC-1, WMV 9 can be supported by Surface Book (2), but MKV, the Matroska Multimedia Container is a media format that can hold a number of video, audio and subtitle tracks in one single file, and serves as a popular format for storing movies or TV shows. It is not included in the Surface Book 2/1 supported video formats list, this is why MKV is not supported by Surface Book 2/1. Living up to the promise to provide native support of MKV codec in Windows 10, the inability to play MKV files without MKV codec on Surface Book 2/1 seems to remain there unchanged.
Which is the best way to play MKV files on Surface Book 2/1? We’ll see here.
Surface Book 2/1 can open MKV when getting the help from additional programs, like MKV player for Surface Book and MKV to Surface Book converter. Here, we will show you the best program to enable MKV playback on Surface Book 2/1, to help you play MKV files on Surface Book (2) tablets, including MKV files backed up from Blu-ray, downloaded online, received from others, etc.
Download Surface Book 2/1 MKV Player? No Hurry
When we have some MKV files for playing on Surface, going to Google Play and downloading an Surface Book MKV player seems to be the most direct way the majority could think of.
Option 1: PressPlay Video
Editor rating: 8.4| User rating: 7.5| Supported OS: Windows 8.1, Windows 10
Overviews: PressPlay Video is a free media player for Windows 8 providing the best experience for playing your local MKV and FLV files. It is a full featured Windows 8 MKV player that supports advanced touch, mouse and keyboard controls. Integrated with an explorer, it also displays the folders in your libraries, portable devices, HomeGroup and media servers.
Pros: Easy to use; play MKV/FLV videos side-by-side; remember playing position; advanced touch, mouse and keyboard controls.
Cons: Often start with an error message.
Option 2: DAPlayer
Editor rating: 8.5| User rating: 7.7| Supported OS: Windows 8/8.1/10/7, Mac OS
Overviews: DAPlayer is a sleek and powerful MKV player that comes with 400+ video and audio codecs, so that you can play almost any video on Windows 8/8.1 64 bit or 32 bit. Thanks to the support for high definition video, you are allowed to watch full HD 1080p MKV, AVCHD, H264 videos with this free MKV player for Windows 8. Besides, DAPlayer provides a wide selection of configuration options.
Pros: Play lots of video audio formats; support more than 400 built-in codecs; Complete setting menu.
Cons: The default skin is too dark to browse.
And unfortunately, there are only few apps that bolster MKV playback on Windows Store, excluding those paid ones. So we particularly compiled the best free MKV players for Windows 8, 8.1 64/32 bit.
There is no denying that it is a fix, but you need to figure out a few things before any further.
1. Installing an extra player on storage-limited Surface will take up precious memory footprint and may make your device run slower. Do you really need to use a special video player just to play a few MKV files on Surface Book 2/1?
2. Most players are not compatible with all video audio codecs. Even if a player is advertised to support for MKV file format, it may be unable to play all MKV files flawlessly. This is also why some people submitted posts online saying “Surface Book player play MKV with DTS without sound”, “Surface player play MKV with sound only, but in a black screen” or other similar questions.
Play MKV on Surface Book 2/1 Using MKV Converter
Apart from downloading MKV player on Surface Book, a video converter that can convert MKV files and others to Surface Book will be also a good solution. Besides MKV, you are likely to meet other formats incompatible with your Surface Book (2) and your player.
If you try to use HandBrake to free convert MKV to Surface Book (2), you will find there is no specific profile for Surface, since HandBrake is no more than a video transcoder freeware for Apple (and has few Android profiles).
To play 2K/4K video (.mkv) on Surface Book (2) tablet, there is another video tool that can do it for you. As one of the alternatives of Handbrake, Pavtube Video Converter Ultimate converts MKV to Surface Book 2/1 supported MPEG4, AVI or WMV video file in low, mid and high video resolutions, and it compress 2K/4K movie size to fit for Surface Hub. Only several mouse clicks are required: load downloaded 2K/4K movies -> select output profile for Surface Book -> hit “Start conversion” to begin compressing/converting -> once finished, simply transfer the compressed/converted movies to Surface Book.
Meanwhile, this tool also enables you to convert MKV to all popular mobile devices directly, like Surface Book 2/1, Surface RT, Surface Pro, Samsung Galaxy Note 5/S7, iPhone SE/6S/6S Plus, Kindle Fire, Google Nexus, etc. In addition to help play MKV on Surface Book 2/1, it can also help play other incompatible videos like AVI, FLV, MOV on Surface Book 2/1 with no limits via converting.
Free Download and Install Pavtube Video Converter Ultimate:
Other Download:
– Pavtube old official address: http://www.pavtube.cn/blu-ray-video-converter-ultimate/
– Cnet Download: http://download.cnet.com/Pavtube-Video-Converter-Ultimate/3000-2194_4-75938564.html
How to Convert 2K/4K MKV for Playing on Surface Book 2/1
Firstly, you should download and install a MKV to Surface Book converter on your computer. Here, let’s take Pavtube Video Converter Ultimate as an example. It is fully compatible with Windows 10, 8.1, 8, 7, etc. And the Mac version can work well on Mac OS X 10.6 and higher including OS X 10.10 Yosemite and 10.11 El Capitan. And then follow the steps below to convert 2K/4K MKV for watching on Surface Book 2/1.
1. Add 2K/4K MKV files
Install and run MKV to Surface Book Converter. To import MKV files that you want to convert, you can click “File” > “Add Video/audio” or “Add from folder” button or directly drag and drop them into the main display window of this program. Batch conversion is supported so you can add many files at a time to save the conversion time.
Tips:
a. You can join several MKV files for Surface Book 2/1 via checking the “Merge into one file” box.
b. If you have a large MKV files and wanna split the video to several small parts, tap the “Split selected task” icon on the main interface to make it.
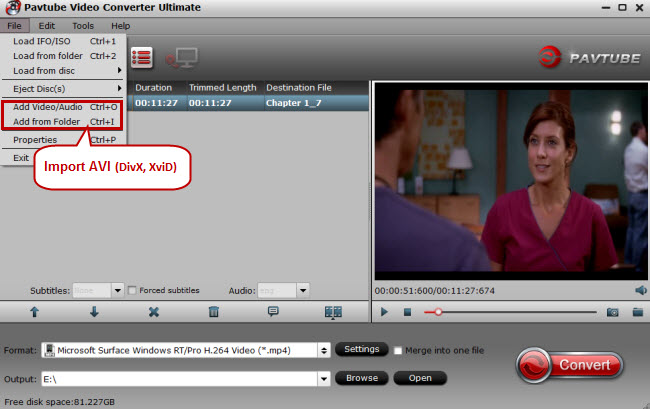
2. Choose output video format for Surface Book 2/1
Generally speaking, H.264, MPEG-4, AVI, WMV are supported by Surface Book 2/1. Also, this MKV converter provides optimized formats for Microsoft branded Surface devices; choose “Microsoft Surface Windows RT/Pro H.264 Video (*.mp4)” from “Surface” catalogue.
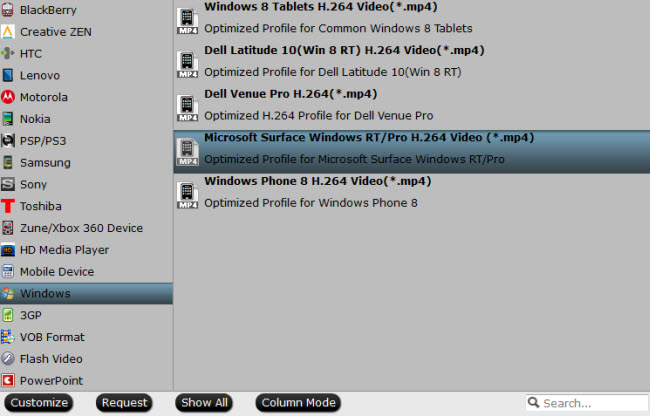
Tip 1: Profile Settings (Optional)
Click “Settings” to change the video resolution, bit rate, etc. for full screen playback smoothly or select the corresponding device as the output format. Please remember the file size is based more on bitrate than resolution which means bitrate higher results in bigger file size, and lower visible quality loss. You can compress/downscale 2K/4K MKV files to lower resolution in this way.
Tip 2: Video Editing (Optional)
Click “Edit selected task” to trim, crop, add special effects/watermark/subtitles to your videos. Just customize the videos as you like. If you want to keep the original video effects, just skip to the next step.
a. Trim: You can trim your 2K/4K MKV files to capture and convert your favorite video clips for playing on Microsoft Surface Book 2/1.
b. Crop: You can crop 2K/4K MKV area to remove the black video sides for playing on Microsoft Surface Book 2/1 in full screen.
c. Effect: You can adjust 2K/4K MKV effects by setting video contrast, brightness and saturation.
d. Watermark/Subtitle: Add image/video watermark or insert .srt, .ass, .ssa subtitle to 2K/4K MKV
3. Start converting MKV to Surface Book 2/1
When all the settings are OK, tap “Start conversion” button to start the MKV to Surface Book (2) conversion. After the conversion, you can click “Open” to get the result videos. Then you can easily transfer the converted mkv files to your Surface Book 2/1 for playback without any limit.
Related Software:
BDMagic for Windwos/Mac – The best Blu-ray solution to rip and backup any commercial and region-locked Blu-ray to Surface Book (2).
DVDAid for Windows/Mac – Capacity of ripping copy-protected DVD to Surface Book (2) with suitable format.
ByteCopy for Windows/Mac – It can rip Blu-ray/DVD to lossless MKV keeping all chapter markers for playback on Surface Book (2).
ChewTune– Remove DRM from Rental & Purchased iTunes movies, Digital Copy, Amazon videos, etc and easy get the DRM-Free for Surface Book (2) playback.
Related Articles:
Apr
Popcorn Hour A-500 PRO is a Networked Media Jukebox designed by and for music and movie lovers. When we press play and watch our movie, we enable ourselves to be taken away to a place that transcends reality. As a die-hard movie fan, there are times when we need to copy and stream 3D Blu-ray discs to Popcorn Hour A-500 Pro for either sharing on big screen HDTV or safekeeping. This guide would offer you the detailed solution.
Can Popcorn Hour A-500 Pro play 3D Blu-ray?
The most popular way that allows you to watch 3D Blu-ray disc movie via your HDTV is the 3D Blu-ray player, while Popcorn Hour A-500 Pro is not Blu-ray capable. Take note that only 3D Blu-ray ISO and 3D MKV files are the formats Popcorn Hour A-500 Pro supports.
See what formats Popcorn Hour A-500 Pro can play in the following picture:
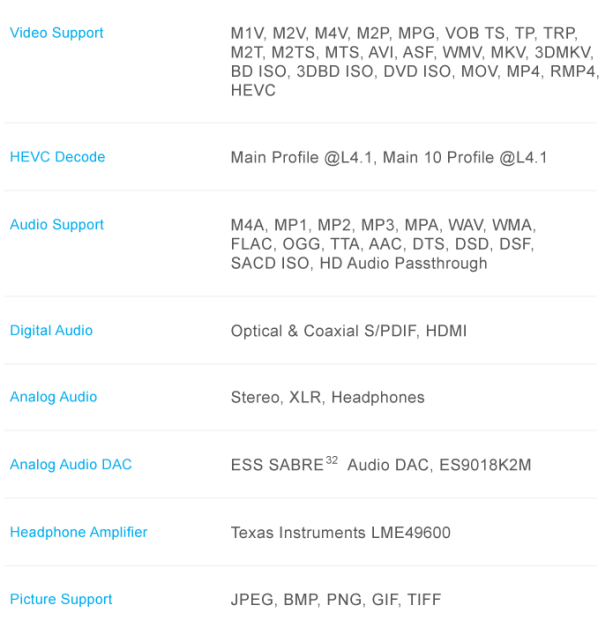
Get 3D Blu-ray Movies running on Popcorn Hour A-500 Pro
What if playing 3D Blu-ray on TV without Blu-ray player? In order to get 3D Blu-ray Movies running on Popcorn Hour A-500 Pro, we have to rip 3D Blu-ray to Popcorn Hour A-500 Pro supported video formats at first. This would not be difficult once you choose the right 3D Blu-ray ripping tool and solution.
Best 3D Blu-ray Ripper and Copy for Popcorn Hour A-500 Pro
When it comes to 3D Blu-ray ripper, Pavtube ByteCopy is second to none. It is able to remove region code, rip and compress any 2D/3D Blu-rays, DVDs including latest copy-protected BD/DVD discs, folders and ISO files to 2D or 3D MKV with compatible size for Popcorn Hour A-500 Pro. Most notably, it offers “Directly Copy for 3D Bluray” option to extract M2TS main title from 3D Blu-ray discs with 3D effect retained. If you like, you can rip 3D Blu-ray to lossless MKV keeping multiple subtitle/audio track and all chapter markers.
It is available to rip and copy 3D Blu-ray to Popcorn Hour A-500 Pro on Windows XP, Vista, 7, 8, and 10, etc. <Read review to learn more functions>
If you’re using a Mac, ByteCopy for Mac allows you to convert Blu-ray to Popcorn Hour A-500 Pro on Mac OS X (including El Capitan and Yosemite). Below will be the step-by-step guide for you.
Free download and install Pavtube ByteCopy:
Other Download:
– Pavtube old official address: http://www.pavtube.cn/bytecopy/
– Cnet Download: http://download.cnet.com/Pavtube-ByteCopy/3000-7970_4-76158512.html
Rip and copy 3D Blu-ray for Popcorn Hour A-500 Pro streaming
This guide uses ByteCopy (Including Windows 10) screenshots. The way to rip 3D Blu-ray disc to Popcorn Hour A-500 Pro on Mac is almost the same. Just make sure you’ve downloaded the right version.
Get Prepared
a. Source 3D Blu-ray movies, in either disc, folder or ISO image file.
b. Hard drive with enough space.
c. Blu-ray drive.
d. Pavtube ByteCopy or ByteCopy for Mac.
e. Internet connection (in case of 3D Blu-ray discs being encrypted).
1. Load 3D Blu-ray files
Insert your 3D Blu-ray disc to the Blu-ray Disc drive, then launch ByteCopy and click “File” to choose “Load from disc” to have 3D Blu-ray content imported.
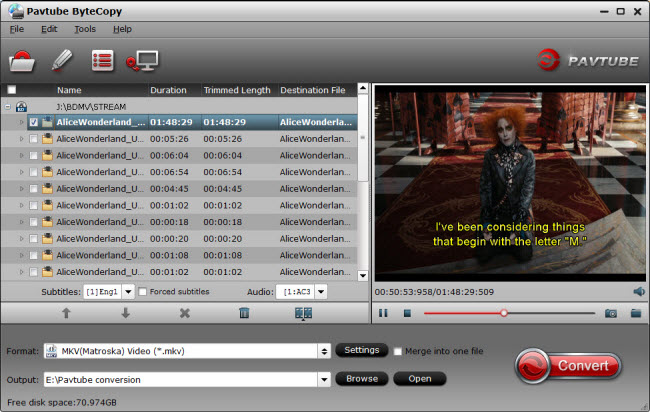
Tip: Before start ripping 3D Blu-ray to Popcorn Hour A-500 Pro, you can choose your wanted subtitle/audio track and forced subtitle before the next step.
2. Choose target format
Option A – Full copy 3D Blu-ray to BDMV for burning for Popcorn Hour A-500 Pro
Click “Copy the entire disc” on the top of the menu to start to entire copy 3D Blu-ray to with original video structure and then create free Blu-ray ISO image to play on Popcorn Hour A-500 Pro since it doesn’t play 3D Blu-ray menu directly.
Option B – Directly backup 3D Blu-ray to M2TS for Popcorn Hour A-500 Pro
In this way, you only extract the main title from 3D Blu-ray discs without preserving the extra info. You can save lots of storage space by backing 3D Blu-ray to M2TS. Hit “Format” then select “Copy” to choose “Directly Copy for 3D Bluray”.
Option C – Rip 3D Blu-ray to lossless MKV for Popcorn Hour A-500 Pro
Navigate to “Format”>”Multi-track”, and choose “Lossless/encoded Multi-track MKV(*.mkv)” which means you can make lossless 3D Blu-ray copy with all the chapter markers preserving.
Option D – Convert 3D Blu-ray to 2D/3D MKV for Popcorn Hour A-500 Pro
Click the Format bar and go to the Profile column, choose “MKV(Matroska) Video (*.mkv)” as the output video format in the category of “Common Video”. Or select “3D Video > MKV Side-by-Side 3D Video (*.mkv)” with keeping 3D effect from original 3D Blu-ray.

3. Profile Settings
Click the “Settings” icon, and you can adjust codec, bit rate, frame rate, sample rate and audio channel, etc.
Tip: To keep the 1080p video resolution, you’d set the video size as 1920*1080 to convert 3D Blu-ray to Popcorn Hour A-500 Pro for playing keeping 1080p. If you want to compress 3D Blu-rays, you can downscale the video size and video bitrae.
4. Start converting/copying 3D Blu-ray to Popcorn Hour A-500 Pro
Hit the big “Start conversion” button to start the 3D Blu-ray to 2D MKV/3D MKV/M2TS/Muti-track MKV conversion for Popcorn Hour A-500 Pro with the ideal 3D Blu-ray to Popcorn Hour Converter utility. After the conversion, get the outputs to stream to Popcorn Hour A-500 Pro for TV playback over DLNA for playback at ease. Start enjoying! The viewing experience is simply phenomenal!
See Popcorn Hour A-500 PRO Review:
Popcorn Hour A 500 PRO Android Stream UPnP audio:
Tip. About 3D Blu-ray movies
Let’s know more about 3D movies. A 3D or 3-D (three-dimensional) film is a motion picture that enhances the illusion of depth perception. Derived from stereoscopic photography, a regular motion picture camera system is used to record the images as seen from two perspectives, and special projection hardware and/or eyewear are used to provide the illusion of depth when viewing the film.
What is Blu-ray 3D?
In December 2009, the Blu-ray Disc Association (BDA) finalized the specification for 3D content on Blu-ray Disc. BD 3D delivers full HD 1080p resolution to each eye, regardless of whether that display uses LCD, plasma, or LED technology. With 3D on Blu-ray, each eye gets its own 1,920×1,080-pixel image. These 2 images are combined into one extra-tall frame.
To enjoy Blu-ray 3D via your computer, you need:
1. 3D HDTV (with 3D glasses);
2. 3D media player software (like PowerDVD, Total Media Theatre);
a. PowerDVD
PowerDVD is the No. 1 Media Player for playback Blu-ray, 3D Video & HD Movie on Windows platform. Its Unique TrueTheater enhancements let you not only enjoy a vivid 3D movie, but also converts 2D content into 3D, offering a whole new viewing experience for content such as Blu-ray HD movies, slideshows, YouTube videos and more. The depth of the 3D experience can be optimized with easy slider controls to get the best results from your 3D display.
b. Total Media Theatre
Total Media Theatre is another Blu-ray playback software for enjoy Blu-ray as well as 3D movies on your computer. It allows you to play 3D movies and video files including Blu-ray 3D movies. You can create 3D videos in real-time from 2D videos and DVDs via its patent Sim3D technology. So does the 2D image playback. Other feature like adjusting the depth perception to customize your 3D experience is also available. It is the most user-friendly Blu-ray player software as reviewed from a lot of users.
3. Blu-ray drive
4. 3D Blu-ray movies.
What kind of video file is used for 3D Blu-ray?
The Blu-ray Disc Association has chosen the Multiview Video Coding (MVC) codec to store 3D, so that even though it provides a full 1080p frame for each eye, it will only require about 50% more storage space compared to the 2D version, and all 3D discs will be fully backward compatible, in 2D, on existing players.
Do I have to wear glasses? What kind?
The viewer still has to wear polarized glasses, but in Blu-ray 3D, the glasses have LCD active shutters that are synchronized with signals from the TV. The shutters rapidly block the right- and left-eye views alternately so each eye receives the correct image. This technology provides higher resolution than simpler X-Pol glasses because in Active Shutter technology, each eye sees all the lines in the video, whereas in X-Pol each eye sees only half the lines.
Do I need a new screen to watch Blu-ray 3D?
Yes. A BD 3D compatible screen is required to view 3D content. The new screens have higher refresh rates and IR transmitters that work with the Active Shutter glasses. 3D screens can also display 2D content.
Do I need a special Blu-ray Player?
Yes. 3D – compatible Blu-ray Disc players will be marked with the BD 3D logo. These are known as Profile 5 players.
Do I need to shoot stereoscopic video to create Blu-ray 3D?
You can create original content in stereoscopic 3D, or you can add the 3D effect to 2D video by creating an offset image in post production.
How do I author a 3D Blu-ray Disc?
The basic authoring concepts for Blu-ray Disc carry over from 2D to 3D. Sony Creative Software’s DoStudio and Blu-print have support for 3D authoring.
Are Blu-ray Disc menus in 3D?
The BDA defines a specification for 3D menus in HDMV mode and BD-J.
Related Articles:
Apr
The advent of Oculus VR & Samsung Gear VR has further boosted the VR craze started by Google Cardboard and other VR devices. The popular formats used for watching videos are either SBS (Side By Side 3D) or 360-Degrees. If you want a fresh bite of the awesome 3D VR experience on Gear VR, Oculus Rift, HTC Vive, VR One…, chances are here for you to learn VR Headset 3D Movie FAQs including knowledge of 3D Movie on VR Headset Playback Guides, Tips and Solutions, etc.

To Watch 3D VR Movies on VR Headset, What Do I Need?
The 3D VR movie you found on YouTube is split into 2 pictures since a pair of 3D VR glasses can work with the split images to create immersive Virtual Reality. So, just like watching 3D movies on computer, in order to watch 3D VR movies VR Headset like Gear VR, Oculus Rift, HTC Vive, VR One…, you need:
1. A pair of 3D VR glasses (Or 3D VR headset)
A 3D VR equipment turns any blurs, double images, distortions of a virtual video/3D VR games into touchable, interactive experience that we call reality. Without such a gadget, you won’t be able to immerse into the full scenario of a horror movie or gunplay, or interact with any object that conjures out of VR 3D.
2. A 3D VR movie
Note: A VR video player would be a must to play 3D VR movies on computer. Alternatively, if you want to watch VR videos on iPhone, you may download a VR APP like Discovery VR for iOS. If you use a Samsung or Android phone to watch 3D VR movies, Smash Hit for Samsung Gear VR, Cardboard for Android Phone would be good to go.
Create Your Own VR Video for VR Headset, How to Realize?
We can save any content on the microSD Galaxy Note 4 or S6/S7 or sync to iPhone via iTunes for using in 3D glasses, but you must be placed in the appropriate format. Because of the playable format of the 3D glasses have strict requirements, such as: some MKV movie files(downloaded from Internet or some raw Blu-ray rips in MKV) in 2D or 3D SBS(Side-by-Side) work on VR headsets, but the audio has to be encoded in AAC or MP3 for stereo. AC3 audio and DTS Dolby don’t seem to work. Some YouTube downloaded FLV are not workable in VR headsets like Google Cardboard, Gear VR, VR One, etc. What’s more, 2D/3D Blu-ray or DVD are not supported by VR headsets obviously, we need the best 3D Movie Converter for VR Headsets to do 3D Video conversion firstly.
Top VR Headset 3D Movie FAQs
Below is a easy-to-understand VR Headset 3D Movie FAQs, check it out!
Q: Can I wear my eye glasses with the 3D VR GLASSES when watching 3D movie?
A: A lot of people who wear glasses find that they don’t need to with our headset because the lenses can be adjusted. Although the adjustment is left/right (so you can match the lenses to where your pupils are), we have found it is often all the adjustment you need.
Q: Where can I find the 3D VR GLASSES app?
A: We have not yet announced when a native app for 3D VR GLASSES Start will be released. Right now, you can go to google play or Apple APP store to see the best videos, apps and experiences that can be enjoyed on the headset. (Be sure to sign up to receive updates as we add more cool stuff.)
Q: What kind of content is available for the 3D VR GLASSES?
A: The headset works with several different types of content:
1. Apps built for 3D VR GLASSES
2. Google Cardboard apps (because we have capacitive-touch inputs)
3. Any videos that are set up for side-by-side viewing on a mobile phone (e.g., YouTube videos set up for 3D viewing)
> See Media Formats Supported by Gear VR Software
Q: For Christmas, my 11 year old son requested a Viewmaster VR headset to use on my G4.. How to play my purchased DVD on that VR headset. Has anyone tried them, or any other reasonably priced goggles that are better?
A: To view DVD on any VR headset, you need convert DVD into virtual reality video with 2D/3D effect for playback on Viewmaster or other VR headsets with iPhone.
Q: Any thoughts on the Zeiss VR One? How can I view Blu-ray on VR One with 2D/3D effect?
A: No matter what you are willing to do, you need a VR Blu-ray Ripper indeed with which you can changing a 2D/3D Blu-ray to format/resolution available to VR One.
Q: What is it like to watch a movie (2D or 3D) on Oculus Rift? What kind of experience do you get?
A: There is a free application on the Oculus share page called VR Cinema. It easily let’s you play 2d or 3d movie files on the Rift, while putting you in a virtual movie theatre. You can even walk around the theatre and sit in any seat you like. Though, because the 3d effect of the Rift is so many magnitudes beyond the 3d effect of typical blockbuster films, the 3d effect from within VR Cinema is sort of lackluster in my opinion. A much more compelling experience is true made-for-Rift content, which actually makes you feel like you are there.
Other VR Headset 3D Playback Guides and Solutions:
2D/3D Blu-ray to VR Headset:
DVD to VR Headset:
YouTube to VR Headset:
3D YIFY to VR Headset: Get 3D Yify Movies to play on Gear VR
3D movie to VR Headset: 3D movie to VR One | 3D movie to Gear VR | 3D movie to ANT VR Kit | 3D movie to Google Cardboard | Create 3D SBS for Vitrio VR
Top 3D movie to VR Headset Converter
There are a number of great free and paid applications that can make the 3D movie to VR Headset conversion process one-click, or give you all the tools you need to rip and encode beautiful video. Still, you need to know which one will be the best. Then, we took a look at the five best 3D video converting tools and put them to a vote.
Pavtube Video Converter Ultimate |
Pavtube Video Converter | Xilisoft 3D Video Converter | Imtoo 3D Movie Converter | Tipard 3D Converter | |
| Price | $65 | $35 | $35.95 | $35.95 | $39 |
| Support 3D Modes | |||||
| Side by Side (Half-Width) | √ | √ | √ | √ | √ |
| Side by Side(Full) | √ | √ | √ | √ | √ |
| Top and Bottom (Half-Height) | √ | √ | √ | √ | √ |
| Top and Bottom (Full) | √ | √ | √ | √ | √ |
| Anaglyph | √ | √ | √ | √ | √ |
| Input File Formats | |||||
| 3D YIFY/YouTube | √ | √ | √ | √ | √ |
| 3D Blu-ray/ISO | √ | – | – | – | – |
| 3D MTS/MKV | √ | √ | √ | √ | √ |
| 2D Blu-ray | √ | – | – | – | – |
| DVD | √ | – | – | – | – |
| H.265/HEVC | √ | √ | – | – | – |
| H.264 | √ | √ | √ | √ | √ |
| MXF | √ | √ | – | – | – |
| XAVC/XAVC S | √ | √ | – | – | – |
| Output File Formats | |||||
| 3D MP4 | √ | √ | √ | √ | √ |
| 3D MKV | √ | √ | √ | √ | √ |
| 3D MOV | √ | √ | √ | √ | – |
| 3D AVI | √ | √ | √ | √ | √ |
| Advanced Features | |||||
| Adjust 3D Depth | √ | √ | √ | √ | – |
| Switch Left Right | √ | √ | √ | √ | – |
| Trim | √ | √ | √ | √ | √ |
| Split & Merge | √ | √ | √ | √ | √ |
| Crop | √ | √ | √ | √ | √ |
| Adjust resolution | √ | √ | √ | √ | √ |
| Adjust bitrate & frame rate | √ | √ | √ | √ | √ |
| Operating System | |||||
| Windows | √ | √ | √ | √ | √ |
| Mac | √ | √ | √ | √ | √ |
Now we’re back to crown the winner. Pavtube Video Converter Ultimate is a professional 2D/3D Video Converter Ultimate (PC and Mac) program which can helps you re-encode any 2D/3D movie files to VR Headsets (Samsung Gear VR, Oculus Rift, HTC Vive, VR One included) more compatible 3D formats and make 3D movies accepted by any VR Headsets with ease.
The best 3D Video Converter software allows you to make compatible video files for all of your VR Headsets or Android/iOS devices, even if you don’t know terms like FLV, MKV, M4V, MP4, VOB, M2TS, MTS, WMV, MPEG, DVD, Blu-ray, etc. Mac version is here.
>See Pavtube Video Converter Ultimate vs AnyDVD
Get Pavtube Video Converter Ultimate in bundle package: ByteCopy+Video Converter Ultimate with Only $79.9 which can save you $27.1, then you can transcode any SD/HD/4K movies and rip Blu-ray/DVD/ISO for VR headsets freely playback on Windows 7/Vista/XP/8/8.1/10.
More Tips for VR Headsets:
Virtual Desktop For Rift DK2 | Setup Kodi on Gear VR | Things about Gear VR & Oculus Rift
Related Articles:
Apr
Facing with a bunch of Blu-ray discs, do you feel in trapped in that you must take much time to hunting for the one Blu-ray movie? Or you have might to be think about ripping and copying the Blu-ray discs to digital files so that you can put and store your Blu-ray movies to NAS, Hard Drive, Home Server to manage and organize more conveniently. Here, we want to introduce you top 2 Blu-ray ripper to help you rip and copy Blu-ray – Pavtube ByteCopy and AnyDVD (HD) aka Redfox.
Read Also: Popular Blu-ray Ripping/Copying FAQ
Top 1. Pavtube ByteCopy
Pavtube ByteCopy <review> is an efficient and easy-to-use BD/DVD converter and can convert movies to MKV/MP4/MOV with multiple audio tracks & subtitles to virtually any popular video and audio format so that you can play movies on different devices.
Get a 50% off discount for Pavtube ByteCopy by joining Pavtube Black Friday & Cyber Monday Crazy Promotion. More surprises are waiting for you.
Top 2. Slysoft AnyDVD
AnyDVD is a device driver that allows you to decrypt DVDs, remove copy protections and user operation prohibitions. After upgrade, it can also decrypt Blu-ray sources. In addition to DVD decryption, you are also allowed to copy those audio CDs with copy protection.
Comparison Chart: Pavtube ByteCopy and Slysoft AnyDVD(HD)
| Comparison | Pavtube ByteCoy | Slysoft AnyDVD |
|---|---|---|
| Conversion object | ||
| DVD disc/ folder/ ISO Image file IFO Image file |
√
|
√
|
| Blu-ray disc/folder/ ISO Image file |
√
|
√
|
| Main features | ||
| Full Copy Blu-ray |
√
|
√
|
| Directly Copy Blu-ray |
√
|
√
|
| Forced subtitles |
√
|
√
|
| Batch Conversion |
√
|
√
|
| 2D/3D-3D |
√
|
–
|
| Snapshot |
√
|
–
|
| NVIDIA CUDA/AMD APP acceleration |
√
|
–
|
| Blu-ray to (lossless) MKV |
√
|
–
|
| Blu-ray to Multi-track MP4/MOV/AVI |
√
|
–
|
| Video preview |
√
|
–
|
| Add external subtitle to Blu-ray |
√
|
–
|
| Export SRT subtitles |
√
|
–
|
| Editing functions |
√
|
–
|
| Supported OS | ||
| Mac |
√
|
–
|
| Windows |
√
|
√
|
| Help & Support |
√
|
√
|
Actually, Pavtube ByteCopy overwhelms AnyDVD in almost every aspect which is quite obvious from the above-listed form.
1. Automatically detect and transcode movies with DRM protection
After putting your BD/DVD into your optical drive, and starting Pavtube ByteCopy, it will automatically identify those movies with DRM protection, and in the meantime will automatically transcode the movie. MakeMKV, though, can read those discs protected with AACS and BD+, an extra plugin is necessary to install to remove protection, which is quite complicated in operation and slow in speed.
2. Multi-track preservation
As is known from the above from, both Pavtube ByteCopy and MakeMKV can make lossless copy of BD/DVD. However, Pavtube ByteCopy can produce multi-track MKV/MP4/MOV/AVI including more than one audio stream to meet the requirements for more media players, mobile devices, etc.
3. Various audio/video output formats
MakeMKV, as its name suggests, can only convert BDs/DVDs to MKV format. Pavtube ByteCopy, as an all-round converter, can convert BDs/DVDs to any popular audio and video formats.
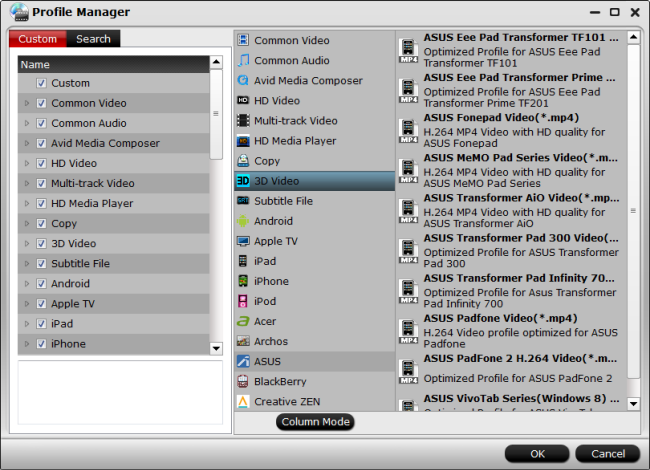
4. Powerful BDs/DVDs backup
Pavtube ByteCopy can copy the entire BD/DVD disc content to your computer hard drive with its original structure and all audio/subtitle tracks and chapter markers preserved. In addition to its full disk copy, it can also save 100% intact BD M2TS/DVD VOB movies without extras, which is called directly copy.
5. Built-in video editor
The built-in video editor allows you to make your own favorite movie. For example, trimming video clips, cropping unwanted images, and adding subtitles, etc.
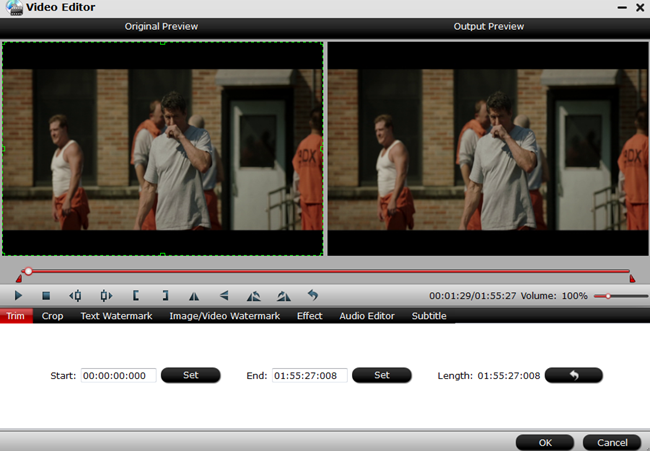
6. Video preview window
This is one of the most outstanding features of Pavtube ByteCopy. When you open Pavtube ByteCopy and load DVDs, on the right side of the main interface there is a small window allows you to have a smooth preview of the video you want to convert. Really a big highlight!
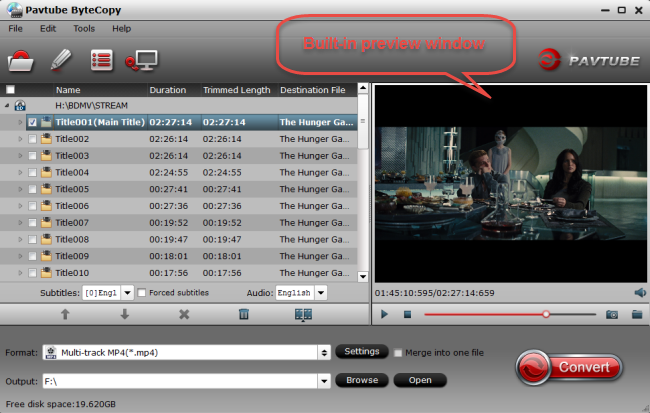
7. Other outstanding points
With Pavtube ByteCopy at hand, you are allowed to watch videos with 3D effect. Wanna take one of the video images as your desk background? Then have a try of snapshot. What’s more, Pavtube ByteCopy also can export SRT subtitles.
For more powerful functions of Pavtube ByteCopy, please visit http://www.multipelife.com/bytecopy.
Wanna save money? Hurry up and go to www.multipelife.com/special-offer for more detailed promotion information.
Read More Reviews
Pavtube DVDAid vs AnyDVD – As an experienced user of some popular DVD rippers in the market, here I’d like to make detailed reviews of 2 best solutions to watching dvds with copy protection for your reference.
Pavtube BDMagic vs AnyDVD – Have you ever been disappointed at the output movies with poor quality in picture, sound and chapter information after using some certain conversion tool?
Related Articles:
Apr
People love 4K video but not all your media players and devices can play 4K content. In most case, when you want to play or edit 4K content, you need to compress the grand 4K to 1080p, 720p even lower resolution. For example, powerful as VLC, although it updated as the first media player to play 4K video, people still choose to downscale 4K to 1080p for smoother playback on VLC. And this behavior needs a 4K Video Converter to be realized.

In the former guide, we introduced you top 5 4K Video Converter for Windows and today we want to gather the best 5 4K Video Converter for Mac for you. To give you the most intuitionistic exhibition about the 4K functions of the top 5 4K video converter for Mac, we made a comparison chard below.
Top 5 4K Video Converter for Mac macOS Sierra 2016 Reviews
| Software | Pavtube iMedia Converter for Mac | Aiseesoft Video Converter Ultimate for Mac | Any Video Converter for Mac | Xilisoft Video Converter Ultimate for Mac | iFastime Video Converter Ultimate for Mac |
| Price | $65 | $45 | $59.95 | $59.95 | $45.95 |
| Pros | Supports both 4k video and 4k Blu-ray | Produce high quality video files | Convert 4K video to any format file format | Convert 4K and other source files into many different file formats | Supports to convert and edit 4K video |
| Cons | No 4K video downloading option | Lacks the option to add subtitles to videos for the hearing impaired | The 4k video conversion is too slow | Much CPU occupied and the output 4K file can be very large | Limits on 4K output |
| Input File Formats | |||||
|---|---|---|---|---|---|
| 4K Video |
√ |
√ |
√ |
√ |
√ |
| HD Video |
√ |
√ |
√ |
√ |
√ |
| SD Video |
√ |
√ |
√ |
√ |
√ |
| 4K H.265/HEVC |
√ |
√ |
– |
√ |
√ |
| 4K H.264 |
√ |
√ |
√ |
√ |
√ |
| 4K XAVC S |
√
|
√
|
–
|
–
|
√
|
| 4K Prores |
√
|
–
|
–
|
–
|
√
|
| 4K Blu-ray |
√ |
–
|
–
|
–
|
√
|
| Standard BD/DVD |
√
|
√
|
√
|
√
|
√
|
| Ouptut File Formats | |||||
| 4K Video |
√
|
√
|
√
|
√
|
√
|
| HD Video |
√
|
√
|
√
|
√
|
√
|
| SD Video |
√
|
√
|
√
|
√
|
√
|
| 4K H.265 MP4 |
√
|
√
|
√
|
√
|
√
|
| 4K H.265 MKV |
√
|
–
|
–
|
–
|
√
|
| 4K Prores |
√
|
√
|
√
|
–
|
√
|
| 4K H.264 MP4 |
√
|
√
|
√
|
√
|
√
|
| 4K H.264 MOV |
√
|
√
|
√
|
√
|
√
|
| 4K TV Preset |
√
|
√
|
√
|
√
|
√
|
| 4K Apple TV |
√
|
√
|
√
|
√
|
√
|
| 4K YouTube/Vimeo |
√
|
√
|
√
|
√
|
√
|
| Custom Tool | |||||
| Trim 4K Video |
√
|
√
|
√
|
√
|
√
|
| Merge & Split 4K Video |
√
|
√
|
√
|
√
|
√
|
| Compress 4K to 1080p/720p/540p |
√
|
√
|
√
|
√
|
√
|
| Batch Convert 4K Video |
√
|
√
|
√
|
√
|
√
|
| Add subtitles to 4K video |
√
|
–
|
√
|
√
|
√
|
Especially, we want to praise Pavtube iMedia Converter for Mac for its multiple functions as the best 4K Video Converter for Mac. This professional convertor for 4k videos can convert any video of any resolution in 4k format. Also, it can convert any 4k video into any common video formats of AVI, MP4, MOV, WebMD, WMV, FLV, DivX as well as the same in HD.
Key features:
- You can convert any video in 3840 x 2160 or 4096 x 2160 4k resolution.
- It allows you to edit the 4k video such as crop, trim, merge, watermark, rotate, effects and many more.
- You can play the 4k videos in your device and also download them directly from YouTube using the in-built downloader with this application.
- Helps you convert the 4k videos for portable devices like Galaxy S7, Sony Xperia Z5 Premium, iPad Pro 9.7/12.9, iPad Air 3, UHD TV, etc.
- Also, you can covert videos to YouTube friendly format which will allow faster upload of videos to YouTube.
- Changing the brightness or adding subtitles is another key feature of this program.
- In addition, you can have a backup of Blu-ray 3D movies to 3D/2D video files like 2D/3D MP4/AVI/MKV for Gear VR, ZEISS VR One, etc.
- Compatible with Mac OS X 10.12 macOS Sierra, Mac OS X 10.11 El Capitan, Mac OS X 10.10 Yosemite, 10.9 Mavericks, 10.8 Mountain Lion, 10.7 Lion, 10.6 Snow Leopard, 10.5 Leopard.
Screenshot
Availability
Where to find 4k & HDR Movies and Content?
Sometimes, you just get interested in 4K content but actually you don’t know where to get the 4K video to experience the brilliant visual effect. There’s still not too much available, but the amount is steadily increasing. Here are the main ways you can watch the ultra high definition content you crave.
| Source | 4k & HDR Movies | 4k & HDR TV Shows | 4k & HDR Videos | Bit Rate | Approx. Data/Hour |
|---|---|---|---|---|---|
| Physical media | |||||
| 4k Blu-ray | 22 (22 HDR) + regular releases | – | – | 108-128 mbps | N/A |
| Streaming & Subscription | |||||
| YouTube | – | – | Thousands | 16 mbps | 7 GB |
| Netflix | 9 | 24 (2 HDR) | 5 | 16 mbps | 7 GB |
| Amazon Prime Video | 7 | 12 (2 HDR) | 4 | 16 mbps | 7 GB |
| Streaming/Download Purchase & Rental | |||||
| Amazon Video | Many | 6 | 13 | 16 mbps | 7 GB |
| Ultraflix | Many | 3 | Many | 6-25 mbps | 2.7-11.25 GB |
| Fandango Now (Prev. MGo) | 35 (22 HDR) | – | – | 10+ mbps | 4.5+ GB |
| Vudu | 34 (34 HDR) | – | – | 11+ mbps | 4.95+ GB |
| Sony Ultra | Several | – | – | 16 mbps | 7 GB |
| Provider Exclusive | |||||
| Xfinity UHD** | – | – | – | 15 mbps | 6.75 GB |
| DirecTV Genie HD | Many | – | – | – | N/A |
| Dish Hopper 3 & 4k Joey | Many | Several | – | – | N/A |
| UHD Drive | |||||
| Sony FMP-X10 | 74+ | 3+ | 50+ | 20-46 mbps | 9GB (Streaming) |
| Samsung UHD Video Pack v. 2 | 10 | – | 30 | – | N/A |
Related Articles:
Apr
When you need a media player to play your local videos on PC, it is likely that you will choose VLC media player definitely instead of any of the other media players available. Why people like VLC? The reason being, it is indeed a proven fact that VLC media player can play almost all the media file formats that you throw at VLC, given that your PC has the power to play it. So what about 3D SBS video? Does VLC can play 3D SBS video on PC?
How Search: H.265 to VLC | 4K Video to VLC | Blu-ray to VLC | DVD to VLC |
Many people would ask that since VLC can play nearly all kinds of videos, can it play 3D video? Yes. VLC can successfully play 3D SBS video on your PC. Not like other media players, in which the 3D video will appear divided into two frames running side by side and playing the same content, with the help of VLC media player’s advanced features, 3D SBS video can be merged into a single frame and the final output will be in anaglyph 3D. You can then use your red/cyan glasses to watch the movie in 3D. For those who need to watch 3D SBS movies on their PC with VLC, here’s how you can do so.
How To Watch 3D SBS Movies in VLC Media Player?
Step 1: Run VLC media player and play the 3D SBS movie in it.
Step 2: Click on Tools and select Effects and Filters.
Step 3: Click on Video Effects and select the Advanced tab.
Step 4: Enable the Anaglyph 3D option and close the Effects and Filter windows.
There you go, the video will now appear in anaglyph 3D. Put on your red/cyan glasses to watch the movie in 3D.
How to watch a 3D video in regular 2D with VLC??
”When I download a 3D movie and play it in VLC, it plays two copies of the video side by side. How to convert it to a normal video and watch in 2D?”
From time to time, we don’t need the 3D effect when playing 3D video in VLC. So how to get 2D effect in VLC with 3D source? You can use a Video Converter to convert the 3D video to 2D video then play it with VLC.
Pavtube Video Converter Ultimate can convert 3D SBS video, 3D TB video, 3D Anaglyph video to 2D for VLC playing. It can re-encode any video such as H.265, MP4, MKV, AVI, FLV, Tivo, WMV, 3GP to another format for playing on various devices with VLC, WMP, QuickTime and other media players.
This 3D to VLC converter is easy to use so that non-computer man can re-encode 3D to 2D MP4, MKV for VLC with simple three clicks. It is a 100% clean software, no adware, no junk software, no virus software.
Free download and install
Other Download:
– Pavtube old official address: http://www.pavtube.cn/blu-ray-video-converter-ultimate/
– Cnet Download: http://download.cnet.com/Pavtube-Video-Converter-Ultimate/3000-2194_4-75938564.html
Steps to convert 3D video to 2D for VLC
Step 1: Download and launch the program, load your 3D files with ‘Add video’ or ‘Add from folder’. It supports batch conversion so you can add multiple 3D videos to the program.
Step 2: Make the suitable choice for your original 3D movies to VLC compatible video format. If you want 2D video, you can choose idea one from “Common Video” and “HD Video”.
3D to VLC video converter also is a editor for movies. Click the pencil icon and find more editing items for videos, ‘Trim’ to when to start and when to finish, ‘Crop’ to get rid of the unwanted edges, etc. More you can get into the interface here. Additionally, it also support the DVD or Blu-ray’s conversion. If you get into the ‘Options’ menu, ‘Acceleration’ function is waiting for you too!
Step 3: Go back to the UI then click “Convert” icon to start to re-encode 3D video to 2D format for VLC.
After the conversion, you can play 3D videos on VLC in regular 2D effect successfully.
Related Articles:
- How to Use HandBrake to Rip/Convert DVD to MP4?
- Make 3D Movies for your Samsung Gear VR With Old Movie Library and Blu-ray/DVD Disc
- Convert 3D MKV/FLV/YouTube/Blu-ray to 3D MP4 for ANTVR Kit
- Convert 3D MKV/FLV/WMV/AVI to Galaxy S5/iPhone 6 For Watching on ZEISS VR One
- Watch 3D Video on GOODO 3D VR Headset
Apr
Watching TV shows and movies on the go is always entertaining. It is even better when the device is large. The Samsung Galaxy is large. This article will tell you how to watch Blu-Ray movies on Samsung Galaxy S7, Galaxy S7 Edge, Galaxy S6, Galaxy S6 Edge/Edge+, Galaxy Note 5, Galaxy Note 4.
First of all, you will need a Blu-Ray drive in your computer. Higher-end computers will handle Blu-Ray ripping a lot better than lower-end machines. Then you need a Blu-Ray rippers online or other great shareware/freeware video converters. If you don’t have one, don’t worry, here, we prepared top 4 Blu-ray to Samsung Galaxy converter in 2016 to help you rip Blu-ray to Samsung Galaxy S7/S7 Edge, backup Blu-ray to Galaxy S6/S6 Edge/S6 Edge+, convert Blu-ray to Samsung Galaxy Note 5 to watch on the road.
Read this before start: Samsung Galaxy S7/S7 Edge Supported Video and Audio Formats
2016 Top 4 Blu-ray to Samsung Galaxy Converter Comparison
| Software Compare | Pavtube ByteCopy (Win/Mac)
|
Pavtube BDMagic (Win/Mac)
|
Leawo Blu-ray Ripper (Win/Mac)
|
4Videosoft Blu-ray Ripper (Win/Mac)
|
| Supported Source | ||||
| Blu-ray Discs |
√
|
√
|
√
|
√
|
| Blu-ray Folder |
√
|
√
|
√
|
√
|
| Blu-ray ISO Image File |
√ |
√ |
√
|
√
|
| Output Formats | ||||
| SD MP4/MOV/M4V |
√
|
√
|
√
|
√
|
| HD MP4/MOV/M4V |
√
|
√
|
√
|
√
|
| Galaxy Optimized Preset |
√
|
√
|
√
|
√
|
| Lossless MKV |
√ |
–
|
–
|
–
|
| Encode MP4/MOV: with multi-audio track |
√ |
–
|
–
|
–
|
| MP3, AAC, FLAC,OGG |
√ |
√ |
√ |
√ |
| WAV, M4A, DTS, |
√ |
√ |
√ |
√ |
| Other Functions | ||||
| Bypass Copy Encryption |
√
|
√
|
√
|
–
|
| Add SRT subtitle. |
√ |
√ |
√ |
√ |
| Adjust Aspect Ratio |
√ |
√ |
√ |
√ |
| Adjust Frame Rate |
√ |
√ |
√ |
√ |
| Adjust Resolution |
√ |
√ |
√ |
√ |
| Adjust Bitrate |
√ |
√ |
√ |
√ |
| Merge & Split Video |
√ |
√ |
√ |
√ |
| Trim & Crop Video |
√ |
√ |
√ |
√ |
| Add Watermark |
√ |
√ |
√ |
√ |
| Extract SRT Subtitle |
√ |
– |
–
|
–
|


Enter Blu-ray to Samsung Galaxy converter software. These applications scan your Blu-ray movies, rip their contents from the disc and convert them into a format that can be played on Samsung Galaxy 3/2/1. The best converter software also prepares files that are playable on your other devices such as iPad Air 3, iPad Pro 9.7/12.9, PS3, PS4, Xbox One, Xbox 360, FCP X/6/7, iMovie and more.
We’ve rated and ranked all of the best Blu-ray to Samsung Galaxy converter software available on the market today. At the end of our analysis Pavtube ByteCopy <review>and Pavtube BDMagic <review>claimed the top spots on our side-by-side comparison chart. We’ve also created informative article about 2016 Top 5 DVD to Cell Phone Converter Reviews for your perusal.
Related Articles:
Apr
4K (aka Ultra High Definition) video has over eight million pixels (3840 x 2160). It provides extremely clear picture, as it has four times more resolution than 1080p for example. When you have some 4K videos, you may find that these 4K won’t be played on your any Android devices, neither Android tablet nor Android phone. That’s because not each Android tablet/phone supports true 4K resolution. 
However, it doesn’t mean that if you have 4K videos no matter download them or record them by yourself, you can’t play the 4K video on Android phone/tablet. You can use some 4K video players for Android to stream 4K videos on Android devices. Some top 4K video players for Android devices are listed below:
Top 4K Video Players for Android phone/tablet
1.VLC Player
VLC was recently updated to include support for 4K video playback in version 2.1. This player has support for a very large range of codecs, making it possible to play back virtually any type of video file (as well as audio).
2. MX Video Player for Android
It is a free video player that supports almost every video file format as well as subtitle files such as MKV subtitle track, .srt, .sub, .ass, .mpl, .psb etc. MX Player is the first Android video player which supports multi-core decoding. And with the help of the new H/W decoder, its hardware acceleration feature can be applied to more videos, which also enables itself to support 4K video playback (though sometime the 4K video playback will be a little stumble).
3. ALLPlayer 6.6
Similar to VLC media player, ALLPlayer is ideal for playing stubborn video files including 4K video that won’t play in your usual video player. It supports subtitles and plays just about anything and if it can’t play a file, it will try to download the appropriate codec from the ALLPlayer website.
Apart from 4K video player, you also can use some 4K file converter to help you play 4K video on Android phone/tablet.
4K File Converter to Make you Play 4K video on Android phone/tablet
Pavtube Video Converter Ultimate<4K File Converter for Mac>, a professional convertor for 4k videos/files. Pavtube Video Converter Ultimate can convert any video of any resolution in 4k format to Android tablet/phone supported video. Also, it can convert any 4k video into any common video formats of AVI, MP4, MOV, WebMD, WMV, FLV, DivX as well as the same in HD.
Key features:
- Like any other converting program, it can convert different file formats like AVI to WMV and so on.
- Also, you can covert videos to YouTube friendly format which will allow faster upload of videos to YouTube.
- As an editor, you can trim a video or crop it to suit your requirement.
- Changing the brightness or adding subtitles is another key feature of this program.
- In addition, you can have a backup of Blu-ray 3D movies to 3D/2D video files like MP4, AVI and others.
- Pavtube Video Converter Ultimate also supports NVIDIA CUDA and ATI Stream acceleration technologies.
Free download and install
Other Download:
– Pavtube old official address: http://www.pavtube.cn/blu-ray-video-converter-ultimate/
– Cnet Download: http://download.cnet.com/Pavtube-Video-Converter-Ultimate/3000-2194_4-75938564.html
Compress 4K to 1080p/720p for Android phone/tablet
Step 1: Load 4K Files
Run 4K File Converter for Android. Start up the program, click “File” menu, and select “Add Video/Audio” or “Add from folder” to import source YouTube 4K video files.
Step 2: Set output format for Android
Clicking the Format bar, you can choose to select “Android Phones 1080p Video(*.mp4)” or “Android Tablets 1080p Video(*.mp4)” video under “Android” main category. This format will be compatible with all Android phones and tablets. You can also opt to output device preset file formats according to the device that you are desire to play 4K videos on.
Step 3: Compress 4K video to 1080p for Android
Click “Settings” on the main interface to pop out “Profile Settings” window, under “
“Size(pix)” drop-down options, select “1920*1080” to compress 4K to 1080p or 720p for your Android phone/tablet.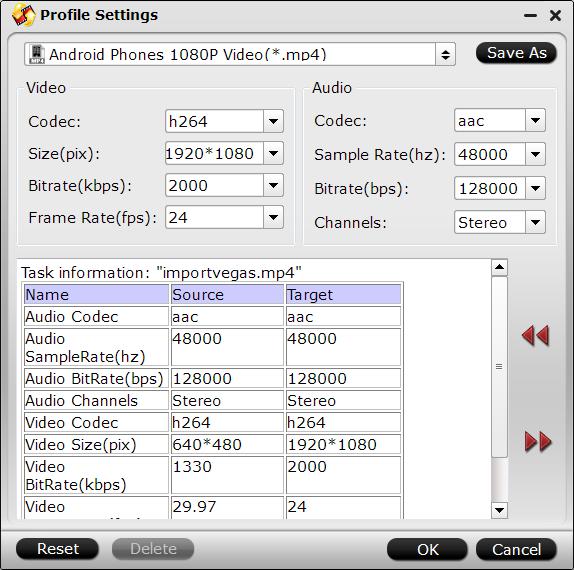
Step 4: Start 4K video to Android conversion
Clicking the Convert button on main interface to start When the conversion is completed, you will get no problem to transfer and play converted 4K files on Android phones or tablets.
Where to get 4K Video for Android phone/tablet
Currently, people can download 4K video from YouTube 4K channel or record 4K video with 4K recorder.
Which camcorders can produce “4K videos”?
Sony: FS700, CineAlta F5, CineAlta F55, CineAlta F65
Canon: EOS C500, EOS-1D C DSLR
Astrondesign AH-4413, Point Grey Flea3 8.8 MP, GoPro HERO3 Black, Nvidia GTX Titan, AMD Radeon HD 7970
How to Download 4K video from YouTube for Android devices?
1.Download and Install the 4K Video Downloader application.
2. Go to YouTube and find the content, you can use 2160p as additional search term. Copy the video link from the browser.
3. Press “Paste Link” button in 4K Video Downloader application.
4.Select “MP4” as a format and “2160p” as a quality in the download window and press “Download” button.
5. Then it remains only to wait until the downloading is completed and play downloaded video.
In Addition: 4K Android phones and tablets
There are some Android phone/tablets that can play 4K video directly without needing 4K File Converter. Lets’s see some Android phone/tablet that support 4K.
1.Samsung 4K phone
Samsung Galaxy S6/S5, Samsung Galaxy S6 edge, Samsung Galaxy S5 Plus, Samsung Galaxy S5 Sport, Samsung Galaxy S5 Active, Samsung Galaxy Note Edge, Samsung Galaxy Note 4/3, Samsung Galaxy Alpha, Samsung Galaxy S5 LTE-A
2.Sony 4K phone
Sony Xperia Z4/Z3/Z2, Sony Xperia Z3V, Sony Xperia Z3 Compact, Sony Xperia Z2A
3.HTC 4K phone
HTC One M9, HTC One E9+, HTC One M9+
4.LG 4K phone
LG G Pro 2, LG G Flex 2, LG G3
5.Motorola 4K phone
Motorola DROID Turbo, Motorola Moto X
6.ZTE
ZTE Star II, ZTE nubia Z7 Max, ZTE nubia Z7 mini, ZTE nubia Z7, ZTE Nubia Z5S
7.Google 4K phone
Google Nexus 6
8.Meizu
Meizu MX4 Pro, Meizu MX4
9.Oppo
OPPO U3, OPPO R5, OPPO Find 7a, OPPO Find 7
10.Xiaomi
Xiaomi Mi 4
11.OnePlus One
12.Lenovo
Lenovo Vibe Z2 Pro
13.Asus
Asus PadFone X, Acer Liquid S2
As to 4K tablets, the only 4K tablet we can find now is Panasonic’s Toughpad, despite the 20″ screen which is bigger than usual tablets.
Related Articles:
Apr
Samsung had started sending out approval emails to customers who took advantage of the manufacturer’s promotion offering a free Gear VR with the purchase of a Samsung Galaxy S7 or S7 edge. From the feedback, there are indeed many people getting a free VR when purchased the S7 or S7 Edge. 
For those who get their first Gear VR, they may don’t know how to watch 3D movies on Gear VR via Galaxy S7/S7 Edge. So here, we gathered around all the tips and tricks about viewing 3D movies with Gear VR via Galaxy S7/S7 Edge. We hope it will be helpful.
Gear VR Supported Media Formats
.mp4 .m4v .3gp .3g2 .ts .webm .mkv .wmv .asf .avi .flv. In our opinion, .mkv is best, while audio is aac. Only audio which Android standardly supports work and that is AAC and MP3. AC3 and DTS were removed because of high licensing costs.
Make sure your movies are in 720p. John Carmack said the best format for movies is 720p, and when John Carmack says something, you better listen.
If you find your movie to be not in the right format, you can download video converter program to convert your moviefile for Gear VR playback via S7/S7 Edge. I have personally used Pavtube Video Converter Ultimate, and am still amazed at how well it performs for a freemium program.
In Addition: Apart from Galaxy S7, Samsung Gear VR also works on the following Samsung Galaxy smartphones: Galaxy Note 5, Galaxy S6/S6 Edge/S6 Edge+.
When you make sure your 3D video is supported by Gear VR, you can transfer the 3D videos to Galaxy S7 or Galaxy S7 Edge to view on Gear VR. There are some steps below to teach you how to enjoy 3D movies on Gear VR via S7/S7 Edge successfully.
There are two ways to watch your own video content in the “My Videos” section of Oculus Cinema with Gear VR via Galaxy S7/S7 Edge. First, any movies you record using your Galaxy Galaxy S7/S7 Edge′s camera will automatically appear in the “My Videos” section. The other way is to copy Gear VR compatible video files directly to your Galaxy S7/S7 Edge phone or SD card in any of the following directories:
On your phone’s internal storage (Galaxy S7/S7 Edge):
/DCIM/
/Movies/
/Oculus/Movies/
On your phone’s removable SD card (Card):
/DCIM/
/Movies/
/Oculus/Movies/
On a PC, your S7/S7 Edge’s storage can be accessed from Windows Explorer by simply plugging in the USB data/charging cable – no software is required. On a Mac, files can be transferred to your phone using Android File Transfer (https://www.android.com/filetransfer/), which is a free utility provided by Google.
When downloading 3D movies, you’ll notice that they come in either Side-by-Side (SBS) format, which comes in Full SBS and Half SBS, or Over/Under (or Top/Bottom) format. For the non-techie people, they refer to the resolution of the movies and the way the two frames are separated (vertically for the former and horizontally for the latter).
A Side-by-Side format comes in 1920 x 1080. Full SBS nets you the full resolution in both frames, while Half SBS gives you 960 x 1080 for each frame. On the other hand, the Over/Under format comes in 1280 x 720, with each frame coming in at 1280 x 360.
The Gear VR automatically assumes that all files in the “3D” folder are in the SBS format. If you have a movie in Over/Under format, you must create a text file to have it correctly read. Simply copy and paste the following to Notepad and save it in the EXACT name of the movie:
{
“format”: “3DTB”
}
Yes, the quotes are included. So, Over/Under movies in your 3D movies folder should have two accompanying files: the .png file for the poster image (assuming you got one) and the aforementioned text file.
Except for that last part which borders on the technical side, watching movies on your Gear VR is a simple matter. All you really need to do is copy your movies in the correct folder and you’re good to go.
Convert 2D, 3D TB Video to 3D SBS MP4/MKV for Gear VR viewing via Galaxy S7
Just like we said above, the perfect compatible 3D for Gear VR is SBS MKV and MP4. So if you have some 3D movies download from YIFY, YouTube, forfree3d.com, 3dmoviesstreaming.com or you have some 3D Blu-ray, DVD and want to view these videos on Gear VR via Galaxy S7/S7 Edge, you can use a video transcoder to re-encode videos to 3D SBS for Gear VR.
We aforementioned that we love to use Pavtube Video Converter Ultimate to convert unsupported video to 3D SBS MP4/MKV for Gear VR. Because it can rip all Blu-ray/DVD to 3D SBS MP4/MKV for Gear VR and convert any 4K/SD/HD video, TV shows and music dramas to 3D SBS video for Gear VR viewing on S7/S7 Edge. It offers three kinds of 3D effect: SBS, TB and Anaglyph and can switch 3D effect to another. It can transfer AC3/DTS audio to AAC/MP3 audio file accepted by Gear VR software without quality loss. (Review)
Free download and install
Steps to convert videos to 3D SBS video for Gear VR
Step 1: Import source video.
Run this 3D Video Converter for Gear VR (Mac version)on your computer. For disc-based concent,insert your 3D/2D Blu-ray/DVD movie to disc drive, and click “Load from disc” button to load Blu-ray or DVD from ROM. For video file, click the “Add video” button, browse to computer hard drive and import video into this app.Batch conversion feature allows you to import multiple source videos to converted to Gear VR.
Step 2: Select 3D SBS format for Gear VR
Tap on “Format” bar and find “3D Video”, there are a lot of format options for you. “MP4 Side-by-Side 3D Video (*.mp4)” is recommended for Samsung Gear VR.Or you can choose 3D SBS MKV for Gear VR playing with Galaxy S7/S7 Edge. 
Tip: We recommend using 1280×720 HD resolution to encode your videos. Higher resolutions will not provide any better quality, meaning you’ll waste space and processing power.
We also recommend using a higher bit rate than a typical web stream at that resolution, as the pixels in your video will be magnified on the phone’s screen. The optimal bit rate is content dependent, and many videos can get by with less, but 5 Mb/s should give good quality.
While H.264 is the recommended video coding, H.265 videos can also be played.
3D movies should be encoded “full side-by-side” with a 1:1 pixel aspect ratio. Content mastered at 1920×1080 compressed side -by- side 3D should be resampled to 1920×540 resolution full side -by -side resolution.
You can click “Settings” near the “Format” to adjust the video resolution and bitrate to get more compatible format with Gear VR.
Step 3: Convert 3D Content to SBS 3D MP4 for Gear VR
Click “Convert” button, video to SBS 3D MP4 or 3D SBS MKV conversion begins. When the process finishes, open the output folder to locate the 3D SBS video for Gear VR.
Now, setup your Gear VR and put these converted SBS 3D MKV/MP4 video files in the ‘MyVideos’ folder miscroSD of VR Gear and start your theatric 3D experience at home!
Related Articles:
- Play Digital Copy in Galaxy S6 with Gear VR Innovator Edition
- Convert 3D MKV/FLV/YouTube/Blu-Ray To 3D MP4 For ANTVR Kit
- How To Copy ITunes Movies To IPhone 6 For ZEISS VR One?
- Put 3D FLV Contents on Google Cardboard Via Android/iOS Devices
- Convert 3D MKV/FLV/WMV/AVI to Galaxy S5/iPhone 6 For Watching on ZEISS VR One
Apr
Tablet is a good kind of portable device to watch movies on the go with high resolution and bigger screen than smartphone. If you also want one to play video, just get a Microsoft Surface Book. The new released Microsoft Surface Book is a top of the range and very powerful tablet computer with a 3000 x 2000 resolution display and 128GB or 256GB SSD storage with a SD card slot in addition to that. And it has two USB 3.0 ports that gives you fast speed to transfer movies to Microsoft Surface Book.
Of course, as a tablet, even Microsoft Surface Book can give you better video enjoyment experience, it still can’t allow you play DVD movies directly. The reason is simple: Microsoft Surface Book doesn’t have DVD drive. To play DVD movie on Microsoft Surface Book, you need to use a DVD Ripper to extract the main title of DVD video to Microsoft Surface Book supported digital file, like MP4.
After read many top DVD Ripper reviews, we finally determine to use Pavtube ByteCopy <review> to rip DVD and convert the format to MP4 for Microsoft Surface Book. This best DVD Ripper can easily remove the copy protection of DVD and save the content to MP4, MKV, AVI, WMV, MOV, H.265, etc video. Especially, if you have a video player on Microsoft Surface Book that can play MKV files, you can convert DVD to lossless MKV with Pavtube ByteCopy.
You can adjust the video size, codec, bitrate, frame rate and audio channel, codec, sample rate, etc to get better DVD playback on Microsoft Surface Book. If you are using Mac, please use the equivalent Pavtube ByteCopy for Mac to copy DVD to Microsoft Surface Book. It supports the newest Mac OS X El Capitan system.
Free download and install:
Other Download:
– Pavtube old official address: http://www.pavtube.cn/bytecopy/
– Cnet Download: http://download.cnet.com/Pavtube-ByteCopy/3000-7970_4-76158512.html
How to Copy and Play DVD movies on Microsoft Surface Book?
Step 1. Load DVD
Click “File” in top left corner and then follow “Load from disc” to import DVD movie. If you got DVD ISO images, DVD IFO files, and DVD folders on your computer, just follow “File” > “Load from folder” or “File” > “Load IFO/ISO.
Step 2. Choose MP4 as output format for Surface Book
Surface Book can absolutely play MP4 files, so just go to the output format list to choose “Windows” > “Microsoft Surface Windows RT/Pro H.264 Video (*.mp4).” This output video can be used on Microsoft Surface Book, Surface Book 2, Surface Pro 4, Surface Pro 5. 
If you want lossless MKV format, please navigate to “Multi-track Video” > “Lossless MKV”
Step 3. Adjust audio and video settings for Surface Book (Optional)
Check the technical specifications of Surface Book. And go to “Profile Settings” screen to adjust audio and video settings like size/resolution, frame rate, sample rate and bitrate to match your Surface Book, which will maximize your enjoyment on the fabulous tablet.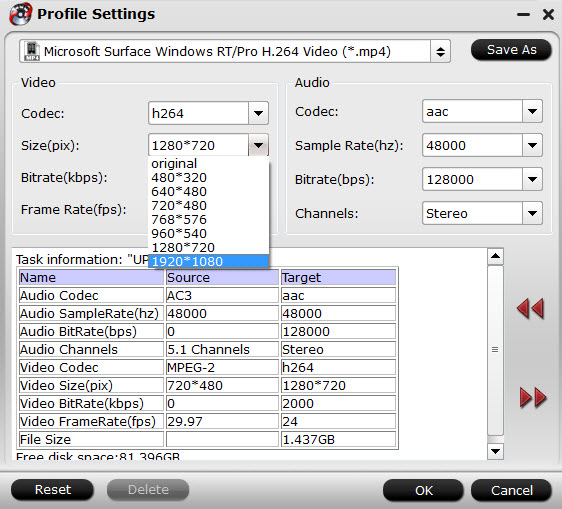
Step 4. Rip DVD to Surface Book
Set an output folder to save the converted DVD movie and then hit the “Convert” button to start conversion from DVD to Surface Book.
Step 5. Copy DVD to Surface Book.
There are multiple ways for you to put the converted DVD movie to Microsoft Surface Book.
a. OneDrive (formerly called SkyDrive, Microsoft cloud service)
b. Connect to a network computer
c. Use USB flash drive or memory card
This way is so easy, right? By removing the copy protection and shift format, you can successfully play DVD movies on Microsoft Surface Book.
Related Articles:
Apr
With high resolution, Blu-ray is ruling the Home Entertainment. You might have paid a good amount of money for your Blu-ray collections and they can get be quite bulky. Now, you may just consider converting Blu-ray to MOV then transfer to iTunes so that you can watch the Blu-ray movies via iTunes on your iPhone SE, iPad Air 3, iPad Pro 9.7/12.9, Apple TV 4. But unfortunately, Apple does not create software to allow you to copy Blu-ray into iTunes directly.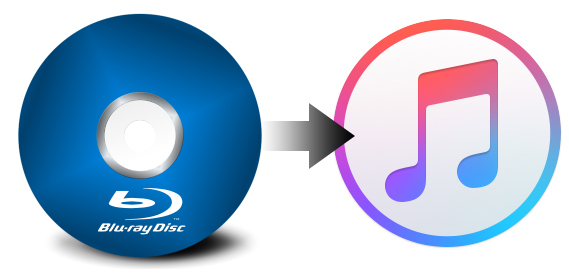
MOV is a file extension developed by Apple, it normally represents QuickTime multimedia file, often used in websites and in a lot of digital cameras, compatible with both Mac and Windows OS.To rip Blu-ray to MOV for iTunes playback on PC/Mac, you need a third-party software – Blu-ray Ripper to help you remove encryption of Blu-ray and shift format to MOV for iTunes. Here the guide just show you the specified tutorial on convert Blu-ray to MOV for iTunes syncing to any iOS devices on PC/Mac.
Tools Needed
To follow this guide, you will need the following tools:
- Blu-ray Ripper
- A Windows computer or a Mac
- Blu-ray Discs
As for Blu-ray Ripper, if you don’t any idea, I suggest you Pavtube ByteCopy for Mac and Pavtube ByteCopy for Windows <review>. This is a top-ranked Blu-ray to iTunes converter. You can see it in many top Blu-ray Ripper reviews online and recommendations for it on many forums.
Key Features of Pavtube ByteCopy for Windows/Mac
- 1:1 backup Blu-ray/DVD with original video structure on PC/Mac.
- Copy Blu-ray/DVD keeping main title on PC/Mac
- Rip DVD/Blu-ray to MOV, M4V, MP4 for iTunes with excellent video quality
- Copy Blu-ray/DVD to lossless MKV with multiple subtitle/audio streaming and all chapter markers and multitrack MP4/MOV on /PC/Mac.
- Make users choose desired subtitle, forced subtitle, keep multiple subtitles, extract srt subtitle from DVD/Bluray moveis and to add external subtitle to DVD/Blu-ray movies
- Enables users to adjust video codec, bitrate, frame rate, size, audio channel, codec, bitrate and display aspect ratio
- Mac version is compatible with Mac OS X 10.11 El Capitan, Mac OS X 10.10 Yosemite, 10.9 Mavericks, 10.8 Mountain Lion, 10.7 Lion, 10.6 Snow Leopard, 10.5 Leopard
- Windows version supports Windows 2003/XP/Vista/Windows 7/Windows 8/Windows 8.1/Windows 10
Free download and install:
Other Download:
– Pavtube old official address: http://www.pavtube.cn/bytecopy/
– Cnet Download: http://download.cnet.com/Pavtube-ByteCopy/3000-7970_4-76158512.html
How to Convert Blu-ray to MOV for iTunes on PC/Mac
Note: The snapshots are from Windows version but the Blu-ray to MOV for iTunes convresion steps are suitable for both Windows version and Mac version.
You May Also Interested: Top 5 DVD to iTunes Converter for Mac and Windows
Step 1. Load Blu-ray movie
Insert your purchased Blu-ray disc into the disc drive, and run Mac Blu-ray ripper on your computer. Click “File” > “Load from disc” to realize Blu-ray movie loading work. Batch conversion supported allows you import more than one Blu-ray movies to convert to MOV.
Step 2: Choose MOV format
Navigate to “Format’ > “Common Video” > “MOV – QuickTime(*.mov)”. To play Blu-ray via iTunes, you also can choose multitrack MOV and multitrack MP4 from multi-track video profile.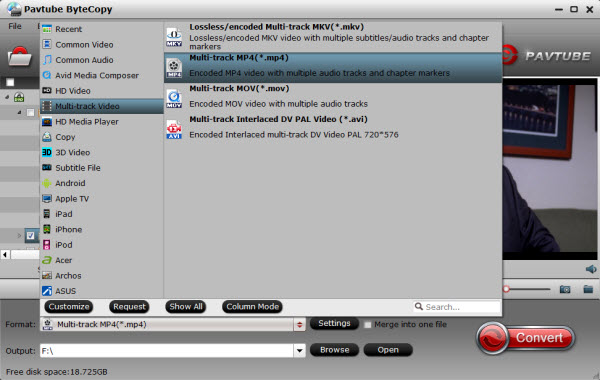
Tip: There are an array of tweaking options can be manually handled by clicking the Settings icon next to Format. You can make changes at this point such as video codec, aspect ratio or video size.
Step 3: Start Blu-ray to MOV conversion
Now we are ready for the ripping. Click the “Convert” button at the bottom-right of the screen to begin the Blu-ray to MOV for iTunes ripping process. A progress bar will display how far along you are in the process, and when the conversion is complete you will see the succeeded status displayed.
Typical ripping time may be around a few minutes, but will vary depending on your hardware of computer, output parameters you set, and size of the disc. After the Blu-ray to MOV for iTunes conversion, you can sync the ripped Blu-ray movies to iTunes on PC/Mac.
Finally, you can watch Blu-ray movies via iTunes on Apple TV 4, Apple TV 3, iPhone SE, iPhone 7, iPhone 6S (Plus), iPad Pro 9.7/12.9, iPad Air 3, iPad Mini 4, etc,
Related Software:
Pavtube Video Converter Ultimate for Windows/Mac can convert MKV to MOV for iTunes, convert AVI to iTunes, compress 4K to iTunes, covert FLV to iTunes, convert H.265 to iTunes, convert FLAC to iTunes, convert MWV to iTunes, etc. And if you get Blu-ray to iTunes and any Video to iTunes converter from Pavtube together, you can get a discount:
ByteCopy($42) + Video Converter Ultimate($65) = Only $79.9, Save $27.1
Related Articles:
Apr
YouTube will be the biggest video supplying site with millions of funny videos, TV shows, 3D movies, 4K videos, etc. And YouTube might have made it harder to watch. it requires an Internet connection so we kind of depend on the internet. But it’s still possible to download videos from YouTube using an app on your iPad Pro 9.7 then you can play YouTube videos on iPad Pro 9.7 offline. Here’s a step-by-step guide which will work for you.
There are many free YouTube video downloader for iPad Pro 9.7, such as video downloader, YouTube converter, Documents 5, etc. Here we take video downloader as the instance to show you the easy way to download YouTube video on iPad Pro 9.7 to view without the internet connection.
How to Free Download YouTube video on iPad Pro 9.7?
Step 1: Go to App Store on iPad Pro 9.7. Then search for and download a “video downloader” application compatible for use with YouTube videos. At this time, experts in the tech industry recommend using Video Downloader Lite Super by George Young, since the app is free of charge and lacks ads and pop-up messages.
Step 2: Launch the video downloader app on your iPad Pro 9.7 after installation is complete.The app’s built-in browser will open and default to YouTube’s website at https://www.youtube.com/.
Note: Type YouTube’s URL into the address bar if the site does not launch automatically upon opening the app.
Step 3: Navigate to and tap on the YouTube video you want downloaded to your iPad Pro 9.7. Tap on the “play” button to watch the video. Either the icon of a disk, or the option to “download” the video will display at the bottom of your session, depending on your iPad’s version of iOS.
Step 4: Select the option to “save” or “download” the video to your iPad Pro 9.7. Tap and hold on the video pane to access a menu with these options if no options display on-screen.
Step 5: Type a name for the video, then tap on “Save.” The YouTube video will save to the “Files” folder in the video downloader application, which you can access at any time with or without an Internet connection on your iPad Pro 9.7.
Or you can choose to download YouTube video to PC then transfer the downloaded YouTube video to iPad Pro 9.7 via iTunes. Below are some ways to free download YouTube video to the computer.
How to Download YouTube video to the computer?
There are many ways to download YouTube videos, either using a browser plug-in or simply by pasting the URL of the video into another website. One easy way is to type dl or dlv infront of YouTube in the URL (eg. www.dlyoutube.com…), then press Enter. This takes you straight to a downloader site where you decide what quality video you want and then press Download. Easy. Or you choose use KeepVid to download YouTube video.
1. Head to www.youtube.com and find a video you want to download. Hit Ctrl-L to highlight the URL address. PressCtrl-C to Copy the URL from your browsers address bar.
2. Head to keepvid.com and click in the box to the left of the Download button. Press Ctrl-V to paste your copied URL and click Download. You’ll see the available versions of the video appear below.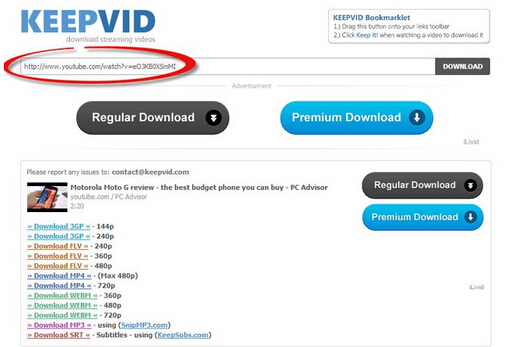
3. From the list, choose the format you want. For iPad Pro 9.7 playing, MP4 is recommended for the best compatibilitythe and then go to the highest quality – in this case it’s 720p. Simply click the link to start the download – ignore the flashing adverts around the page which are not download links at all.
4. Look in your ‘downloads’ folder, or click the downloaded video in your browser’s status bar (we’re using Chrome here) to watch the video. To playing YouTube video on iPad Pro 9.7, you only need to sync the download MP4 video to iPad Pro 9.7 via iTunes. 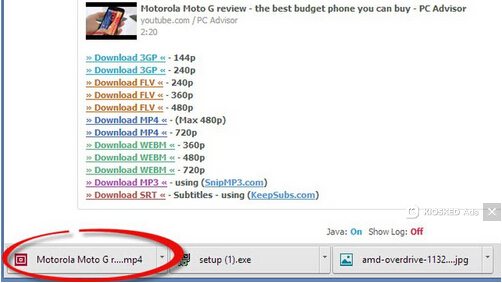
Tips: Convert Unsupported YouTube video to iPad Pro 9.7 Supported Video
As we all know, Apple products including iPad Pro 9.7 only play MP4, MOV, M4V. But YouTube downloaded video maybe MP4, FLV, 3GP, WebM. Except MP4, the other three video formats aren’t supported by iPad Pro 9.7. If you have some unsupported YouTube video and don’t have the internet or chance to download them again with iPao Pro 9.7 playable formats, or the video you want to download has no the MP4 version for iPad Pro 9.7, you can use a video to iPad Pro converter to re-encode the video to iPad Pro 9.7.
Pavtube Video Converter Ultimate <Mac version> is a professional video transcoder that can re-encode any YouTube video to iPad Pro 9.7 supported MP4, MOV, M4V with high resolution. It supports batch conversion so you can batch convert YouTube video to MP4 1080p/720p for iPad Pro 9.7/12.9, iPad Air 3, iPad Mini 4, iPhone SE, iPhone 6S, etc. Easy to use. 100% clean. No adware.
Free download and install
Step 1: Drag and drop YouTube videos to the app simply or click “File” on the top of the interface.
Step 2: Choose MP4, MOV, M4V format video from “Common Video” or “HD Video”. Or you can select the optimized preset for iPad Pro 9.7 from “iPad” profile. You can choose iPad Mini HD video as the target format which is supported also by iPad Pro 9.7.
Tip: You can click “Settings” to adjust the video size to iPad Pro supported resolution to get better YouTube video playback.
Step 3: Click “Convert” on the UI to start YouTube video to iPad Pro 9.7 conversion.
Related Articles:
Mar
Are you looking for a professional 4K Video Converter? Here gathered around top 5 4K Video Converters for Windows for you. Hope you can find the ideal one for you.
4K technology seems to be on the cusp of taking over the HD digital media world, from TV screens to computer monitors to cameras and projectors, 4K screen resolution and all of its accompanying features are starting to circulate widely. But there are still many devices that can’t handle 4K videos. So in this case, if you want to enjoy 4096×2160 or 3840× 2160 on normal 1080p, even 720p resolution screen, you need to compress 4K to lower resolution to adapt to your devices.
Here, we gathered top 10 4K Video Converter for Windows that can help you convert 4K to 1080p, convert 4K to 720p, etc. If you want a 4K Video Converter for Mac OS X El Capitan, Yosemite, etc, please read Top 5 4K video Converter for Mac 2016.
Top 5 4k video converters for windows
1. Pavtube Video Converter Ultimate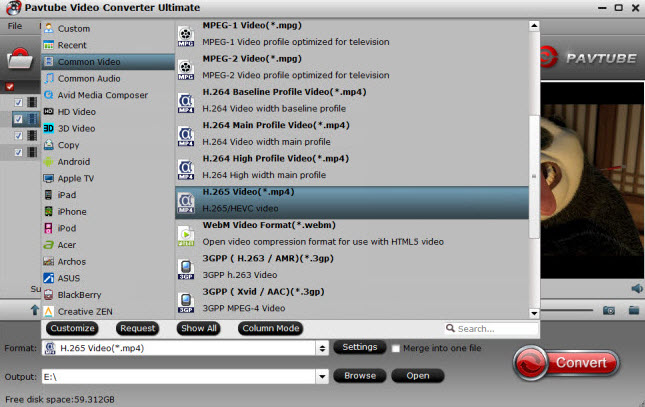
Pavtube Video Converter Ultimate is a professional 4K video converter on Windows 10/8.1/8, etc. It can transcode 4K video to another format, edit 4K video, compress 4K video to 1080p/720p/480p, even upscale your SD/HD video to 4096×2160 or 3840× 2160 resolution for your 4K TV, 4K tablet, 4K projector, etc
Key features:
- Convert any video in 3840 x 2160 or 4096 x 2160 4k resolution to H.265/H.264 4K MP4, MKV, AVI, etc.
- Transcode your iPhone 6S, Galaxy S7, Sony Xperia Z5/XA 4K shottings to SD/HD video for uploading to YouTube/FaceBook/Vimeo.
- Re-encode DJI Phantom 4, GoPro HERO 4, Canon XC10, etc 4K AVCHD, XAVC, MTS, MXF, MP4, MOV, etc.
- Convert any 4K video to edit in Windows Movie Maker, Wax, FCP, iMovie, Sony Vegas, Blender, Lightworks, etc.
- Solve 4K video playback issues on Himedia Q10 Pro, Nvidia Shield Android TV Box, Apple TV 4, Boxee, etc.
- Edit simply 4k video such as crop, trim, merge, add watermark, rotate, effects and many more.
- Transcode 4K video to play on iPhone 7, iPhone 6S, iPad Air 3, iPad Pro, PS4, Xbox One, Xbox 360, LG G5, Galaxy TabPro S, Galaxy Tab S2, Blackberry, Motorola, Nokia, etc.
- Supports NVIDIA CUDA and ATI Stream acceleration technologies.
- Backup 4K Blu-ray to 3D SBS MP4/MKV for Gear VR, Oculus Rift DK 2, ZEISS VR One, Freely VR, PLAY VR, etc.
Get a 50% off discount for Pavtube Video Converter Ultimate by joining Pavtube Black Friday & Cyber Monday Crazy Promotion. More surprises are waiting for you.
2. Acrok Video Converter Ultimate
Acrok Video Converter Ultimate can convert video in 4K to another popular video format/codec in 4K or 1080p.
Key features:
- Convert 4k MKV, AVI, FLV, etc videos to AVI, MKV, WMV, MOV and other formats.
- Convert 2D/3D videos into 3D MP4 in 1080p/720p
- Allows user to add subtitles to source 4K video.
3. Wondershare Video Converter Ultimate
Wondershare Video Converter Ultimate is a multiple functions tool that can convert 4K video and record video from 4K streaming.
Key Features:
- Convert any Videos to another formats.
- Download videos directly from YouTube using the in-built downloader with this application.
- Convert the videos for portable devices like Android devices, iPad, iPhone, TVs, DVD, etc.
- Converts files 30x faster than other converters.
- Record any 4k videos from streaming online sites.
4. EaseFab Video Converter
EaseFab Video Converter is one of the easiest to use video converter for conversion of 4k videos. It is a professional video converter for all Windows users which has an amazing and wide collection of features.
Key Features:
- It is a cheap 4K video converter in the ma
- Covert 4k videos to 1080p or 720p HD or even SD video format.
- Convert your video for various programs like iMovie, Avid Media Composer, Final Cut pro, etc. and also for ProRes, DVCPRO, MPEG-3 and others.
- Provides a very fast conversion speed with high output quality.
- allows you to trim, crop and watermark the video files.
5. 4K TV Converter
If you have a 4K TV, that will be wonderful to enjoy 4k content on them. But sometimes, not all 4K video can be played on 4K TVs. In this case, you can use 4K TV converter to convert 4K video to TV.
Key Features:
- Allows users to watch movies of their choice on a 4K television.
- Coverts popular video formats in 4k resolution.
- Supports Windows 10/8/8.1/7, etc
Where to get 4K Video when you have the best 4K Video Converter?
Currently, people can download 4K video from YouTube 4K channel or record 4K video with 4K recorder.
Which camcorders can produce “4K videos”?
Sony: FS700, CineAlta F5, CineAlta F55, CineAlta F65
Canon: EOS C500, EOS-1D C DSLR
Astrondesign AH-4413, Point Grey Flea3 8.8 MP, GoPro HERO3 Black, Nvidia GTX Titan, AMD Radeon HD 7970
How to Download 4K video from YouTube for Android devices?
1.Download and Install the 4K Video Downloader application.
2. Go to YouTube and find the content, you can use 2160p as additional search term. Copy the video link from the browser.
3. Press “Paste Link” button in 4K Video Downloader application.
4.Select “MP4″ as a format and “2160p” as a quality in the download window and press “Download” button.
5. Then it remains only to wait until the downloading is completed and play downloaded video.
Related Articles:
- Convert 4K Blu-ray for 4K TV Playback via Roku 4 on Mac
- Make Apple TV 4 Stream 4K House of Cards
- 4K Players + Play 4K Ultra HD Video on PC with Two Methods
- How to Play 4K Video on Amazon Fire TV (2015) via HDMI?
- Convert 4K Video to Sony Xperia Z5 Premium Supported Format
- How to Upload 4K Video to YouTube With Suitable Format and Parameters?
- 7 Ways to Watch 4K Video in Your Home & How to Play 4K
- Enable UHD TV to Play 4K Blu-ray/MKV/MP4/AVI
- How to Watch Any 4K Video on Sony Bravia 4K TV?
- Play 4K on Kodi – Install 4K Media Add-On for Kodi
- How to Rip 4K Blu-ray to Sony FMPX10 4K Ultra HD Media Player?
- How to Watch 4K Video in VLC?
Mar
Apart from going to gymnasium, exercising following workout DVDs is another good idea to do some exercise. you can insert the exercise DVD to DVD Player then watch the exercise video on wide screen TV. Or you also can rip and copy these exercise and art DVD to your new iPad Air 3 then watch and follow the video outside door, exercising while breathing the fresh air.
The Best Exercise DVDs for Any Fitness Goal
The Goal: Lose the Muffin Top– 10 Minute Solution: Best Belly Blasters
The Goal: Get Pippa Middleton’s Buns– The Butt Bible
The Goal: Get Drool-Worthy Abs– Crunch-Free Xtreme Abs
The Goal: Sculpt Your Body with Pilates– Pilates Super Sculpt
The Goal: Get Through a Workout While Pregnant– Morning Sickness Blues to Bliss
The Goal: Get Your Pre-Baby Body Back with Baby in Tow– Happy Baby, Fit Mama
The Goal: Serious, Targeted Sculpting– Body Target 60
The Goal: Lose Those Last Ten Pounds– 10 Pound Slimdown
The Goal: Sweat Like the Stars Do — Bootcamp Style– A.S.A.P. Hollywood Bootcamp 4×4
The Goal: A Gym-Style Workout at Home– STS Total Body
Best DVD Ripper to Rip and Copy Exercise and Art DVD
Pavtube DVDAid is professional DVD Ripper that can remove DVD copy protection and change DVD to iPad Air 3 and other portable devices supported video and audio format. It can convert Movies DVD, Music DVD, TV Series DVD, Drama DVD, Workout DVD to iPad Air 3, iPad Air 2, iPad Pro 2, iPad Pro, iPad Mini 4, Apple TV 4, Apple TV 3 without any quality loss.
Along with multiple practical bonus features like video editor, DVDAid is capable of improving your DVD movie experience without location or time limitations. It could backup DVD and convert DVD to various video and audio formats including m3u8, H.265/H.264 MP4, MKV, MOV, AVI, WMV, MP3, AAC to let you enjoy DVD movies on any mobile device like iPhone 6S, iPhone 6S Plus, Galaxy S7, Kindle Fire HDX, PS4, Surface Pro 4, Xperia X Series, LG G5, etc.
| Supported DVD format | DVD disc, DVD folder, ISO image file |
| Output video/audio | MP4, H.264, MOV, M4V, MP3, AAC, AC3 |
| Preloaded profiles | Apple TV 3, iPad Air, iPad 4, New iPad 3, iPad 2, iPad, iPhone 5S, iPhone 5C, iPhone5/4S/4/3, iPod Touch 5, etc. |
Free download and install:
Other Download:
– Pavtube old official address: http://www.pavtube.cn/dvd_ripper/
– Cnet Download: http://download.cnet.com/Pavtube-DVDAid/3000-7970_4-76158510.html
How to Copy Exercise and Art DVD to iPad Air 3?
Step 1: Add exercise and art DVD
Install and launch DVD to iPad Air 3 converter on PC <Mac version>. Click “File” on the top of the interface to load exercise DVD video to the software.
Learn Also: Best Blu-ray to iPad Air/Mini/Pro Converter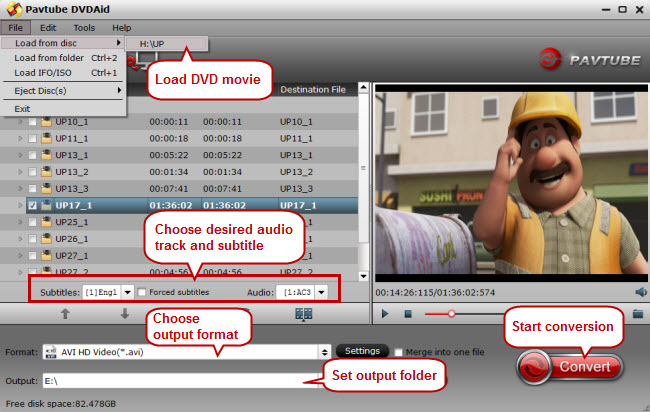
Step 2: Choose format for iPad Air 3
Click “Format” drop-down list and choose “iPad > iPad HD Video(*.mp4)” as the compatible MP4 preset with best video quality. Or you can choose other presets for iPad Air 3 if you don’t need full size videos.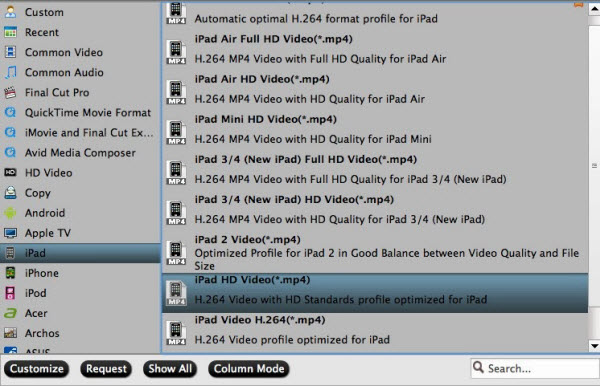
Note: With Pavtube DVDAid, you stalso can rip your exercise and art DVD to Windows Media Center, PS3/PS4, Samsung TV, MX player for Android phone to watching without using DVD discs and DVD Player again.
Step 3: Reset A/V parameters (Optional)
With the right settings you can retain the quality of the original exercise DVD while also saving space for iPad Air 3. Simply click Settings bar and you can tweak the settings to your satisfaction and even save it as preset.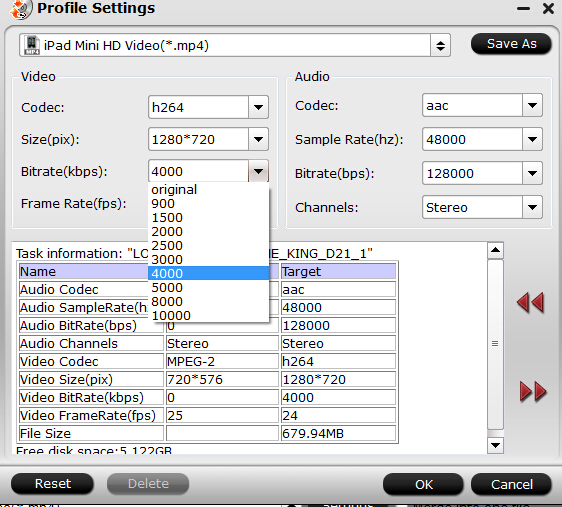
Step 4: Start exercise DVD to iPad Air 3 conversion
go back to the UI, tit the big red “Convert” to start converting workout DVD with best video settings to iPad Air 3.
After the conversion, click “Open output folder” in the conversion window, or “Open” in main interface to quick locate the converted video and copy to iPad Air 3 via iTunes.
Tip: If you have some MKV, FLV, VOB, etc digital version exercise video and want to transfer them to iPad Air 3 for playing, you can use Pavtube Video Converter Ultimate to help you convert MOV to iPad, FLV to iPad, MKV to iPad, VOB to iPad, 4K to iPad, WMV to iPad, Tivo to iPad etc.
Related Articles: